

This guide shows you how to use the Workers Builds REST API to programmatically trigger builds, manage triggers, and monitor build status. The examples use curl commands that you can run directly in your terminal or adapt to your preferred programming language. Some examples pipe output through jq ↗ to filter JSON responses — install it if you do not have it already.
To use the Builds API, you need an API token to authenticate your requests. The Builds API requires a user-scoped API token. Account-scoped tokens are not supported and will return "Invalid token" errors.
Create your token at dash.cloudflare.com/profile/api-tokens ↗ with the following permissions:
| Permission | Access level | Why you need it |
|---|---|---|
| Workers Builds Configuration | Edit | Trigger builds, manage triggers, configure environment variables |
| Workers Scripts | Read | Only needed for one endpoint to retrieve your Worker's tag (documented as external_script_id) |
The Builds API identifies Workers by their tag, an immutable UUID assigned by Cloudflare. In API responses and parameters, this value appears as external_script_id.
| Identifier | Example | Where it comes from |
|---|---|---|
Worker name (id) |
my-worker |
The name you gave your Worker |
Worker tag (external_script_id) |
1a2b3c4d5e6f7a8b9c0d1e2f3a4b5c6d |
Immutable UUID assigned by Cloudflare |
Every Builds API endpoint that references a Worker requires the tag, not the name.
A trigger is a configuration that defines how your Worker gets built and deployed. It specifies the build command, deploy command, environment variables, and which branches should trigger builds. Each Worker has up to two triggers: one for production (runs on your production branch) and one for preview (runs on all other branches). To set up triggers, refer to Set up Workers Builds from scratch.
Trigger fields:
| Field | Type | Description |
|---|---|---|
trigger_name |
string | Display name for the trigger |
build_token_uuid |
string | UUID of the build token used to deploy your Worker. Find this in your Worker's Settings > Builds > API token section, or via the GET /builds/tokens endpoint. |
build_command |
string | Command to build your project (for example, npm run build) |
deploy_command |
string | Command to deploy your Worker (for example, npx wrangler deploy) |
root_directory |
string | Path to your project root |
branch_includes |
array | Branch patterns that trigger builds (for example, ["main"] or ["*"]) |
branch_excludes |
array | Branch patterns to exclude |
path_includes |
array | File path patterns that trigger builds |
path_excludes |
array | File path patterns to ignore |
build_caching_enabled |
boolean | Enable or disable build caching |
environment_variables |
object | Build-time variables specific to this trigger |
Most Builds API operations follow this pattern: first get your Worker's tag, then get the trigger UUID, then perform build operations.

| Step | Action | Endpoint |
|---|---|---|
| 1 | Get Worker tag | GET /workers/scripts |
| 2 | Get trigger UUID | GET /builds/workers/:worker_tag/triggers |
| 3a | Trigger a build | POST /builds/triggers/:trigger_uuid/builds |
| 3b | List builds | GET /builds/workers/:worker_tag/builds |
| 3c | Get build logs | GET /builds/builds/:build_uuid/logs |
| 3d | Cancel a build | PUT /builds/builds/:build_uuid/cancel |
Call the Workers Scripts API to list all your Workers and find the tag for the Worker you want to work with:
curl -s "https://api.cloudflare.com/client/v4/accounts/{account_id}/workers/scripts" \
  --header "Authorization: Bearer <API_TOKEN>" \
  | jq '.result[] | {name: .id, tag: .tag}'
Example output:
{
  "name": "my-worker",
  "tag": "1a2b3c4d5e6f7a8b9c0d1e2f3a4b5c6d"
}
{
  "name": "another-worker",
  "tag": "8a1b2c3d4e5f67890abcdef123456789"
}
Save the tag value for your Worker. You will use it in all subsequent API calls.
Use the GET /builds/workers/{tag}/triggers endpoint to list triggers for your Worker:
curl -s "https://api.cloudflare.com/client/v4/accounts/{account_id}/builds/workers/{worker_tag}/triggers" \
  --header "Authorization: Bearer <API_TOKEN>" \
  | jq '.result[] | {trigger_uuid, trigger_name, branch_includes, branch_excludes}'
Example output:
{
  "trigger_uuid": "f47ac10b-58cc-4372-a567-0e02b2c3d479",
  "trigger_name": "Deploy production",
  "branch_includes": ["main"],
  "branch_excludes": []
}
{
  "trigger_uuid": "a1b2c3d4-e5f6-7890-abcd-ef1234567890",
  "trigger_name": "Deploy non-production branches",
  "branch_includes": ["*"],
  "branch_excludes": ["main"]
}
Save the trigger_uuid for the trigger you want to work with. Remember, you will have at most two triggers: one for your production branch (for example, main) that deploys to your live Worker, and optionally one for all other branches that creates preview deployments.
Now that you have the Worker tag and trigger UUID, you can trigger builds, list build history, and get logs.
Use the POST /builds/triggers/{uuid}/builds endpoint with the trigger_uuid from Step 2.
curl -s "https://api.cloudflare.com/client/v4/accounts/{account_id}/builds/triggers/{trigger_uuid}/builds" \
  --header "Authorization: Bearer <API_TOKEN>" \
  --header "Content-Type: application/json" \
  --request POST \
  --data '{"branch": "main"}'
You must specify branch, commit_hash, or both:
| Field | Description |
|---|---|
branch |
Git branch name to build (for example, main) |
commit_hash |
Specific commit SHA to build. If provided without branch, builds the commit on its current branch. |
The response includes the build_uuid which you can use to monitor the build.
Use the GET /builds/workers/{tag}/builds endpoint with the worker_tag from Step 1.
curl -s "https://api.cloudflare.com/client/v4/accounts/{account_id}/builds/workers/{worker_tag}/builds" \
  --header "Authorization: Bearer <API_TOKEN>" \
  | jq '.result[] | {build_uuid, status, branch, created_at}'
The response includes build_uuid for each build, which you need for getting logs or canceling builds.
Use the GET /builds/builds/{uuid}/logs endpoint. Get the build_uuid from:
- List builds
- The response when triggering a build
- Get latest builds by script IDs
- The last segment of the URL on your build details page in the dashboard
curl -s "https://api.cloudflare.com/client/v4/accounts/{account_id}/builds/builds/{build_uuid}/logs" \
--header "Authorization: Bearer <API_TOKEN>"Use the PUT /builds/builds/{uuid}/cancel endpoint. Get the build_uuid from:
- List builds
- The response when triggering a build
- Get latest builds by script IDs
- The last segment of the URL on your build details page in the dashboard
curl -s "https://api.cloudflare.com/client/v4/accounts/{account_id}/builds/builds/{build_uuid}/cancel" \
  --header "Authorization: Bearer <API_TOKEN>" \
--request PUTUse the PATCH /builds/triggers/{uuid} endpoint with the trigger_uuid from Step 2. You can update any of the trigger fields described in What is a trigger?.
curl -s "https://api.cloudflare.com/client/v4/accounts/{account_id}/builds/triggers/{trigger_uuid}" \
  --header "Authorization: Bearer <API_TOKEN>" \
  --header "Content-Type: application/json" \
  --request PATCH \
  --data '{
    "build_command": "npm run build:prod",
    "deploy_command": "npx wrangler deploy"
}'Environment variables are set per trigger, meaning you can have different values for production and preview builds. For example, you might set NODE_ENV=production on your production trigger and NODE_ENV=development on your preview trigger. Refer to the environment variables API reference for full endpoint details.
Use the trigger_uuid from Step 2.
curl -s "https://api.cloudflare.com/client/v4/accounts/{account_id}/builds/triggers/{trigger_uuid}/environment_variables" \
--header "Authorization: Bearer <API_TOKEN>"You can set different variables for each trigger. For example, to set production environment variables:
curl -s "https://api.cloudflare.com/client/v4/accounts/{account_id}/builds/triggers/{production_trigger_uuid}/environment_variables" \
  --header "Authorization: Bearer <API_TOKEN>" \
  --header "Content-Type: application/json" \
  --request PATCH \
  --data '{
    "NODE_ENV": {"value": "production", "is_secret": false},
    "API_KEY": {"value": "prod-secret-key", "is_secret": true}
  }'
And different values for preview builds:
curl -s "https://api.cloudflare.com/client/v4/accounts/{account_id}/builds/triggers/{preview_trigger_uuid}/environment_variables" \
  --header "Authorization: Bearer <API_TOKEN>" \
  --header "Content-Type: application/json" \
  --request PATCH \
  --data '{
    "NODE_ENV": {"value": "development", "is_secret": false},
    "API_KEY": {"value": "dev-secret-key", "is_secret": true}
  }'
Set is_secret to false for plain values and true for sensitive values that should be masked in logs.
Use the trigger_uuid from Step 2. The variable_key is the key name you set (for example, NODE_ENV).
curl -s "https://api.cloudflare.com/client/v4/accounts/{account_id}/builds/triggers/{trigger_uuid}/environment_variables/{variable_key}" \
  --header "Authorization: Bearer <API_TOKEN>" \
--request DELETEUse the POST /builds/triggers/{uuid}/purge_build_cache endpoint with the trigger_uuid from Step 2. This clears cached dependencies and build artifacts for that trigger.
curl -s "https://api.cloudflare.com/client/v4/accounts/{account_id}/builds/triggers/{trigger_uuid}/purge_build_cache" \
  --header "Authorization: Bearer <API_TOKEN>" \
--request POSTThe following examples show common use cases for the Builds API.
This example walks through the complete process of connecting a GitHub repository to a Worker and setting up automated builds using only the API.
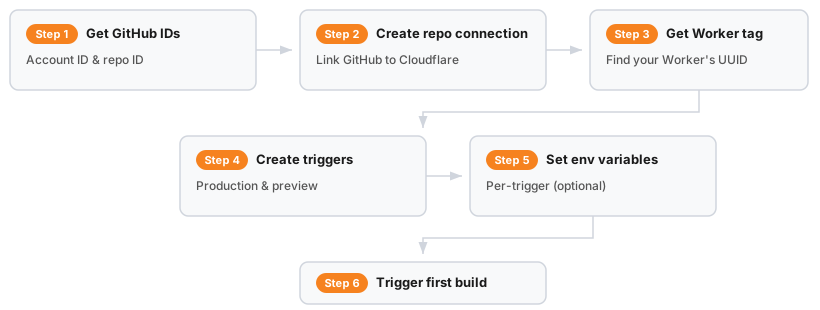
| Step | Action | Endpoint |
|---|---|---|
| 1 | Get GitHub account/repo IDs | GET api.github.com/users/... and GET api.github.com/repos/... |
| 2 | Create repo connection | PUT /builds/repos/connections |
| 3 | Get Worker tag | GET /workers/scripts |
| 4 | Get build token UUID | GET /builds/tokens |
| 5a | Create production trigger | POST /builds/triggers |
| 5b | Create preview trigger | POST /builds/triggers |
| 6 | Set environment variables | PATCH /builds/triggers/:trigger_uuid/environment_variables |
| 7 | Trigger first build | POST /builds/triggers/:trigger_uuid/builds |
Before using the API, you must first install the Cloudflare GitHub App through the dashboard:
- Go to Workers & Pages in the Cloudflare dashboard ↗.
- Select any Worker and go to Settings > Builds > Connect.
- Select GitHub and authorize the Cloudflare GitHub App for your account or organization.
This one-time setup creates the connection between your GitHub account and Cloudflare. Once complete, you can use the API for everything else.
After installing the GitHub App, you need your GitHub account ID and repository ID. You can find these from an existing trigger or from the GitHub API.
From GitHub's API:
# Get your GitHub user/org ID
curl -s "https://api.github.com/users/<GITHUB_USERNAME>" | jq '.id'

# Get a repository ID
curl -s "https://api.github.com/repos/<GITHUB_USERNAME>/<REPO_NAME>" | jq '.id'Create a connection between your GitHub repository and Cloudflare:
curl -s "https://api.cloudflare.com/client/v4/accounts/{account_id}/builds/repos/connections" \
  --header "Authorization: Bearer <API_TOKEN>" \
  --header "Content-Type: application/json" \
  --request PUT \
  --data '{
    "provider_type": "github",
    "provider_account_id": "<GITHUB_USER_ID>",
    "provider_account_name": "<GITHUB_USERNAME>",
    "repo_id": "<GITHUB_REPO_ID>",
    "repo_name": "<REPO_NAME>"
  }'
Save the repo_connection_uuid from the response.
curl -s "https://api.cloudflare.com/client/v4/accounts/{account_id}/workers/scripts" \
  --header "Authorization: Bearer <API_TOKEN>" \
| jq '.result[] | {name: .id, tag: .tag}'A build token authorizes the build system to deploy your Worker. To get your build token UUID:
- Go to your Worker in the Cloudflare dashboard ↗.
- Navigate to Settings > Builds > API token.
- Select an existing build token or create a new one.
You can also list your build tokens via the API:
curl -s "https://api.cloudflare.com/client/v4/accounts/{account_id}/builds/tokens" \
  --header "Authorization: Bearer <API_TOKEN>" \
  | jq '.result[] | {build_token_uuid, build_token_name}'
Save the build_token_uuid for the next step.
Create a trigger that deploys when you push to main:
curl -s "https://api.cloudflare.com/client/v4/accounts/{account_id}/builds/triggers" \
  --header "Authorization: Bearer <API_TOKEN>" \
  --header "Content-Type: application/json" \
  --request POST \
  --data '{
    "external_script_id": "<WORKER_TAG>",
    "repo_connection_uuid": "<REPO_CONNECTION_UUID>",
    "build_token_uuid": "<BUILD_TOKEN_UUID>",
    "trigger_name": "Deploy production",
    "build_command": "npm run build",
    "deploy_command": "npx wrangler deploy",
    "root_directory": "/",
    "branch_includes": ["main"],
    "branch_excludes": [],
    "path_includes": ["*"],
    "path_excludes": []
}'Create a second trigger for preview deployments on all other branches:
curl -s "https://api.cloudflare.com/client/v4/accounts/{account_id}/builds/triggers" \
  --header "Authorization: Bearer <API_TOKEN>" \
  --header "Content-Type: application/json" \
  --request POST \
  --data '{
    "external_script_id": "<WORKER_TAG>",
    "repo_connection_uuid": "<REPO_CONNECTION_UUID>",
    "build_token_uuid": "<BUILD_TOKEN_UUID>",
    "trigger_name": "Deploy preview branches",
    "build_command": "npm run build",
    "deploy_command": "npx wrangler versions upload",
    "root_directory": "/",
    "branch_includes": ["*"],
    "branch_excludes": ["main"],
    "path_includes": ["*"],
    "path_excludes": []
  }'
Note the different deploy_command: production uses wrangler deploy while preview uses wrangler versions upload to create preview URLs without affecting the live deployment.
Set production environment variables:
curl -s "https://api.cloudflare.com/client/v4/accounts/{account_id}/builds/triggers/{production_trigger_uuid}/environment_variables" \
  --header "Authorization: Bearer <API_TOKEN>" \
  --header "Content-Type: application/json" \
  --request PATCH \
  --data '{
    "NODE_ENV": {"value": "production", "is_secret": false}
  }'
Set preview environment variables:
curl -s "https://api.cloudflare.com/client/v4/accounts/{account_id}/builds/triggers/{preview_trigger_uuid}/environment_variables" \
  --header "Authorization: Bearer <API_TOKEN>" \
  --header "Content-Type: application/json" \
  --request PATCH \
  --data '{
    "NODE_ENV": {"value": "development", "is_secret": false}
}'curl -s "https://api.cloudflare.com/client/v4/accounts/{account_id}/builds/triggers/{production_trigger_uuid}/builds" \
--header "Authorization: Bearer <API_TOKEN>" \
--header "Content-Type: application/json" \
--request POST \
--data '{"branch": "main"}'Your Worker is now connected to GitHub. Future pushes to main will automatically trigger production deployments, and pushes to other branches will create preview deployments.
Redeploy your current active deployment to refresh build-time data. This is useful when you need to rebuild without code changes.

| Step | Action | Endpoint |
|---|---|---|
| 1 | Get active deployment | GET /workers/scripts/:worker_name/deployments |
| 2 | Find the build for that version | GET /builds/builds?version_ids=:version_id |
| 3 | Retrigger with same branch/commit | POST /builds/triggers/:trigger_uuid/builds |
Step 1: Get the active deployment's version ID
Use the GET /workers/scripts/{script_name}/deployments endpoint with the worker_name from Step 1:
curl -s "https://api.cloudflare.com/client/v4/accounts/{account_id}/workers/scripts/{worker_name}/deployments" \
  --header "Authorization: Bearer <API_TOKEN>" \
  | jq '.result.deployments[0].versions[0].version_id'
Save the version_id from the output.
Step 2: Find the build for that version
Use the GET /builds/builds endpoint with the version_id from the previous step:
curl -s "https://api.cloudflare.com/client/v4/accounts/{account_id}/builds/builds?version_ids={version_id}" \
  --header "Authorization: Bearer <API_TOKEN>" \
  | jq '.result.builds'
From the response, note the trigger.trigger_uuid, build_trigger_metadata.branch, and build_trigger_metadata.commit_hash.
Step 3: Retrigger with the same branch and commit
Use the POST /builds/triggers/{uuid}/builds endpoint with the values from the previous step:
curl -s "https://api.cloudflare.com/client/v4/accounts/{account_id}/builds/triggers/{trigger_uuid}/builds" \
  --header "Authorization: Bearer <API_TOKEN>" \
  --header "Content-Type: application/json" \
  --request POST \
  --data '{
    "branch": "{branch}",
    "commit_hash": "{commit_hash}"
  }'

Passing both `branch` and `commit_hash` pins the build to that exact commit on that branch.You are likely using the Worker name instead of the Worker tag. The Builds API requires the tag (a UUID like 1a2b3c4d5e6f7a8b9c0d1e2f3a4b5c6d), not the Worker name. Refer to Step 1 to get your Worker tag.
For other build errors, refer to Troubleshooting builds.
- Workers Builds REST API reference - Complete endpoint documentation
- Workers Scripts REST API reference - For retrieving Worker tags
- Workers Builds overview - Dashboard setup and configuration
- Build configuration - Build settings and options
- Create API token - How to create tokens with the correct permissions