

Kubernetes ↗ is a container orchestration tool that is used to deploy applications onto physical or virtual machines, scale the deployment to meet traffic demands, and push updates without downtime. The Kubernetes cluster, or environment, where the application instances are running is connected internally through a private network. You can install the cloudflared daemon inside of the Kubernetes cluster in order to connect applications inside of the cluster to Cloudflare.
This guide will cover how to expose a Kubernetes service to the public Internet using a remotely-managed Cloudflare Tunnel. For the purposes of this example, we will deploy a basic web application alongside cloudflared in Google Kubernetes Engine (GKE). The same principles apply to any other Kubernetes environment (such as minikube, kubeadm, or a cloud-based Kubernetes service) where cloudflared can connect to Cloudflare's network.
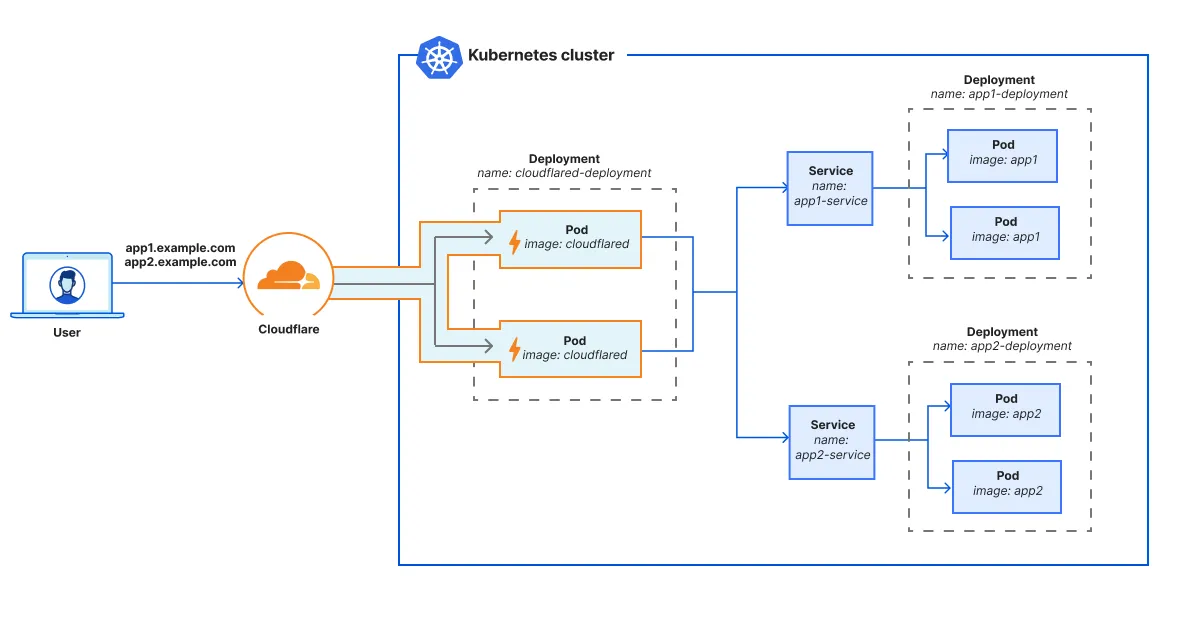
As shown in the diagram, we recommend setting up cloudflared as an adjacent deployment ↗ to the application deployments. Having a separate Kubernetes deployment for cloudflared allows you to scale cloudflared independently of the application. In the cloudflared deployment, you can spin up multiple replicas running the same Cloudflare Tunnel — there is no need to build a dedicated tunnel for each cloudflared pod. Each cloudflared replica / pod can reach all Kubernetes services in the cluster.
Once the cluster is connected to Cloudflare, you can configure Cloudflare Tunnel routes to control how cloudflared will proxy traffic to services within the cluster. For example, you may wish to publish certain Kubernetes applications to the Internet and restrict other applications to internal Cloudflare One Client users.
To complete the following procedure, you will need:
To create a new Kubernetes cluster in Google Cloud:
-
Open Google Cloud ↗ and go to Kubernetes Engine.
-
In Clusters, select Create.
-
Name the cluster. In this example, we will name it
cloudflare-tunnel. -
(Optional) Choose your desired region and other cluster specifications. For this example, we will use the default specifications.
-
Select Create.
-
To connect to the cluster:
- Select the three-dot menu.
- Select Connect.
- Select Run in Cloud Shell to open a terminal in the browser.
- Select Authorize.
- Press
Enterto run the pre-populatedgcloudcommand. - (Recommended) In the Cloud Shell menu, select Open Editor to launch the built-in IDE.
-
In the Cloud Shell terminal, run the following command to check the cluster status:
kubectl get allNAME TYPE CLUSTER-IP EXTERNAL-IP PORT(S) AGE service/kubernetes ClusterIP 34.118.224.1 <none> 443/TCP 15m
A pod represents an instance of a running process in the cluster. In this example, we will deploy the httpbin ↗ application with two pods and make the pods accessible inside the cluster at httpbin-service:80.
-
Create a folder for your Kubernetes manifest files:
mkdir tunnel-example -
Change into the directory:
cd tunnel-example -
In the
tunnel-exampledirectory, create a new file calledhttpbin.yaml. This file defines the Kubernetes deployment for the httpbin app.httpbin.yamlyaml apiVersion: apps/v1 kind: Deployment metadata: name: httpbin-deployment namespace: default spec: replicas: 2 selector: matchLabels: app: httpbin template: metadata: labels: app: httpbin spec: containers: - name: httpbin image: kennethreitz/httpbin:latest imagePullPolicy: IfNotPresent ports: - containerPort: 80 -
Create a new
httpbinsvc.yamlfile. This file defines a Kubernetes service that allows other apps in the cluster (such ascloudflared) to access the set of httpbin pods.httpbinsvc.yamlyaml apiVersion: v1 kind: Service metadata: name: httpbin-service namespace: default spec: type: LoadBalancer selector: app: httpbin ports: - port: 80 targetPort: 80 -
Use the following command to run the application inside the cluster:
kubectl create -f httpbin.yaml -f httpbinsvc.yaml -
Check the status of your deployment:
kubectl get allNAME READY STATUS RESTARTS AGE pod/httpbin-deployment-bc6689c5d-b5ftk 1/1 Running 0 79s pod/httpbin-deployment-bc6689c5d-cbd9m 1/1 Running 0 79s NAME TYPE CLUSTER-IP EXTERNAL-IP PORT(S) AGE service/httpbin-service LoadBalancer 34.118.225.147 34.75.201.60 80:31967/TCP 79s service/kubernetes ClusterIP 34.118.224.1 <none> 443/TCP 24h NAME READY UP-TO-DATE AVAILABLE AGE deployment.apps/httpbin-deployment 2/2 2 2 79s NAME DESIRED CURRENT READY AGE replicaset.apps/httpbin-deployment-bc6689c5d 2 2 2 79s
To create a Cloudflare Tunnel:
In the Cloudflare dashboard, go to Networking > Tunnels.
Select Create a tunnel.
Enter a name for your tunnel (for example,
gke-tunnel).Select Create Tunnel.
Choose your operating system and select Docker.
Applications must be packaged into a containerized image before you can run it in Kubernetes. Therefore, we will use the
cloudflaredDocker container image to deploy the tunnel in Kubernetes.Instead of running the installation command, copy just the token value rather than the whole command. The token value is of the form
eyJhIjoiNWFiNGU5Z...You will need the token for the Kubernetes manifest file.
Leave the Cloudflare Tunnel browser tab open while we focus on the Kubernetes deployment.
cloudflared uses a tunnel token to run a remotely-managed Cloudflare Tunnel. You can store the tunnel token in a Kubernetes secret ↗.
-
In GKE Cloud Shell, create a
tunnel-token.yamlfile with the following content. Make sure to replace<YOUR_TUNNEL_TOKEN>with your tunnel token (eyJhIjoiNWFiNGU5Z...).tunnel-token.yamlyaml apiVersion: v1 kind: Secret metadata: name: tunnel-token stringData: token: <YOUR_TUNNEL_TOKEN> -
Create the secret:
kubectl create -f tunnel-token.yaml -
Check the newly created secret:
kubectl get secretsNAME TYPE DATA AGE tunnel-token Opaque 1 100s
To run the Cloudflare Tunnel in Kubernetes:
-
Create a Kubernetes deployment for a remotely-managed Cloudflare Tunnel:
tunnel.yamlyaml apiVersion: apps/v1 kind: Deployment metadata: name: cloudflared-deployment namespace: default spec: replicas: 2 selector: matchLabels: pod: cloudflared template: metadata: labels: pod: cloudflared spec: securityContext: sysctls: # Allows ICMP traffic (ping, traceroute) to resources behind cloudflared. - name: net.ipv4.ping_group_range value: "65532 65532" containers: - image: cloudflare/cloudflared:latest name: cloudflared env: # Defines an environment variable for the tunnel token. - name: TUNNEL_TOKEN valueFrom: secretKeyRef: name: tunnel-token key: token command: # Configures tunnel run parameters - cloudflared - tunnel - --no-autoupdate - --loglevel - info - --metrics - 0.0.0.0:2000 - run livenessProbe: httpGet: # Cloudflared has a /ready endpoint which returns 200 if and only if # it has an active connection to Cloudflare's network. path: /ready port: 2000 failureThreshold: 1 initialDelaySeconds: 10 periodSeconds: 10 -
Deploy
cloudflaredto the cluster:kubectl create -f tunnel.yamlKubernetes will install the
cloudflaredimage on two pods and run the tunnel using the commandcloudflared tunnel --no-autoupdate --loglevel info --metrics 0.0.0.0:2000 run.cloudflaredwill consume the tunnel token from theTUNNEL_TOKENenvironment variable. -
Check the status of your cluster:
kubectl get allNAME READY STATUS RESTARTS AGE pod/cloudflared-deployment-6d5f9f9666-85l5w 1/1 Running 0 21s pod/cloudflared-deployment-6d5f9f9666-wb96x 1/1 Running 0 21s pod/httpbin-deployment-bc6689c5d-b5ftk 1/1 Running 0 3m36s pod/httpbin-deployment-bc6689c5d-cbd9m 1/1 Running 0 3m36s NAME TYPE CLUSTER-IP EXTERNAL-IP PORT(S) AGE service/httpbin-service LoadBalancer 34.118.225.147 34.75.201.60 80:31967/TCP 3m36s service/kubernetes ClusterIP 34.118.224.1 <none> 443/TCP 24h NAME READY UP-TO-DATE AVAILABLE AGE deployment.apps/cloudflared-deployment 2/2 2 2 22s deployment.apps/httpbin-deployment 2/2 2 2 3m37s NAME DESIRED CURRENT READY AGE replicaset.apps/cloudflared-deployment-6d5f9f9666 2 2 2 22s replicaset.apps/httpbin-deployment-bc6689c5d 2 2 2 3m37s
You should see two cloudflared pods and two httpbin pods with a Running status. If your cloudflared pods keep restarting, check the command syntax in tunnel.yaml and make sure that the tunnel run parameters are in the correct order.
To print logs for a cloudflared instance:
kubectl logs pod/cloudflared-deployment-6d5f9f9666-85l5w2025-06-11T22:00:47Z INF Starting tunnel tunnelID=64c359b6-e111-40ec-a3a9-199c2a656613
2025-06-11T22:00:47Z INF Version 2025.6.0 (Checksum 72f233bb55199093961bf099ad62d491db58819df34b071ab231f622deff33ce)
2025-06-11T22:00:47Z INF GOOS: linux, GOVersion: go1.24.2, GoArch: amd64
2025-06-11T22:00:47Z INF Settings: map[loglevel:debug metrics:0.0.0.0:2000 no-autoupdate:true token:*****]
2025-06-11T22:00:47Z INF Generated Connector ID: aff7c4a0-85a3-4ac9-8475-1e0aa1af8d94
2025-06-11T22:00:47Z DBG Fetched protocol: quic
2025-06-11T22:00:47Z INF Initial protocol quic
...Now that the tunnel is up and running, we can route the httpbin service through the tunnel.
In the Cloudflare dashboard, go to Networking > Tunnels and select your tunnel.
On the Routes tab, select Add route > Published application.
Enter a hostname for the application (for example,
httpbin.<your-domain>.com).Under Service, enter
http://httpbin-service.httpbin-serviceis the name of the Kubernetes service defined inhttpbinsvc.yaml.Select Add route.
To test, open a new browser tab and go to httpbin.<your-domain>.com. You should see the httpbin homepage.
You can optionally add Cloudflare Access to control who can access the service.