Wrangler now supports a --check flag for the wrangler types command. This flag validates that your generated types are up to date without writing any changes to disk.
This is useful in CI/CD pipelines where you want to ensure that developers have regenerated their types after making changes to their Wrangler configuration. If the types are out of date, the command will exit with a non-zero status code.
npx wrangler types --check
If your types are up to date, the command will succeed silently. If they are out of date, you'll see an error message indicating which files need to be regenerated.
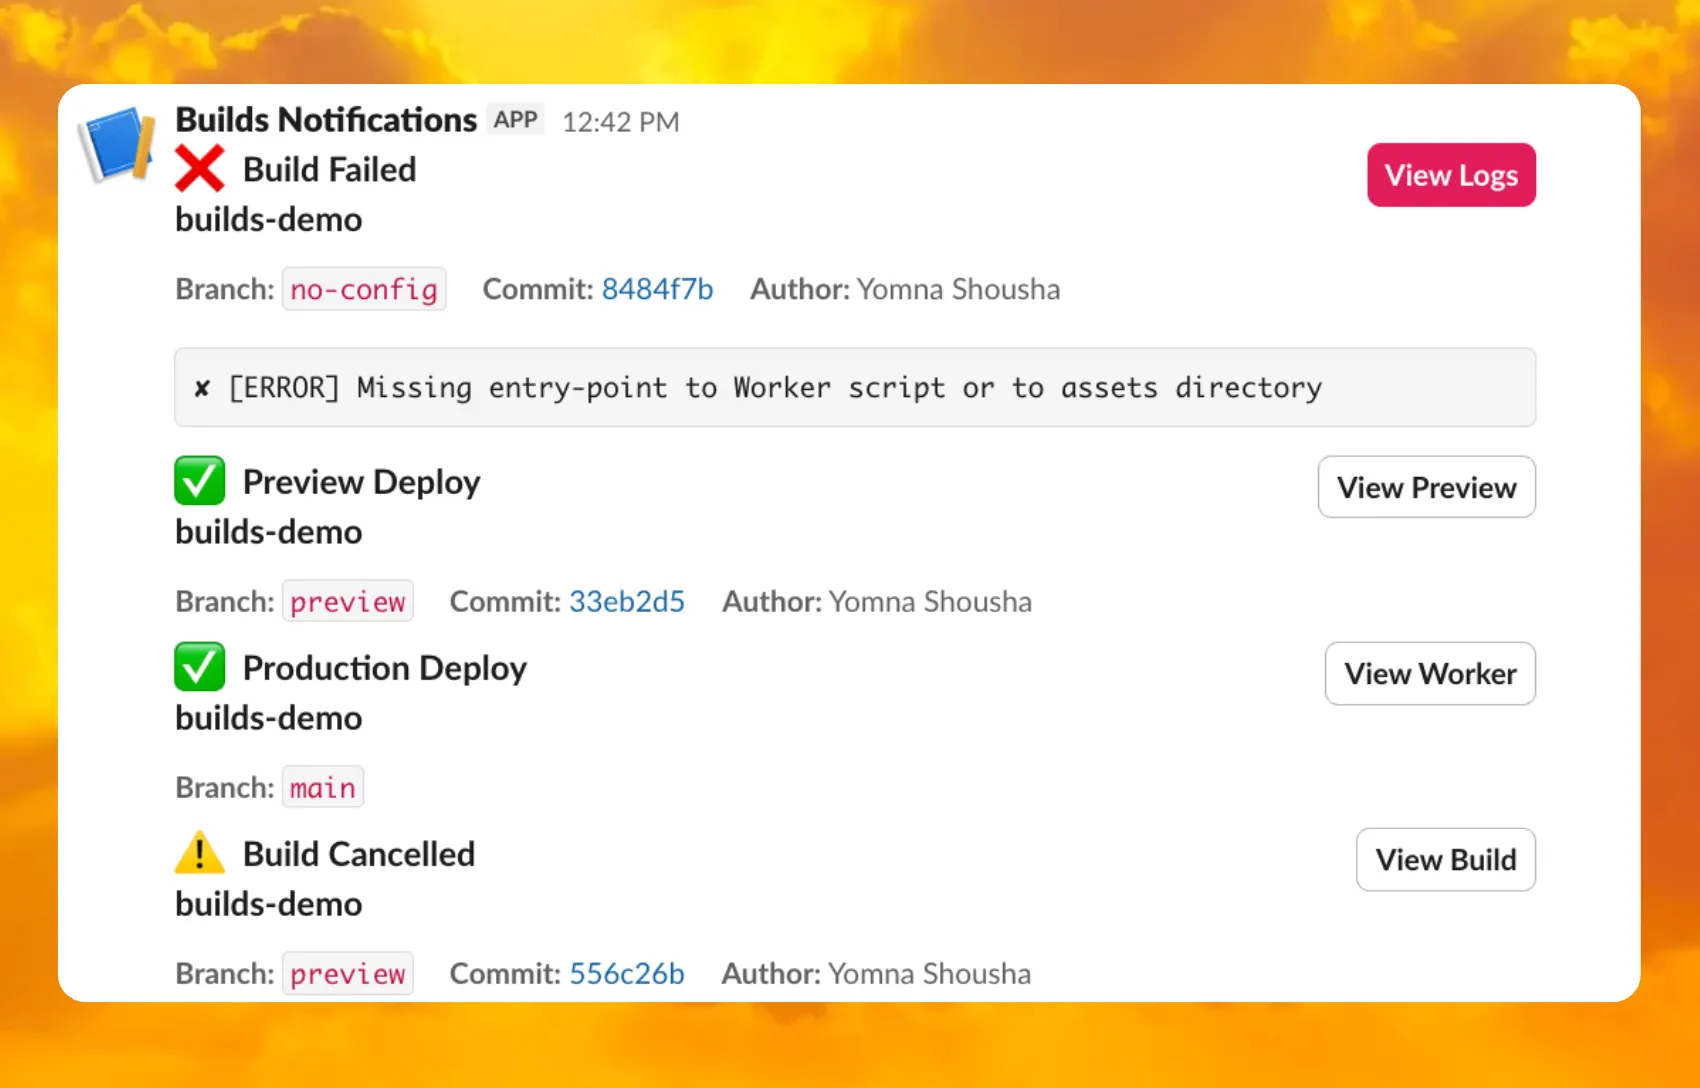
You can now receive notifications when your Workers' builds start, succeed, fail, or get cancelled using Event Subscriptions.
Workers Builds publishes events to a Queue that your Worker can read messages from, and then send notifications wherever you need — Slack, Discord, email, or any webhook endpoint.
You can deploy this Worker ↗ to your own Cloudflare account to send build notifications to Slack:
The template includes:
Build status with Preview/Live URLs for successful deployments
Wrangler now includes built-in shell tab completion support, making it faster and easier to navigate commands without memorizing every option. Press Tab as you type to autocomplete commands, subcommands, flags, and even option values like log levels.
Tab completions are supported for Bash, Zsh, Fish, and PowerShell.
Setup
Generate the completion script for your shell and add it to your configuration file:
After adding the script, restart your terminal or source your configuration file for the changes to take effect. Then you can simply press Tab to see available completions:
Tab completions are dynamically generated from Wrangler's command registry, so they stay up-to-date as new commands and options are added. This feature is powered by @bomb.sh/tab ↗.
Workers Analytics Engine allows you to ingest and store high-cardinality data at scale and query your data through a simple SQL API.
Filtering using HAVING
The HAVING clause complements the WHERE clause by enabling you to filter groups based on aggregate values. While WHERE filters rows before aggregation, HAVING filters groups after aggregation is complete.
You can use HAVING to filter groups where the average exceeds a threshold:
SELECT blob1 AS probe_name, avg(double1) AS average_tempFROM temperature_readingsGROUP BY probe_nameHAVING average_temp > 10
You can also filter groups based on aggregates such as the number of items in the group:
SELECT blob1 AS probe_name, count() AS num_readingsFROM temperature_readingsGROUP BY probe_nameHAVING num_readings > 100
Pattern matching using LIKE
The new pattern matching operators enable you to search for strings that match specific patterns using wildcard characters:
LIKE - case-sensitive pattern matching
NOT LIKE - case-sensitive pattern exclusion
ILIKE - case-insensitive pattern matching
NOT ILIKE - case-insensitive pattern exclusion
Pattern matching supports two wildcard characters: % (matches zero or more characters) and _ (matches exactly one character).
You can match strings starting with a prefix:
SELECT *FROM logsWHERE blob1 LIKE 'error%'
You can also match file extensions (case-insensitive):
SELECT *FROM requestsWHERE blob2 ILIKE '%.jpg'
Another example is excluding strings containing specific text:
SELECT *FROM eventsWHERE blob3 NOT ILIKE '%debug%'
You can now deploy microfrontends to Cloudflare, splitting a single application into smaller, independently deployable units that render as one cohesive application. This lets different teams using different frameworks develop, test, and deploy each microfrontend without coordinating releases.
Microfrontends solve several challenges for large-scale applications:
Independent deployments: Teams deploy updates on their own schedule without redeploying the entire application
Framework flexibility: Build multi-framework applications (for example, Astro, Remix, and Next.js in one app)
Gradual migration: Migrate from a monolith to a distributed architecture incrementally
Create a microfrontend project:
This template automatically creates a router worker with pre-configured routing logic, and lets you configure Service bindings to Workers you have already deployed to your Cloudflare account. The router Worker analyzes incoming requests, matches them against configured routes, and forwards requests to the appropriate microfrontend via service bindings. The router automatically rewrites HTML, CSS, and headers to ensure assets load correctly from each microfrontend's mount path. The router includes advanced features like preloading for faster navigation between microfrontends, smooth page transitions using the View Transitions API, and automatic path rewriting for assets, redirects, and cookies.
Each microfrontend can be a full-framework application, a static site with Workers Static Assets, or any other Worker-based application.
We've shipped a new release for the Agents SDK ↗ v0.3.0 bringing full compatibility with AI SDK v6 ↗ and introducing the unified tool pattern, dynamic tool approval, and enhanced React hooks with improved tool handling.
This release includes improved streaming and tool support, dynamic tool approval (for "human in the loop" systems), enhanced React hooks with onToolCall callback, improved error handling for streaming responses, and seamless migration from v5 patterns.
This makes it ideal for building production AI chat interfaces with Cloudflare Workers AI models, agent workflows, human-in-the-loop systems, or any application requiring reliable tool execution and approval workflows.
Additionally, we've updated workers-ai-provider v3.0.0, the official provider for Cloudflare Workers AI models, and ai-gateway-provider v3.0.0, the provider for Cloudflare AI Gateway, to be compatible with AI SDK v6.
Agents SDK v0.3.0
Unified Tool Pattern
AI SDK v6 introduces a unified tool pattern where all tools are defined on the server using the tool() function. This replaces the previous client-side AITool pattern.
Server-Side Tool Definition
import { tool } from "ai";import { z } from "zod";// Server: Define ALL tools on the serverconst tools = { // Server-executed tool getWeather: tool({ description: "Get weather for a city", inputSchema: z.object({ city: z.string() }), execute: async ({ city }) => fetchWeather(city) }), // Client-executed tool (no execute = client handles via onToolCall) getLocation: tool({ description: "Get user location from browser", inputSchema: z.object({}) // No execute function }), // Tool requiring approval (dynamic based on input) processPayment: tool({ description: "Process a payment", inputSchema: z.object({ amount: z.number() }), needsApproval: async ({ amount }) => amount > 100, execute: async ({ amount }) => charge(amount) })};
If you need the v5 behavior (static-only checks), use the new functions:
import { isStaticToolUIPart, getStaticToolName } from "ai";
convertToModelMessages() is now async
The convertToModelMessages() function is now asynchronous. Update all calls to await the result:
import { convertToModelMessages } from "ai";const result = streamText({ messages: await convertToModelMessages(this.messages), model: openai("gpt-4o")});
ModelMessage type
The CoreMessage type has been removed. Use ModelMessage instead:
import { convertToModelMessages, type ModelMessage } from "ai";const modelMessages: ModelMessage[] = await convertToModelMessages(messages);
generateObject mode option removed
The mode option for generateObject has been removed:
// Before (v5)const result = await generateObject({ mode: "json", model, schema, prompt});// After (v6)const result = await generateObject({ model, schema, prompt});
Structured Output with generateText
While generateObject and streamObject are still functional, the recommended approach is to use generateText/streamText with the Output.object() helper:
Note: When using structured output with generateText, you must configure multiple steps with stopWhen because generating the structured output is itself a step.
workers-ai-provider v3.0.0
Seamless integration with Cloudflare Workers AI models through the updated workers-ai-provider v3.0.0 with AI SDK v6 support.
Model Setup with Workers AI
Use Cloudflare Workers AI models directly in your agent workflows:
import { createWorkersAI } from "workers-ai-provider";import { useAgentChat } from "agents/ai-react";// Create Workers AI model (v3.0.0 - enhanced v6 internals)const model = createWorkersAI({ binding: env.AI,})("@cf/meta/llama-3.2-3b-instruct");
Enhanced File and Image Support
Workers AI models now support v6 file handling with automatic conversion:
// Send images and files to Workers AI modelssendMessage({ role: "user", parts: [ { type: "text", text: "Analyze this image:" }, { type: "file", data: imageBuffer, mediaType: "image/jpeg", }, ],});// Workers AI provider automatically converts to proper format
Streaming with Workers AI
Enhanced streaming support with automatic warning detection:
// Streaming with Workers AI modelsconst result = await streamText({ model: createWorkersAI({ binding: env.AI })("@cf/meta/llama-3.2-3b-instruct"), messages: await convertToModelMessages(messages), onChunk: (chunk) => { // Enhanced streaming with warning handling console.log(chunk); },});
ai-gateway-provider v3.0.0
The ai-gateway-provider v3.0.0 now supports AI SDK v6, enabling you to use Cloudflare AI Gateway with multiple AI providers including Anthropic, Azure, AWS Bedrock, Google Vertex, and Perplexity.
AI Gateway Setup
Use Cloudflare AI Gateway to add analytics, caching, and rate limiting to your AI applications:
import { createAIGateway } from "ai-gateway-provider";// Create AI Gateway provider (v3.0.0 - enhanced v6 internals)const model = createAIGateway({ gatewayUrl: "https://gateway.ai.cloudflare.com/v1/your-account-id/gateway", headers: { "Authorization": `Bearer ${env.AI_GATEWAY_TOKEN}` }})({ provider: "openai", model: "gpt-4o"});
Migration from v5
Deprecated APIs
The following APIs are deprecated in favor of the unified tool pattern:
Deprecated
Replacement
AITool type
Use AI SDK's tool() function on server
extractClientToolSchemas()
Define tools on server, no client schemas needed
createToolsFromClientSchemas()
Define tools on server with tool()
toolsRequiringConfirmation option
Use needsApproval on server tools
experimental_automaticToolResolution
Use onToolCall callback
tools option in useAgentChat
Use onToolCall for client-side execution
addToolResult()
Use addToolOutput()
Breaking Changes Summary
Unified Tool Pattern: All tools must be defined on the server using tool()
convertToModelMessages() is async: Add await to all calls
CoreMessage removed: Use ModelMessage instead
generateObject mode removed: Remove mode option
isToolUIPart behavior changed: Now checks both static and dynamic tool parts
Installation
Update your dependencies to use the latest versions:
TanStack Start ↗ apps can now prerender routes to static HTML at build time with access to build time environment variables
and bindings, and serve them as static assets. To enable prerendering, configure the prerender option of the TanStack Start plugin in your Vite config:
Minor version updates: We typically update preinstalled software to the latest available minor version without notice. For tools that don't follow semantic versioning (e.g., Bun or Hugo), we provide 3 months’ notice.
Major version updates: Before preinstalled software reaches end-of-life, we update to the next stable LTS version with 3 months’ notice.
Build image version deprecation (Pages only): We provide 6 months’ notice before deprecation. Projects on v1 or v2 will be automatically moved to v3 on their specified deprecation dates.
Wrangler now includes a new wrangler auth token command that retrieves your current authentication token or credentials for use with other tools and scripts.
wrangler auth token
The command returns whichever authentication method is currently configured, in priority order: API token from CLOUDFLARE_API_TOKEN, or OAuth token from wrangler login (automatically refreshed if expired).
Use the --json flag to get structured output including the token type:
wrangler auth token --json
The JSON output includes the authentication type:
// API token{ "type": "api_token", "token": "..." }// OAuth token{ "type": "oauth", "token": "..." }// API key/email (only available with --json){ "type": "api_key", "key": "...", "email": "..." }
API key/email credentials from CLOUDFLARE_API_KEY and CLOUDFLARE_EMAIL require the --json flag since this method uses two values instead of a single token.
Wrangler now supports automatic configuration for popular web frameworks in experimental mode, making it even easier to deploy to Cloudflare Workers.
Previously, if you wanted to deploy an application using a popular web framework like Next.js or Astro, you had to follow tutorials to set up your application for deployment to Cloudflare Workers. This usually involved creating a Wrangler file, installing adapters, or changing configuration options.
Now wrangler deploy does this for you. Starting with Wrangler 4.55, you can use npx wrangler deploy --x-autoconfig in the directory of any web application using one of the supported frameworks. Wrangler will then proceed to configure and deploy it to your Cloudflare account.
You can also configure your application without deploying it by using the new npx wrangler setup command. This enables you to easily review what changes we are making so your application is ready for Cloudflare Workers.
The following application frameworks are supported starting today:
Next.js
Astro
Nuxt
TanStack Start
SolidStart
React Router
SvelteKit
Docusaurus
Qwik
Analog
Automatic configuration also supports static sites by detecting the assets directory and build command. From a single index.html file to the output of a generator like Jekyll or Hugo, you can just run npx wrangler deploy --x-autoconfig to upload to Cloudflare.
We're really excited to bring you automatic configuration so you can do more with Workers. Please let us know if you run into challenges using this experimentally. We’ve opened a GitHub discussion ↗ and would love to hear your feedback.
A new Rules of Durable Objects guide is now available, providing opinionated best practices for building effective Durable Objects applications. This guide covers design patterns, storage strategies, concurrency, and common anti-patterns to avoid.
Key guidance includes:
Design around your "atom" of coordination — Create one Durable Object per logical unit (chat room, game session, user) instead of a global singleton that becomes a bottleneck.
Use SQLite storage with RPC methods — SQLite-backed Durable Objects with typed RPC methods provide the best developer experience and performance.
Understand input and output gates — Learn how Cloudflare's runtime prevents data races by default, how write coalescing works, and when to use blockConcurrencyWhile().
Leverage Hibernatable WebSockets — Reduce costs for real-time applications by allowing Durable Objects to sleep while maintaining WebSocket connections.
The testing documentation has also been updated with modern patterns using @cloudflare/vitest-pool-workers, including examples for testing SQLite storage, alarms, and direct instance access:
test/counter.test.jsjs
import { env, runDurableObjectAlarm } from "cloudflare:test";import { it, expect } from "vitest";it("can test Durable Objects with isolated storage", async () => { const stub = env.COUNTER.getByName("test"); // Call RPC methods directly on the stub await stub.increment(); expect(await stub.getCount()).toBe(1); // Trigger alarms immediately without waiting await runDurableObjectAlarm(stub);});
test/counter.test.tsts
import { env, runDurableObjectAlarm } from "cloudflare:test";import { it, expect } from "vitest";it("can test Durable Objects with isolated storage", async () => { const stub = env.COUNTER.getByName("test"); // Call RPC methods directly on the stub await stub.increment(); expect(await stub.getCount()).toBe(1); // Trigger alarms immediately without waiting await runDurableObjectAlarm(stub);});
If you do not want to incur costs, please take action such as optimizing queries or deleting unnecessary stored data in order to reduce your SQLite storage usage ahead of the January 7th target. Only usage on and after the billing target date will incur charges.
Developers on the Workers Paid plan with Durable Object's SQLite storage usage beyond included limits will incur charges according to SQLite storage pricing announced in September 2024 with the public beta ↗. Developers on the Workers Free plan will not be charged.
Compute billing for SQLite-backed Durable Objects has been enabled since the initial public beta. SQLite-backed Durable Objects currently incur charges for requests and duration, and no changes are being made to compute billing.
Python Workers now feature improved cold start performance, reducing initialization time for new Worker instances.
This improvement is particularly noticeable for Workers with larger dependency sets or complex initialization logic.
Every time you deploy a Python Worker, a memory snapshot is captured after the top level of the Worker is executed.
This snapshot captures all imports, including package imports that are often costly to load. The memory snapshot is loaded
when the Worker is first started, avoiding the need to reload the Python runtime and all dependencies on each cold start.
We set up a benchmark that imports common packages (httpx ↗,
fastapi ↗ and pydantic ↗)
to see how Python Workers stack up against other platforms:
Platform
Mean Cold Start (ms)
Cloudflare Python Workers
1027
AWS Lambda
2502
Google Cloud Run
3069
These benchmarks run continuously. You can view the results and the methodology on our benchmark page ↗.
In additional testing, we have found that without any memory snapshot, the cold start for this benchmark takes around 10 seconds, so this change improves cold start performance by roughly a factor of 10.
We are introducing a brand new tool called Pywrangler, which simplifies package management in Python Workers by
automatically installing Workers-compatible Python packages into your project.
With Pywrangler, you specify your Worker's Python dependencies in your pyproject.toml file:
[project]name = "python-beautifulsoup-worker"version = "0.1.0"description = "A simple Worker using beautifulsoup4"requires-python = ">=3.12"dependencies = [ "beautifulsoup4"][dependency-groups]dev = [ "workers-py", "workers-runtime-sdk"]
You can then develop and deploy your Worker using the following commands:
uv run pywrangler devuv run pywrangler deploy
Pywrangler automatically downloads and vendors the necessary packages for your Worker, and these packages are bundled with the Worker when you deploy.
When using the Cloudflare Vite plugin to build and deploy Workers, a Wrangler configuration file is now optional for assets-only (static) sites. If no wrangler.toml, wrangler.json, or wrangler.jsonc file is found, the plugin generates sensible defaults for an assets-only site. The name is based on the package.json or the project directory name, and the compatibility_date uses the latest date supported by your installed Miniflare version.
The Cloudflare Vite plugin now supports programmatic configuration of Workers without a Wrangler configuration file. You can use the config option to define Worker settings directly in your Vite configuration, or to modify existing configuration loaded from a Wrangler config file. This is particularly useful when integrating with other build tools or frameworks, as it allows them to control Worker configuration without needing users to manage a separate config file.
The config option
The Vite plugin's new config option accepts either a partial configuration object or a function that receives the current configuration and returns overrides. This option is applied after any config file is loaded, allowing the plugin to override specific values or define Worker configuration entirely in code.
Example usage
Setting config to an object to provide configuration values that merge with defaults and config file settings:
Workers applications now use reusable Cloudflare Access policies to reduce duplication and simplify access management across multiple Workers.
Previously, enabling Cloudflare Access on a Worker created per-application policies, unique to each application. Now, we create reusable policies that can be shared across applications:
Preview URLs: All Workers preview URLs share a single "Cloudflare Workers Preview URLs" policy across your account. This policy is automatically created the first time you enable Access on any preview URL. By sharing a single policy across all preview URLs, you can configure access rules once and have them apply company-wide to all Workers which protect preview URLs. This makes it much easier to manage who can access preview environments without having to update individual policies for each Worker.
Production workers.dev URLs: When enabled, each Worker gets its own reusable policy (named <worker-name> - Production) by default. We recognize production services often have different access requirements and having individual policies here makes it easier to configure service-to-service authentication or protect internal dashboards or applications with specific user groups. Keeping these policies separate gives you the flexibility to configure exactly the right access rules for each production service. When you disable Access on a production Worker, the associated policy is automatically cleaned up if it's not being used by other applications.
This change reduces policy duplication, simplifies cross-company access management for preview environments, and provides the flexibility needed for production services. You can still customize access rules by editing the reusable policies in the Zero Trust dashboard.
To enable Cloudflare Access on your Worker:
In the Cloudflare dashboard, go to Workers & Pages.
Select your Worker.
Go to Settings > Domains & Routes.
For workers.dev or Preview URLs, click Enable Cloudflare Access.
Optionally, click Manage Cloudflare Access to customize the policy.
The latest release of @cloudflare/agents ↗ brings resumable streaming, significant MCP client improvements, and critical fixes for schedules and Durable Object lifecycle management.
Resumable streaming
AIChatAgent now supports resumable streaming, allowing clients to reconnect and continue receiving streamed responses without losing data. This is useful for:
Long-running AI responses
Users on unreliable networks
Users switching between devices mid-conversation
Background tasks where users navigate away and return
Real-time collaboration where multiple clients need to stay in sync
Streams are maintained across page refreshes, broken connections, and syncing across open tabs and devices.
The MCPClientManager API has been redesigned for better clarity and control:
New registerServer() method: Register MCP servers without immediately connecting
New connectToServer() method: Establish connections to registered servers
Improved reconnect logic: restoreConnectionsFromStorage() now properly handles failed connections
// Register a server to Agentconst { id } = await this.mcp.registerServer({ name: "my-server", url: "https://my-mcp-server.example.com",});// Connect when readyawait this.mcp.connectToServer(id);// Discover tools, prompts and resourcesawait this.mcp.discoverIfConnected(id);
The SDK now includes a formalized MCPConnectionState enum with states: idle, connecting, authenticating, connected, discovering, and ready.
Enhanced MCP discovery
MCP discovery fetches the available tools, prompts, and resources from an MCP server so your agent knows what capabilities are available. The MCPClientConnection class now includes a dedicated discover() method with improved reliability:
Supports cancellation via AbortController
Configurable timeout (default 15s)
Discovery failures now throw errors immediately instead of silently continuing
Bug fixes
Fixed a bug where schedules ↗ meant to fire immediately with this.schedule(0, ...) or this.schedule(new Date(), ...) would not fire
Fixed an issue where schedules that took longer than 30 seconds would occasionally time out
Fixed SSE transport now properly forwards session IDs and request headers
Fixed AI SDK stream events conversion to UIMessageStreamPart
Workers Builds now supports up to 64 environment variables, and each environment variable can be up to 5 KB in size. The previous limit was 5 KB total across all environment variables.
This change enables better support for complex build configurations, larger application settings, and more flexible CI/CD workflows.
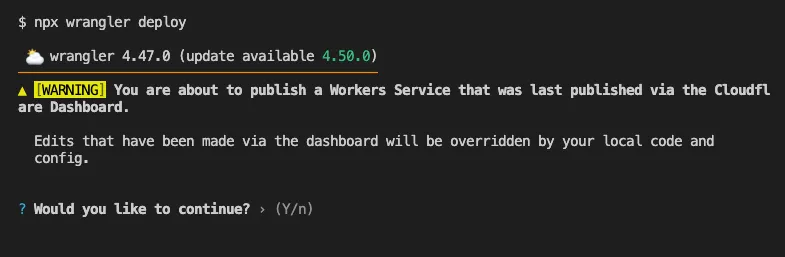
Until now, if a Worker had been previously deployed via the Cloudflare Dashboard ↗, a subsequent deployment done via the Cloudflare Workers CLI, Wrangler
(through the deploy command), would allow the user to override the Worker's dashboard settings without providing details on
what dashboard settings would be lost.
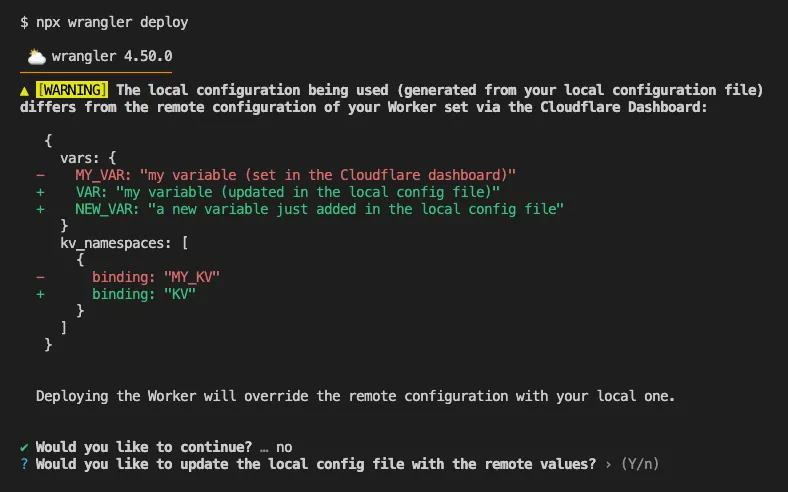
Now instead, wrangler deploy presents a helpful representation of the differences between the local configuration
and the remote dashboard settings, and offers to update your local configuration file for you.
See example below showing a before and after for wrangler deploy when a local configuration is expected to override a Worker's dashboard settings:
Before
After
Also, if instead Wrangler detects that a deployment would override remote dashboard settings but in an additive way, without modifying or removing any of them, it will simply proceed with the deployment without requesting any user interaction.
Update to Wrangler v4.50.0 or greater to take advantage of this improved deploy flow.
You can now perform more powerful queries directly in Workers Analytics Engine ↗ with a major expansion of our SQL function library.
Workers Analytics Engine allows you to ingest and store high-cardinality data at scale (such as custom analytics) and query your data through a simple SQL API.
Today, we've expanded Workers Analytics Engine's SQL capabilities with several new functions:
Whether you're building usage-based billing systems, customer analytics dashboards, or other custom analytics, these functions let you get the most out of your data. Get started with Workers Analytics Engine and explore all available functions in our SQL reference documentation.
Wrangler now supports using the CLOUDFLARE_ENVenvironment variable to select the active environment for your Worker commands. This provides a more flexible way to manage environments, especially when working with build tools and CI/CD pipelines.
What's new
Environment selection via environment variable:
Set CLOUDFLARE_ENV to specify which environment to use for Wrangler commands
Works with all Wrangler commands that support the --env flag
The --env command line argument takes precedence over the CLOUDFLARE_ENV environment variable
Example usage
# Deploy to the production environment using CLOUDFLARE_ENVCLOUDFLARE_ENV=production wrangler deploy# Upload a version to the staging environmentCLOUDFLARE_ENV=staging wrangler versions upload# The --env flag takes precedence over CLOUDFLARE_ENVCLOUDFLARE_ENV=dev wrangler deploy --env production# This will deploy to production, not dev
Use with build tools
The CLOUDFLARE_ENV environment variable is particularly useful when working with build tools like Vite. You can set the environment once during the build process, and it will be used for both building and deploying your Worker:
# Set the environment for both build and deployCLOUDFLARE_ENV=production npm run build & wrangler deploy
When using @cloudflare/vite-plugin, the build process generates a "redirected deploy config" that is flattened to only contain the active environment. Wrangler will validate that the environment specified matches the environment used during the build to prevent accidentally deploying a Worker built for one environment to a different environment.
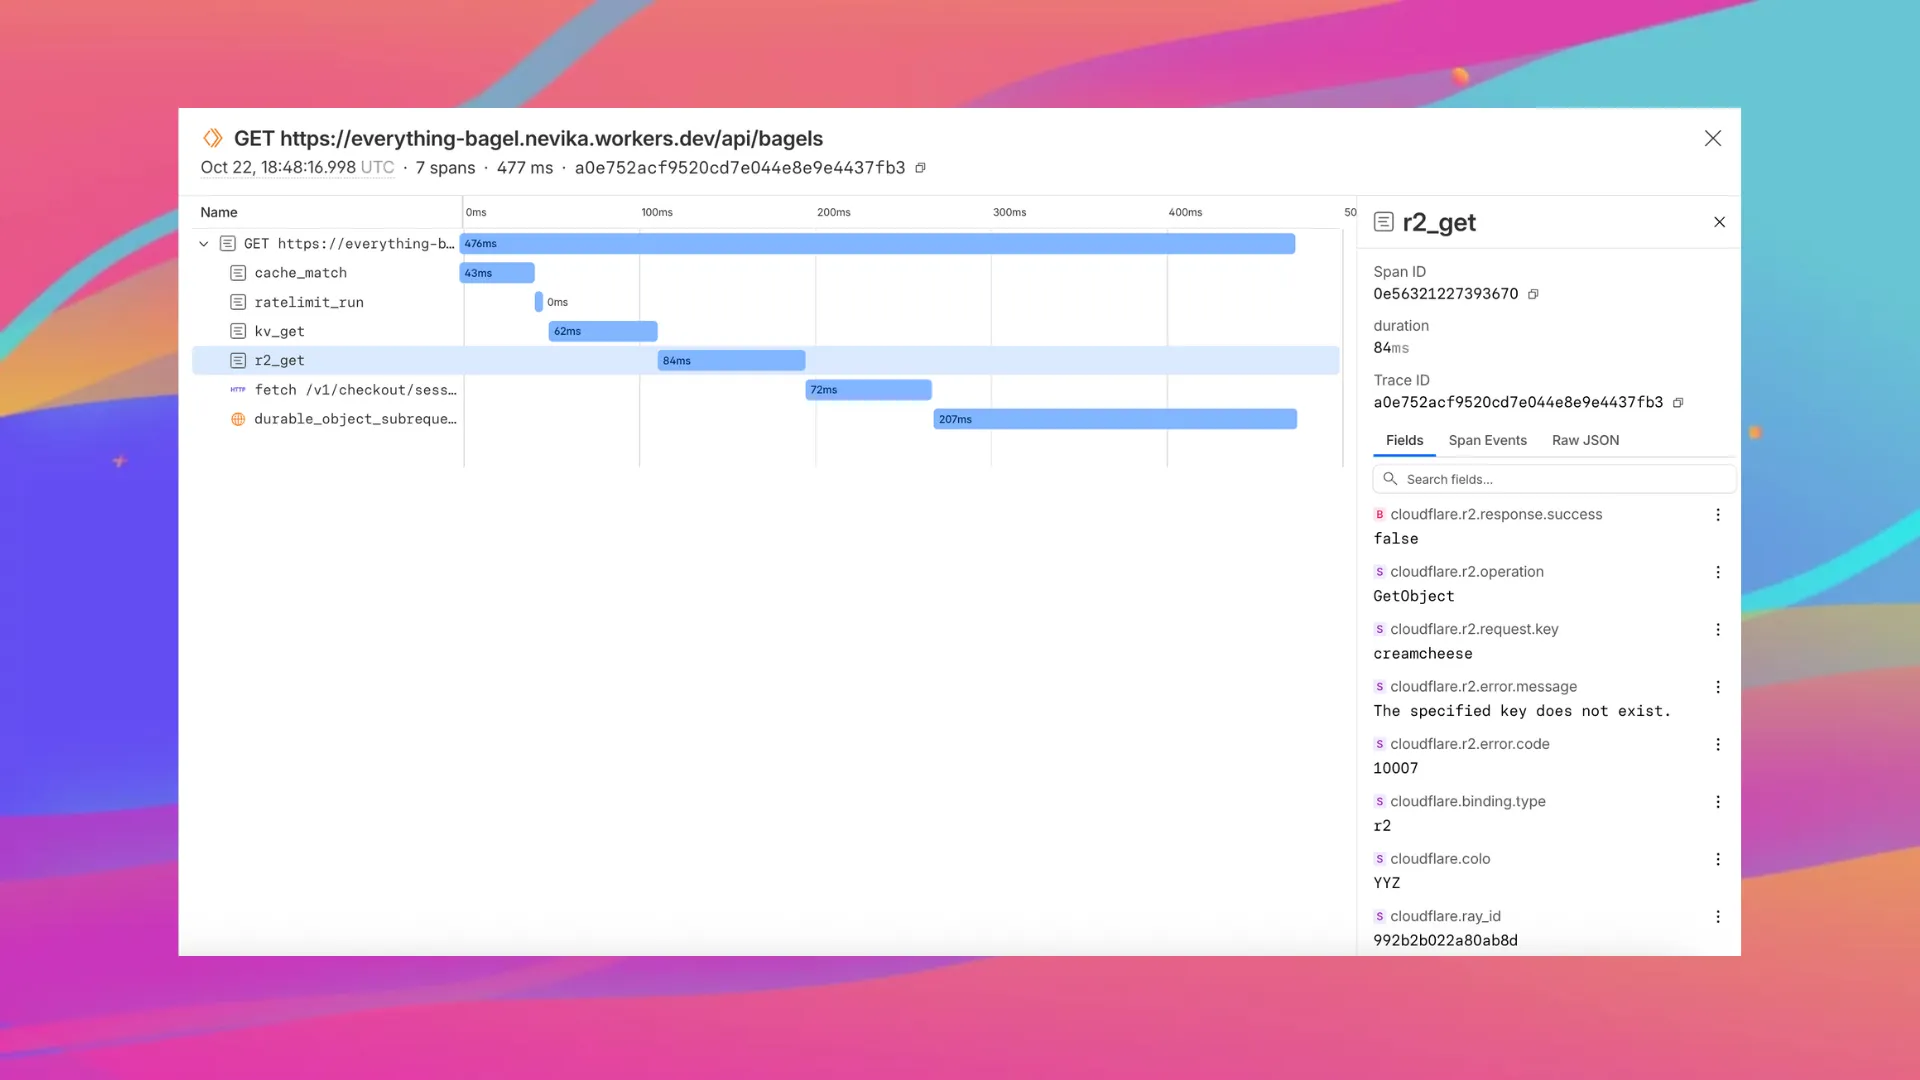
Enable automatic tracing on your Workers, giving you detailed metadata and timing information for every operation your Worker performs.
Tracing helps you identify performance bottlenecks, resolve errors, and understand how your Worker interacts with other services on the Workers platform. You can now answer questions like:
Which calls are slowing down my application?
Which queries to my database take the longest?
What happened within a request that resulted in an error?
You can now:
View traces alongside your logs in the Workers Observability dashboard
You can now set a jurisdiction when creating a D1 database to guarantee where your database runs and stores data. Jurisdictions can help you comply with data localization regulations such as GDPR. Supported jurisdictions include eu and fedramp.
A jurisdiction can only be set at database creation time via wrangler, REST API or the UI and cannot be added/updated after the database already exists.
npx wrangler@latest d1 create db-with-jurisdiction --jurisdiction eu