Pular para o conteúdo

Changelog

New updates and improvements at Cloudflare.

Remote bindings (beta) now works with Next.js — connect to remote resources (D1, KV, R2, etc.) during local development

We recently announced our public beta for remote bindings, which allow you to connect to deployed resources running on your Cloudflare account (like R2 buckets or D1 databases) while running a local development session.

Now, you can use remote bindings with your Next.js applications through the @opennextjs/cloudflare adaptor by enabling the experimental feature in your next.config.ts:

- initOpenNextCloudflareForDev();
+ initOpenNextCloudflareForDev({
+  experimental: { remoteBindings: true }
+ });

Then, all you have to do is specify which bindings you want connected to the deployed resource on your Cloudflare account via the experimental_remote flag in your binding definition:

{
	"r2_buckets": [
		{
			"bucket_name": "testing-bucket",
			"binding": "MY_BUCKET",
			"experimental_remote": true,
		},
	],
}
[[r2_buckets]]
bucket_name = "testing-bucket"
binding = "MY_BUCKET"
experimental_remote = true

You can then run next dev to start a local development session (or start a preview with opennextjs-cloudflare preview), and all requests to env.MY_BUCKET will be proxied to the remote testing-bucket — rather than the default local binding simulations.

Remote bindings & ISR

Remote bindings are also used during the build process, which comes with significant benefits for pages using Incremental Static Regeneration (ISR). During the build step for an ISR page, your server executes the page's code just as it would for normal user requests. If a page needs data to display (like fetching user info from KV), those requests are actually made. The server then uses this fetched data to render the final HTML.

Data fetching is a critical part of this process, as the finished HTML is only as good as the data it was built with. If the build process can't fetch real data, you end up with a pre-rendered page that's empty or incomplete.

With remote bindings support in OpenNext, your pre-rendered pages are built with real data from the start. The build process uses any configured remote bindings, and any data fetching occurs against the deployed resources on your Cloudflare account.

Want to learn more? Get started with remote bindings and OpenNext.

Have feedback? Join the discussion in our beta announcement to share feedback or report any issues.
Run and connect Workers in separate dev commands with the Cloudflare Vite plugin

Workers can now talk to each other across separate dev commands using service bindings and tail consumers, whether started with vite dev or wrangler dev.

Simply start each Worker in its own terminal:

# Terminal 1
vite dev

# Terminal 2
wrangler dev

This is useful when different teams maintain different Workers, or when each Worker has its own build setup or tooling.

Check out the Developing with multiple Workers guide to learn more about the different approaches and when to use each one.

Run AI-generated code on-demand with Code Sandboxes (new)

AI is supercharging app development for everyone, but we need a safe way to run untrusted, LLM-written code. We’re introducing Sandboxes, which let your Worker run actual processes in a secure, container-based environment.

import { getSandbox } from "@cloudflare/sandbox";
export { Sandbox } from "@cloudflare/sandbox";

export default {
	async fetch(request: Request, env: Env) {
		const sandbox = getSandbox(env.Sandbox, "my-sandbox");
		return sandbox.exec("ls", ["-la"]);
	},
};

Methods

  • exec(command: string, args: string[], options?: { stream?: boolean }):Execute a command in the sandbox.
  • gitCheckout(repoUrl: string, options: { branch?: string; targetDir?: string; stream?: boolean }): Checkout a git repository in the sandbox.
  • mkdir(path: string, options: { recursive?: boolean; stream?: boolean }): Create a directory in the sandbox.
  • writeFile(path: string, content: string, options: { encoding?: string; stream?: boolean }): Write content to a file in the sandbox.
  • readFile(path: string, options: { encoding?: string; stream?: boolean }): Read content from a file in the sandbox.
  • deleteFile(path: string, options?: { stream?: boolean }): Delete a file from the sandbox.
  • renameFile(oldPath: string, newPath: string, options?: { stream?: boolean }): Rename a file in the sandbox.
  • moveFile(sourcePath: string, destinationPath: string, options?: { stream?: boolean }): Move a file from one location to another in the sandbox.
  • ping(): Ping the sandbox.

Sandboxes are still experimental. We're using them to explore how isolated, container-like workloads might scale on Cloudflare — and to help define the developer experience around them.

You can try it today from your Worker, with just a few lines of code. Let us know what you build.

@cloudflare/actors library - SDK for Durable Objects in beta

The new @cloudflare/actors library is now in beta!

The @cloudflare/actors library is a new SDK for Durable Objects and provides a powerful set of abstractions for building real-time, interactive, and multiplayer applications on top of Durable Objects. With beta usage and feedback, @cloudflare/actors will become the recommended way to build on Durable Objects and draws upon Cloudflare's experience building products/features on Durable Objects.

The name "actors" originates from the actor programming model, which closely ties to how Durable Objects are modelled.

The @cloudflare/actors library includes:

  • Storage helpers for querying embeddeded, per-object SQLite storage
  • Storage helpers for managing SQL schema migrations
  • Alarm helpers for scheduling multiple alarms provided a date, delay in seconds, or cron expression
  • Actor class for using Durable Objects with a defined pattern
  • Durable Objects Workers API is always available for your application as needed

Storage and alarm helper methods can be combined with any Javascript class that defines your Durable Object, i.e, ones that extend DurableObject including the Actor class.

import { Storage } from "@cloudflare/actors/storage";

export class ChatRoom extends DurableObject<Env> {
    storage: Storage;

    constructor(ctx: DurableObjectState, env: Env) {
        super(ctx, env)
        this.storage = new Storage(ctx.storage);
        this.storage.migrations = [{
            idMonotonicInc: 1,
            description: "Create users table",
            sql: "CREATE TABLE IF NOT EXISTS users (id INTEGER PRIMARY KEY)"
        }]
    }
    async fetch(request: Request): Promise<Response> {
        // Run migrations before executing SQL query
        await this.storage.runMigrations();

        // Query with SQL template
        let userId = new URL(request.url).searchParams.get("userId");
        const query = this.storage.sql`SELECT * FROM users WHERE id = ${userId};`
        return new Response(`${JSON.stringify(query)}`);
    }
}

@cloudflare/actors library introduces the Actor class pattern. Actor lets you access Durable Objects without writing the Worker that communicates with your Durable Object (the Worker is created for you). By default, requests are routed to a Durable Object named "default".

export class MyActor extends Actor<Env> {
    async fetch(request: Request): Promise<Response> {
        return new Response('Hello, World!')
    }
}

export default handler(MyActor);

You can route to different Durable Objects by name within your Actor class using nameFromRequest.

export class MyActor extends Actor<Env> {
    static nameFromRequest(request: Request): string {
        let url = new URL(request.url);
        return url.searchParams.get("userId") ?? "foo";
    }

    async fetch(request: Request): Promise<Response> {
        return new Response(`Actor identifier (Durable Object name): ${this.identifier}`);
    }
}

export default handler(MyActor);

For more examples, check out the library README. @cloudflare/actors library is a place for more helpers and built-in patterns, like retry handling and Websocket-based applications, to reduce development overhead for common Durable Objects functionality. Please share feedback and what more you would like to see on our Discord channel.

Increased blob size limits in Workers Analytics Engine

We’ve increased the total allowed size of blob fields on data points written to Workers Analytics Engine from 5 KB to 16 KB.

This change gives you more flexibility when logging rich observability data — such as base64-encoded payloads, AI inference traces, or custom metadata — without hitting request size limits.

You can find full details on limits for queries, filters, payloads, and more here in the Workers Analytics Engine limits documentation.

export default {
	async fetch(request, env) {
		env.analyticsDataset.writeDataPoint({
			// The sum of all of the blob's sizes can now be 16 KB
			blobs: [
				// The URL of the request to the Worker
				request.url,
				// Some metadata about your application you'd like to store
				JSON.stringify(metadata),
				// The version of your Worker this datapoint was collected from
				env.versionMetadata.tag,
			],
			indexes: ["sample-index"],
		});
	},
};
worker.tsts
export default {
	async fetch(request, env) {
		env.analyticsDataset.writeDataPoint({
			// The sum of all of the blob's sizes can now be 16 KB
			blobs: [
				// The URL of the request to the Worker
				request.url,
				// Some metadata about your application you'd like to store
				JSON.stringify(metadata),
				// The version of your Worker this datapoint was collected from
				env.versionMetadata.tag,
			],
			indexes: ["sample-index"],
		});
	}
};

Automate Worker deployments with a simplified SDK and more reliable Terraform provider

Simplified Worker Deployments with our SDKs

We've simplified the programmatic deployment of Workers via our Cloudflare SDKs. This update abstracts away the low-level complexities of the multipart/form-data upload process, allowing you to focus on your code while we handle the deployment mechanics.

This new interface is available in:

For complete examples, see our guide on programmatic Worker deployments.

The Old way: Manual API calls

Previously, deploying a Worker programmatically required manually constructing a multipart/form-data HTTP request, packaging your code and a separate metadata.json file. This was more complicated and verbose, and prone to formatting errors.

For example, here's how you would upload a Worker script previously with cURL:

curl https://api.cloudflare.com/client/v4/accounts/<account_id>/workers/scripts/my-hello-world-script \
  -X PUT \
  -H 'Authorization: Bearer <api_token>' \
  -F 'metadata={
        "main_module": "my-hello-world-script.mjs",
        "bindings": [
          {
            "type": "plain_text",
            "name": "MESSAGE",
            "text": "Hello World!"
          }
        ],
        "compatibility_date": "$today"
      };type=application/json' \
  -F 'my-hello-world-script.mjs=@-;filename=my-hello-world-script.mjs;type=application/javascript+module' <<EOF
export default {
  async fetch(request, env, ctx) {
    return new Response(env.MESSAGE, { status: 200 });
  }
};
EOF

After: SDK interface

With the new SDK interface, you can now define your entire Worker configuration using a single, structured object.

This approach allows you to specify metadata like main_module, bindings, and compatibility_date as clearer properties directly alongside your script content. Our SDK takes this logical object and automatically constructs the complex multipart/form-data API request behind the scenes.

Here's how you can now programmatically deploy a Worker via the cloudflare-typescript SDK

import Cloudflare from "cloudflare";
import { toFile } from "cloudflare/index";

// ... client setup, script content, etc.

const script = await client.workers.scripts.update(scriptName, {
	account_id: accountID,
	metadata: {
		main_module: scriptFileName,
		bindings: [],
	},
	files: {
		[scriptFileName]: await toFile(Buffer.from(scriptContent), scriptFileName, {
			type: "application/javascript+module",
		}),
	},
});
import Cloudflare from 'cloudflare';
import { toFile } from 'cloudflare/index';

// ... client setup, script content, etc.

const script = await client.workers.scripts.update(scriptName, {
  account_id: accountID,
  metadata: {
    main_module: scriptFileName,
    bindings: [],
  },
  files: {
    [scriptFileName]: await toFile(Buffer.from(scriptContent), scriptFileName, {
      type: 'application/javascript+module',
    }),
  },
});

View the complete example here: https://github.com/cloudflare/cloudflare-typescript/blob/main/examples/workers/script-upload.ts

Terraform provider improvements

We've also made several fixes and enhancements to the Cloudflare Terraform provider:

  • Fixed the cloudflare_workers_script resource in Terraform, which previously was producing a diff even when there were no changes. Now, your terraform plan outputs will be cleaner and more reliable.
  • Fixed the cloudflare_workers_for_platforms_dispatch_namespace, where the provider would attempt to recreate the namespace on a terraform apply. The resource now correctly reads its remote state, ensuring stability for production environments and CI/CD workflows.
  • The cloudflare_workers_route resource now allows for the script property to be empty, null, or omitted to indicate that pattern should be negated for all scripts (see routes docs). You can now reserve a pattern or temporarily disable a Worker on a route without deleting the route definition itself.
  • Using primary_location_hint in the cloudflare_d1_database resource will no longer always try to recreate. You can now safely change the location hint for a D1 database without causing a destructive operation.

API improvements

We've also properly documented the Workers Script And Version Settings in our public OpenAPI spec and SDKs.

Remote bindings public beta - Connect to remote resources (D1, KV, R2, etc.) during local development

Today we announced the public beta of remote bindings for local development. With remote bindings, you can now connect to deployed resources like R2 buckets and D1 databases while running Worker code on your local machine. This means you can test your local code changes against real data and services, without the overhead of deploying for each iteration.

Example configuration

To enable remote mode, add "experimental_remote" : true to each binding that you want to rely on a remote resource running on Cloudflare:

{
	"name": "my-worker",
	// Set this to today's date
	"compatibility_date": "2026-07-20",

	"r2_buckets": [
		{
			"bucket_name": "screenshots-bucket",
			"binding": "screenshots_bucket",
			"experimental_remote": true,
		},
	],
}
name = "my-worker"
# Set this to today's date
compatibility_date = "2026-07-20"

[[r2_buckets]]
bucket_name = "screenshots-bucket"
binding = "screenshots_bucket"
experimental_remote = true

When remote bindings are configured, your Worker still executes locally, but all binding calls are proxied to the deployed resource that runs on Cloudflare's network.

You can try out remote bindings for local development today with:

Have feedback? Join the discussion in our beta announcement to share feedback or report any issues.
Control which routes invoke your Worker script for Single Page Applications

For those building Single Page Applications (SPAs) on Workers, you can now explicitly define which routes invoke your Worker script in Wrangler configuration. The run_worker_first config option has now been expanded to accept an array of route patterns, allowing you to more granularly specify when your Worker script runs.

Configuration example:

{
	"name": "my-spa-worker",
	// Set this to today's date
	"compatibility_date": "2026-07-20",
	"main": "./src/index.ts",
	"assets": {
		"directory": "./dist/",
		"not_found_handling": "single-page-application",
		"binding": "ASSETS",
		"run_worker_first": ["/api/*", "!/api/docs/*"]
	}
}
name = "my-spa-worker"
# Set this to today's date
compatibility_date = "2026-07-20"
main = "./src/index.ts"

[assets]
directory = "./dist/"
not_found_handling = "single-page-application"
binding = "ASSETS"
run_worker_first = [ "/api/*", "!/api/docs/*" ]

This new routing control was done in partnership with our community and customers who provided great feedback on our public proposal. Thank you to everyone who brought forward use-cases and feedback on the design!

Prerequisites

To use advanced routing control with run_worker_first, you'll need:

SSRF vulnerability in @opennextjs/cloudflare proactively mitigated for all Cloudflare customers

Mitigations have been put in place for all existing and future deployments of sites with the Cloudflare adapter for Open Next in response to an identified Server-Side Request Forgery (SSRF) vulnerability in the @opennextjs/cloudflare package.

The vulnerability stemmed from an unimplemented feature in the Cloudflare adapter for Open Next, which allowed users to proxy arbitrary remote content via the /_next/image endpoint.

This issue allowed attackers to load remote resources from arbitrary hosts under the victim site's domain for any site deployed using the Cloudflare adapter for Open Next. For example: https://victim-site.com/_next/image?url=https://attacker.com. In this example, attacker-controlled content from attacker.com is served through the victim site's domain (victim-site.com), violating the same-origin policy and potentially misleading users or other services.

References: https://www.cve.org/cverecord?id=CVE-2025-6087, https://github.com/opennextjs/opennextjs-cloudflare/security/advisories/GHSA-rvpw-p7vw-wj3m

Impact

  • SSRF via unrestricted remote URL loading
  • Arbitrary remote content loading
  • Potential internal service exposure or phishing risks through domain abuse

Mitigation

The following mitigations have been put in place:

Server side updates to Cloudflare's platform to restrict the content loaded via the /_next/image endpoint to images. The update automatically mitigates the issue for all existing and any future sites deployed to Cloudflare using the affected version of the Cloudflare adapter for Open Next

Root cause fix: Pull request #727 to the Cloudflare adapter for Open Next. The patched version of the adapter has been released as @opennextjs/cloudflare@1.3.0

Package dependency update: Pull request cloudflare/workers-sdk#9608 to create-cloudflare (c3) to use the fixed version of the Cloudflare adapter for Open Next. The patched version of create-cloudflare has been published as create-cloudflare@2.49.3.

In addition to the automatic mitigation deployed on Cloudflare's platform, we encourage affected users to upgrade to @opennext/cloudflare v1.3.0 and use the remotePatterns filter in Next config if they need to allow-list external urls with images assets.

Grant account members read-only access to the Workers Platform

You can now grant members of your Cloudflare account read-only access to the Workers Platform.

The new "Workers Platform (Read-only)" role grants read-only access to all products typically used as part of Cloudflare's Developer Platform, including Workers, Pages, Durable Objects, KV, R2, Zones, Zone Analytics and Page Rules. When Cloudflare introduces new products to the Workers platform, we will add additional read-only permissions to this role.

Additionally, the role previously named "Workers Admin" has been renamed to "Workers Platform Admin". This change ensures that the name more accurately reflects the permissions granted — this role has always granted access to more than just Workers — it grants read and write access to the products mentioned above, and similarly, as new products are added to the Workers platform, we will add additional read and write permissions to this role.

You can review the updated roles in the developer docs.

Access git commit sha and branch name as environment variables in Workers Builds

Workers Builds connects your Worker to a Git repository, and automates building and deploying your code on each pushed change.

To make CI/CD pipelines even more flexible, Workers Builds now automatically injects default environment variables into your build process (much like the defaults in Cloudflare Pages projects). You can use these variables to customize your build process based on the deployment context, such as the branch or commit.

The following environment variables are injected by default:

Environment Variable Injected value Example use-case
CI true Changing build behavior when run on CI versus locally
WORKERS_CI 1 Changing build behavior when run on Workers Builds versus locally
WORKERS_CI_BUILD_UUID <build-uuid-of-current-build> Passing the Build UUID along to custom workflows
WORKERS_CI_COMMIT_SHA <sha1-hash-of-current-commit> Passing current commit ID to error reporting, for example, Sentry
WORKERS_CI_BRANCH <branch-name-from-push-event Customizing build based on branch, for example, disabling debug logging on production

You can override these default values and add your own custom environment variables by navigating to your Worker > Settings > Environment variables.

Learn more in the Build configuration documentation.

Workers native integrations were removed from the Cloudflare dashboard

Workers native integrations were originally launched in May 2023 to connect to popular database and observability providers with your Worker in just a few clicks. We are changing how developers connect Workers to these external services. The Integrations tab in the dashboard has been removed in favor of a more direct, command-line-based approach using Wrangler secrets.

What's changed

  • Integrations tab removed: The integrations setup flow is no longer available in the Workers dashboard.
  • Manual secret configuration: New connections should be configured by adding credentials as secrets to your Workers using npx wrangler secret put commands.

Impact on existing integrations

Existing integrations will continue to work without any changes required. If you have integrations that were previously created through the dashboard, they will remain functional.

Updating existing integrations

If you'd like to modify your existing integration, you can update the secrets, environment variables, or Tail Workers that were created from the original integration setup.

  • Update secrets: Use npx wrangler secret put <SECRET_NAME> to update credential values.
  • Modify environment variables: Update variables through the dashboard or Wrangler configuration.
  • Dashboard management: Access your Worker's settings in the Cloudflare dashboard to modify connections created by our removed native integrations feature.

If you have previously set up an observability integration with Sentry, the following environment variables were set and are still modifiable:

  • BLOCKED_HEADERS: headers to exclude sending to Sentry
  • EXCEPTION_SAMPLING_RATE: number from 0 - 100, where 0 = no events go through to Sentry, and 100 = all events go through to Sentry
  • STATUS_CODES_TO_SAMPLING_RATES: a map of status codes -- like 400 or with wildcards like 4xx -- to sampling rates described above

Setting up new database and observability connections

For new connections, refer to our step-by-step guides on connecting to popular database and observability providers including: Sentry, Turso, Neon, Supabase, PlanetScale, Upstash, Xata.

Performance and size optimization for the Cloudflare adapter for Open Next

With the release of the Cloudflare adapter for Open Next v1.0.0 in May 2025, we already had followups plans to improve performance and size.

@opennextjs/cloudflare v1.2 released on June 5, 2025 delivers on these enhancements. By removing babel from the app code and dropping a dependency on @ampproject/toolbox-optimizer, we were able to reduce generated bundle sizes. Additionally, by stopping preloading of all app routes, we were able to improve the cold start time.

This means that users will now see a decrease from 14 to 8MiB (2.3 to 1.6MiB gzipped) in generated bundle size for a Next app created via create-next-app, and typically 100ms faster startup times for their medium-sized apps.

Users only need to update to the latest version of @opennextjs/cloudflare to automatically benefit from these improvements.

Note that we published CVE-2005-6087 for a SSRF vulnerability in the @opennextjs/cloudflare package. The vulnerability has been fixed from @opennextjs/cloudflare v1.3.0 onwards. Please update to any version after this one.

View an architecture diagram of your Worker directly in the Cloudflare dashboard

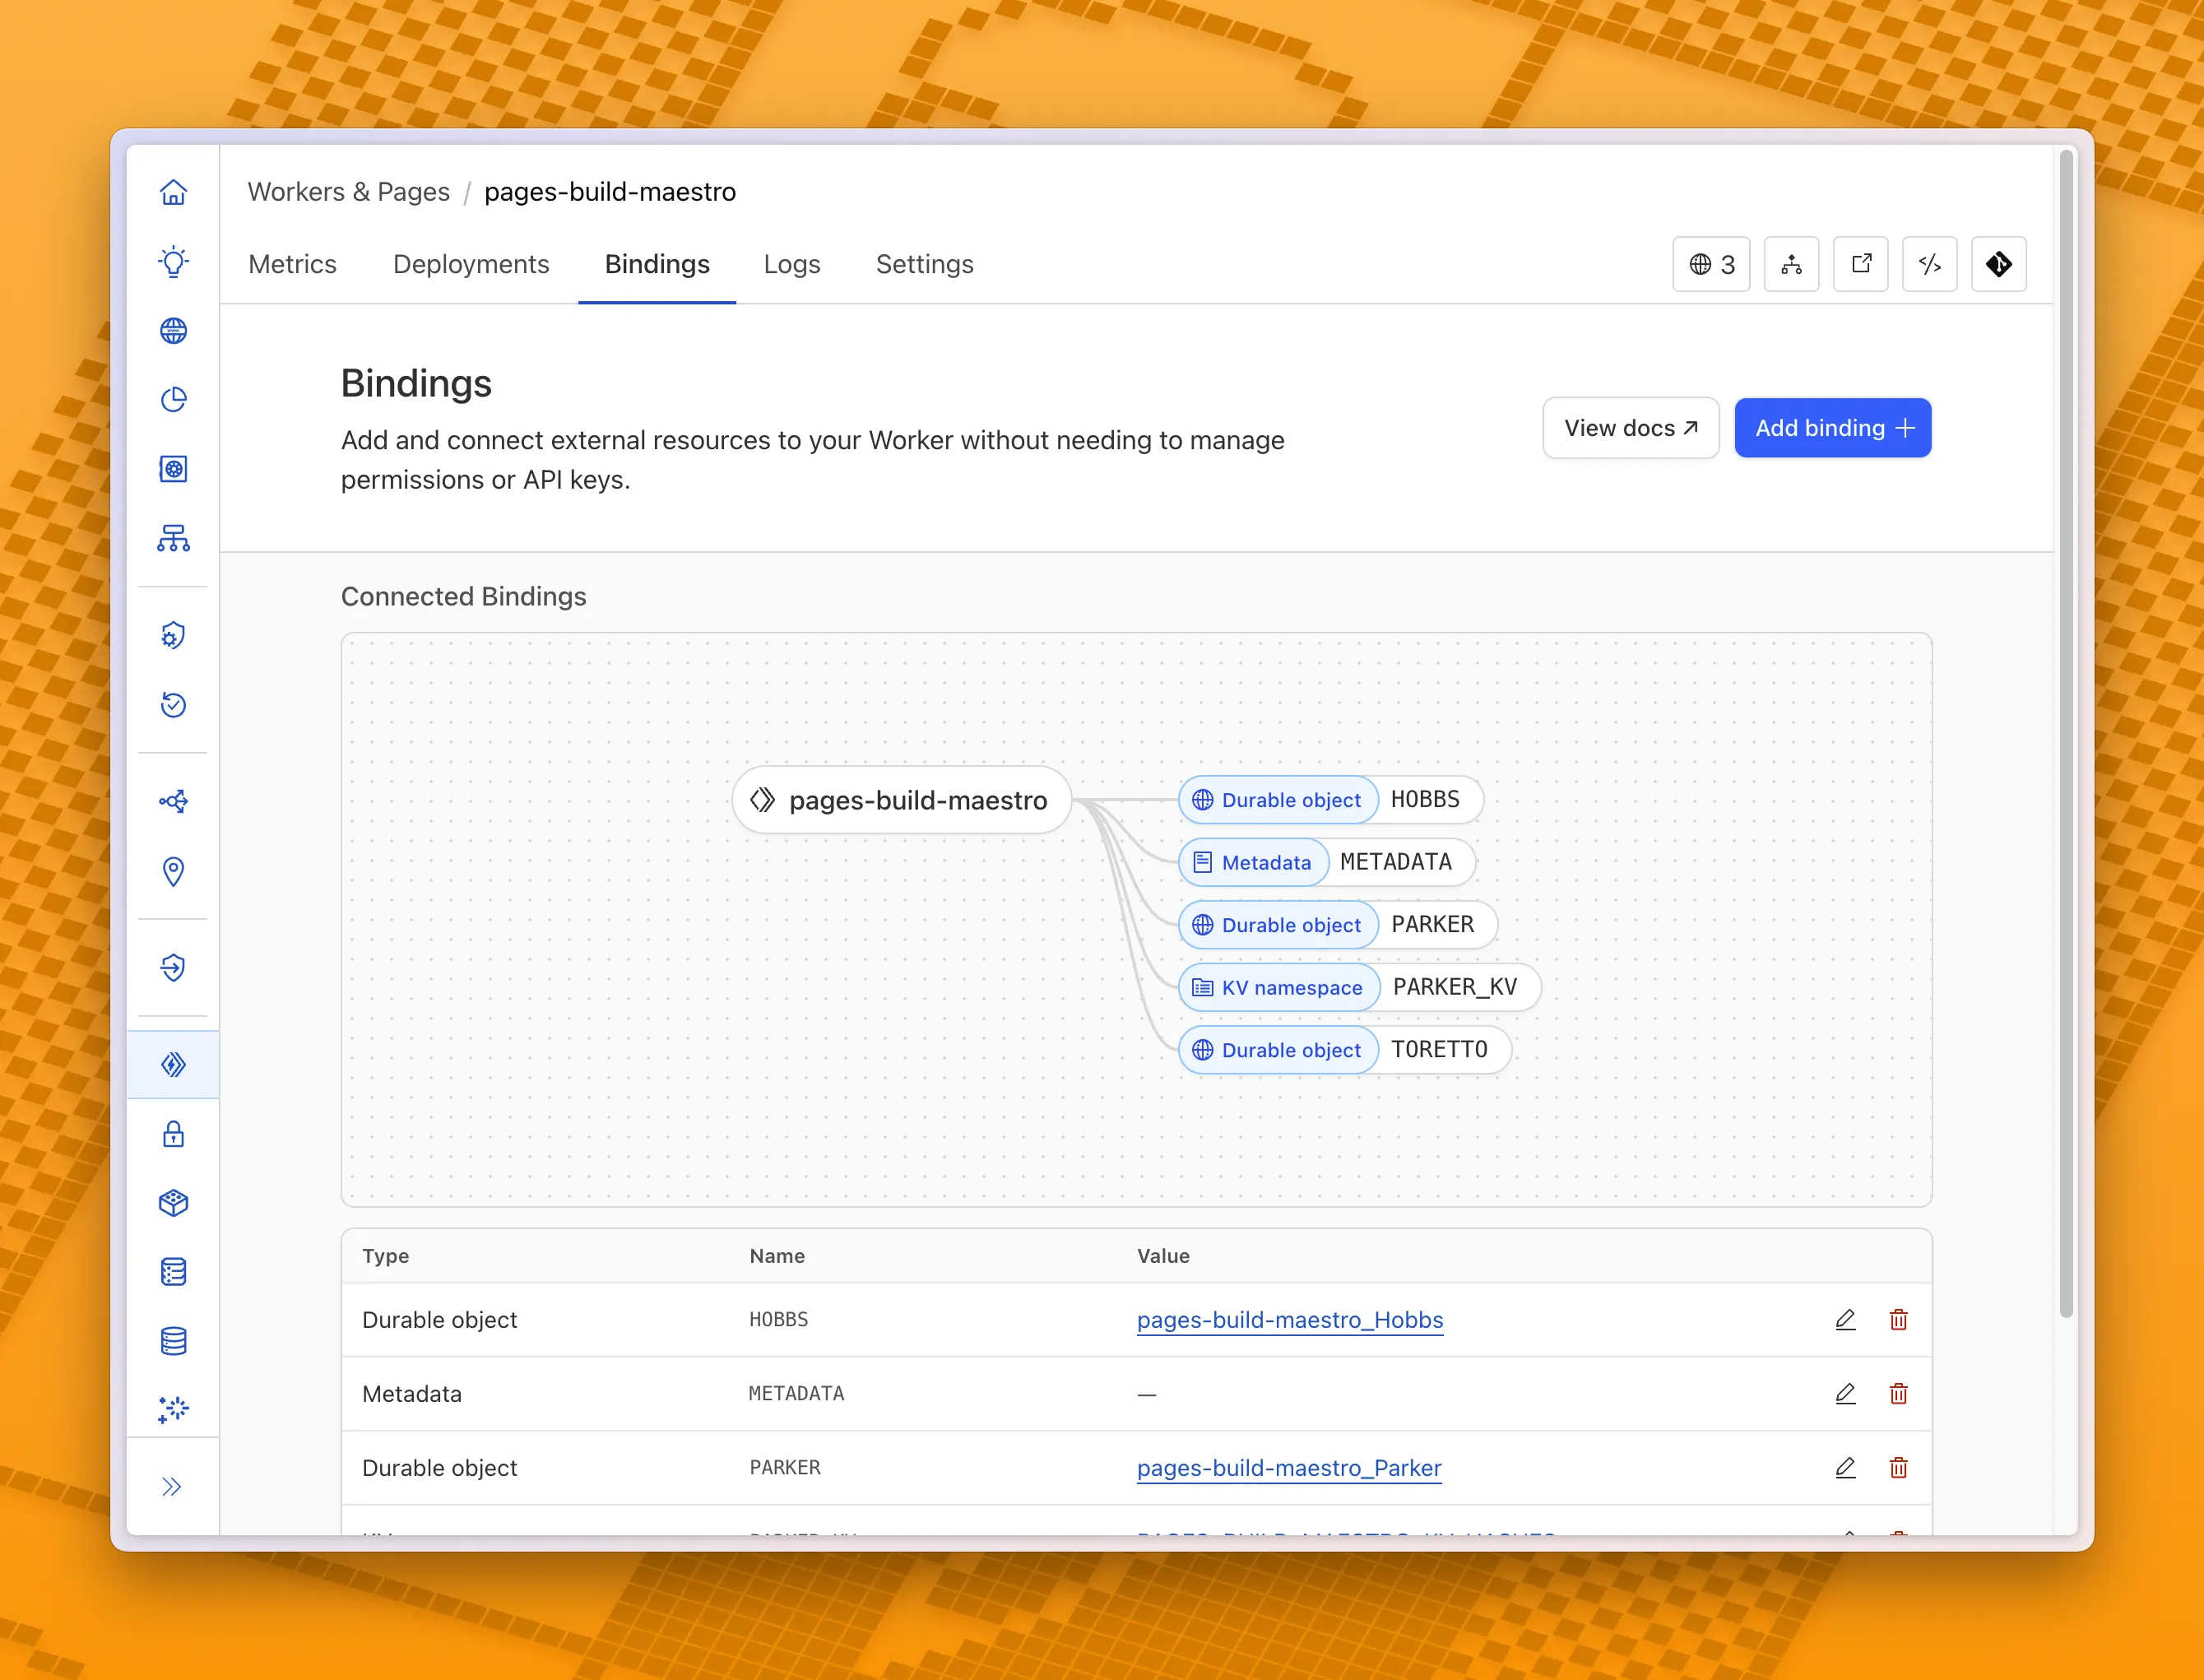
You can now visualize, explore and modify your Worker’s architecture directly in the Cloudflare dashboard, making it easier to understand how your application connects to Cloudflare resources like D1 databases, Durable Objects, KV namespaces, and more.

Bindings canvas

With this new view, you can easily:

  • Explore existing bindings in a visual, architecture-style diagram
  • Add and manage bindings directly from the same interface
  • Discover the full range of compute, storage, AI, and media resources you can attach to your Workers application.

To get started, head to the Cloudflare dashboard and open the Bindings tab of any Workers application.

Debug, profile, and view logs for your Worker in Chrome Devtools — now supported in the Cloudflare Vite plugin

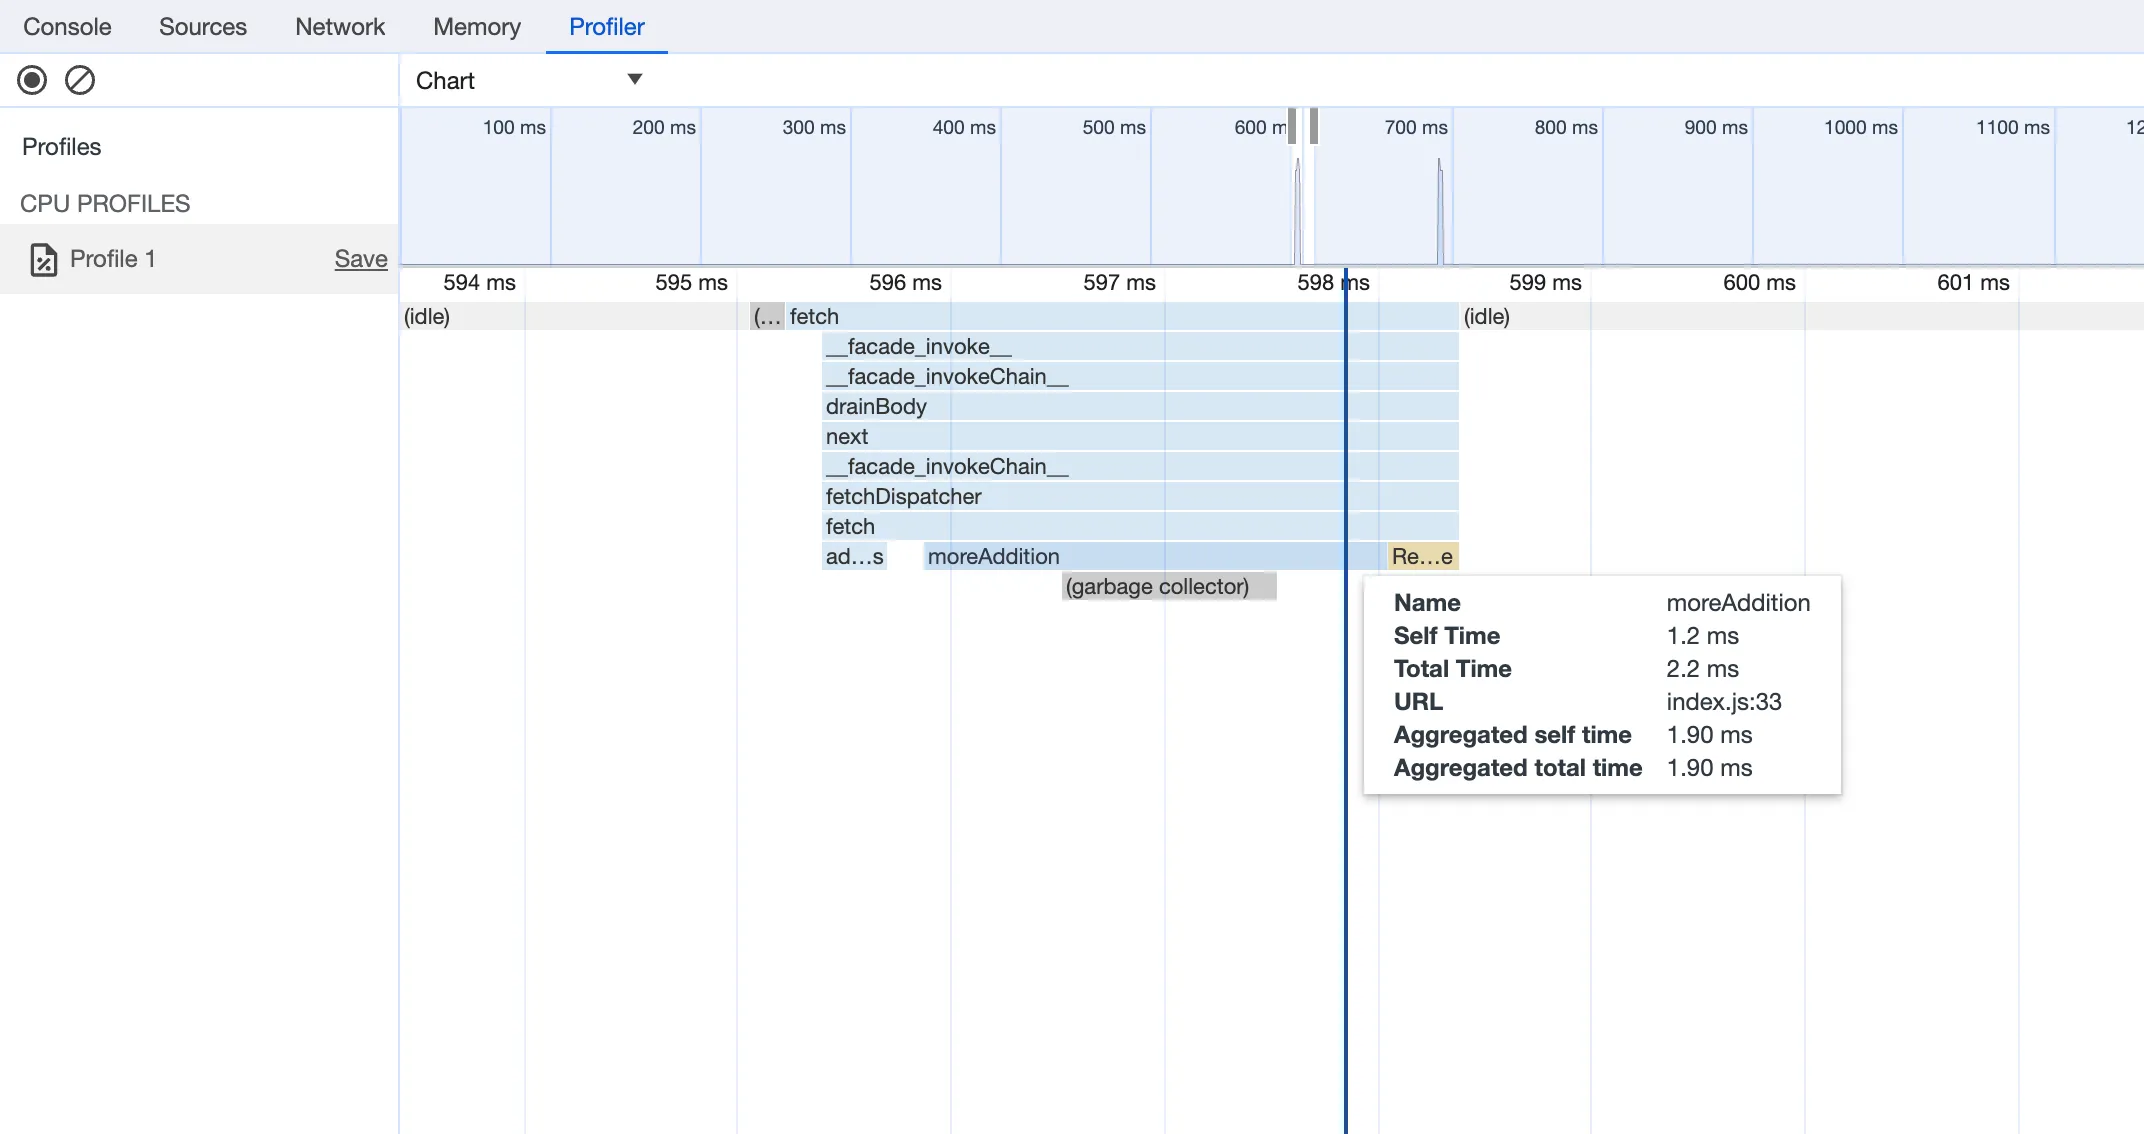
You can now debug, profile, view logs, and analyze memory usage for your Worker using Chrome Devtools when your Worker runs locally using the Cloudflare Vite plugin.

Previously, this was only possible if your Worker ran locally using the Wrangler CLI, and now you can do all the same things if your Worker uses Vite.

When you run vite, you'll now see a debug URL in your console:

  VITE v6.3.5  ready in 461 ms

  ➜  Local:   http://localhost:5173/
  ➜  Network: use --host to expose
  ➜  Debug:   http://localhost:5173/__debug
  ➜  press h + enter to show help

Open the URL in Chrome, and an instance of Chrome Devtools will open and connect to your Worker running locally. You can then use Chrome Devtools to debug and introspect performance issues. For example, you can navigate to the Performance tab to understand where CPU time is spent in your Worker:

CPU Profile

For more information on how to get the most out of Chrome Devtools, refer to the following docs:

50-500ms Faster D1 REST API Requests

Users using Cloudflare's REST API to query their D1 database can see lower end-to-end request latency now that D1 authentication is performed at the closest Cloudflare network data center that received the request. Previously, authentication required D1 REST API requests to proxy to Cloudflare's core, centralized data centers, which added network round trips and latency.

Latency improvements range from 50-500 ms depending on request location and database location and only apply to the REST API. REST API requests and databases outside the United States see a bigger benefit since Cloudflare's primary core data centers reside in the United States.

D1 query endpoints like /query and /raw have the most noticeable improvements since they no longer access Cloudflare's core data centers. D1 control plane endpoints such as those to create and delete databases see smaller improvements, since they still require access to Cloudflare's core data centers for other control plane metadata.

Handle incoming request cancellation in Workers with Request.signal

In Cloudflare Workers, you can now attach an event listener to Request objects, using the signal property. This allows you to perform tasks when the request to your Worker is canceled by the client. To use this feature, you must set the enable_request_signal compatibility flag.

You can use a listener to perform cleanup tasks or write to logs before your Worker's invocation ends. For example, if you run the Worker below, and then abort the request from the client, a log will be written:

index.jsjs
export default {
	async fetch(request, env, ctx) {
		// This sets up an event listener that will be called if the client disconnects from your
		// worker.
		request.signal.addEventListener("abort", () => {
			console.log("The request was aborted!");
		});

		const { readable, writable } = new IdentityTransformStream();
		sendPing(writable);
		return new Response(readable, {
			headers: { "Content-Type": "text/plain" },
		});
	},
};

async function sendPing(writable) {
	const writer = writable.getWriter();
	const enc = new TextEncoder();

	for (;;) {
		// Send 'ping' every second to keep the connection alive
		await writer.write(enc.encode("ping\r\n"));
		await scheduler.wait(1000);
	}
}
index.tsts
export default {
  async fetch(request, env, ctx): Promise<Response> {
    // This sets up an event listener that will be called if the client disconnects from your
    // worker.
    request.signal.addEventListener('abort', () => {
      console.log('The request was aborted!');
    });

    const { readable, writable } = new IdentityTransformStream();
    sendPing(writable);
    return new Response(readable, { headers: { 'Content-Type': 'text/plain' } });
  },
} satisfies ExportedHandler<Env>;

async function sendPing(writable: WritableStream): Promise<void> {
	const writer = writable.getWriter();
	const enc = new TextEncoder();

	for (;;) {
		// Send 'ping' every second to keep the connection alive
		await writer.write(enc.encode('ping\r\n'));
		await scheduler.wait(1000);
	}
}

For more information see the Request documentation.

Durable Objects are now supported in Python Workers

You can now create Durable Objects using Python Workers. A Durable Object is a special kind of Cloudflare Worker which uniquely combines compute with storage, enabling stateful long-running applications which run close to your users. For more info see here.

You can define a Durable Object in Python in a similar way to JavaScript:

from workers import DurableObject, Response, WorkerEntrypoint

from urllib.parse import urlparse

class MyDurableObject(DurableObject):
    def __init__(self, ctx, env):
        self.ctx = ctx
        self.env = env

    def fetch(self, request):
        result = self.ctx.storage.sql.exec("SELECT 'Hello, World!' as greeting").one()
        return Response(result.greeting)

class Default(WorkerEntrypoint):
    async def fetch(self, request):
        url = urlparse(request.url)
        id = env.MY_DURABLE_OBJECT.idFromName(url.path)
        stub = env.MY_DURABLE_OBJECT.get(id)
        greeting = await stub.fetch(request.url)
        return greeting

Define the Durable Object in your Wrangler configuration file:

{
	"durable_objects": {
		"bindings": [
			{
				"name": "MY_DURABLE_OBJECT",
				"class_name": "MyDurableObject"
			}
		]
	}
}
[[durable_objects.bindings]]
name = "MY_DURABLE_OBJECT"
class_name = "MyDurableObject"

Then define the storage backend for your Durable Object:

{
	"migrations": [
		{
			"tag": "v1", // Should be unique for each entry
			"new_sqlite_classes": [ // Array of new classes
				"MyDurableObject"
			]
		}
	]
}
[[migrations]]
tag = "v1"
new_sqlite_classes = [ "MyDurableObject" ]

Then test your new Durable Object locally by running wrangler dev:

npx wrangler dev

Consult the Durable Objects documentation for more details.

Improved memory efficiency for WebAssembly Workers

FinalizationRegistry is now available in Workers. You can opt-in using the enable_weak_ref compatibility flag.

This can reduce memory leaks when using WebAssembly-based Workers, which includes Python Workers and Rust Workers. The FinalizationRegistry works by enabling toolchains such as Emscripten and wasm-bindgen to automatically free WebAssembly heap allocations. If you are using WASM and seeing Exceeded Memory errors and cannot determine a cause using memory profiling, you may want to enable the FinalizationRegistry.

For more information refer to the enable_weak_ref compatibility flag documentation.

Cron triggers are now supported in Python Workers

You can now create Python Workers which are executed via a cron trigger.

This is similar to how it's done in JavaScript Workers, simply define a scheduled event listener in your Worker:

from workers import handler

@handler
async def on_scheduled(event, env, ctx):
  print("cron processed")

Define a cron trigger configuration in your Wrangler configuration file:

{
	"triggers": {
		// Schedule cron triggers:
		// - At every 3rd minute
		// - At 15:00 (UTC) on first day of the month
		// - At 23:59 (UTC) on the last weekday of the month
		"crons": [
			"*/3 * * * *",
			"0 15 1 * *",
			"59 23 LW * *"
		]
	}
}
[triggers]
crons = [ "*/3 * * * *", "0 15 1 * *", "59 23 LW * *" ]

Then test your new handler by using Wrangler with the --test-scheduled flag and making a request to /cdn-cgi/handler/scheduled?cron=*+*+*+*+*:

npx wrangler dev --test-scheduled

curl "http://localhost:8787/cdn-cgi/handler/scheduled?cron=*+*+*+*+*"

Consult the Workers Cron Triggers page for full details on cron triggers in Workers.

Fixed and documented Workers Routes and Secrets API

Workers Routes API

Previously, a request to the Workers Create Route API always returned null for "script" and an empty string for "pattern" even if the request was successful.

Example requestbash
curl https://api.cloudflare.com/client/v4/zones/$CF_ACCOUNT_ID/workers/routes \
-X PUT \
-H "Authorization: Bearer $CF_API_TOKEN" \
-H 'Content-Type: application/json' \
--data '{ "pattern": "example.com/*", "script": "hello-world-script" }'
Example bad responsejson
{
	"result": {
		"id": "bf153a27ba2b464bb9f04dcf75de1ef9",
		"pattern": "",
		"script": null,
		"request_limit_fail_open": false
	},
	"success": true,
	"errors": [],
	"messages": []
}

Now, it properly returns all values!

Example good responsejson
{
	"result": {
		"id": "bf153a27ba2b464bb9f04dcf75de1ef9",
		"pattern": "example.com/*",
		"script": "hello-world-script",
		"request_limit_fail_open": false
	},
	"success": true,
	"errors": [],
	"messages": []
}

Workers Secrets API

The Workers and Workers for Platforms secrets APIs are now properly documented in the Cloudflare OpenAPI docs. Previously, these endpoints were not publicly documented, leaving users confused on how to directly manage their secrets via the API. Now, you can find the proper endpoints in our public documentation, as well as in our API Library SDKs such as cloudflare-typescript (>4.2.0) and cloudflare-python (>4.1.0).

Note the cloudflare_workers_secret and cloudflare_workers_for_platforms_script_secret Terraform resources are being removed in a future release. This resource is not recommended for managing secrets. Users should instead use the:

D1 Read Replication Public Beta

D1 read replication is available in public beta to help lower average latency and increase overall throughput for read-heavy applications like e-commerce websites or content management tools.

Workers can leverage read-only database copies, called read replicas, by using D1 Sessions API. A session encapsulates all the queries from one logical session for your application. For example, a session may correspond to all queries coming from a particular web browser session. With Sessions API, D1 queries in a session are guaranteed to be sequentially consistent to avoid data consistency pitfalls. D1 bookmarks can be used from a previous session to ensure logical consistency between sessions.

// retrieve bookmark from previous session stored in HTTP header
const bookmark = request.headers.get("x-d1-bookmark") ?? "first-unconstrained";

const session = env.DB.withSession(bookmark);
const result = await session
	.prepare(`SELECT * FROM Customers WHERE CompanyName = 'Bs Beverages'`)
	.run();
// store bookmark for a future session
response.headers.set("x-d1-bookmark", session.getBookmark() ?? "");

Read replicas are automatically created by Cloudflare (currently one in each supported D1 region), are active/inactive based on query traffic, and are transparently routed to by Cloudflare at no additional cost.

To checkout D1 read replication, deploy the following Worker code using Sessions API, which will prompt you to create a D1 database and enable read replication on said database.

Deploy to Cloudflare

To learn more about how read replication was implemented, go to our blog post.

Cloudflare Pipelines now available in beta

Cloudflare Pipelines is now available in beta, to all users with a Workers Paid plan.

Pipelines let you ingest high volumes of real time data, without managing the underlying infrastructure. A single pipeline can ingest up to 100 MB of data per second, via HTTP or from a Worker. Ingested data is automatically batched, written to output files, and delivered to an R2 bucket in your account. You can use Pipelines to build a data lake of clickstream data, or to store events from a Worker.

Create your first pipeline with a single command:

Create a pipelinebash
$ npx wrangler@latest pipelines create my-clickstream-pipeline --r2-bucket my-bucket

🌀 Authorizing R2 bucket "my-bucket"
🌀 Creating pipeline named "my-clickstream-pipeline"
 Successfully created pipeline my-clickstream-pipeline

Id:    0e00c5ff09b34d018152af98d06f5a1xvc
Name:  my-clickstream-pipeline
Sources:
  HTTP:
    Endpoint:        https://0e00c5ff09b34d018152af98d06f5a1xvc.pipelines.cloudflare.com/
    Authentication:  off
    Format:          JSON
  Worker:
    Format:  JSON
Destination:
  Type:         R2
  Bucket:       my-bucket
  Format:       newline-delimited JSON
  Compression:  GZIP
Batch hints:
  Max bytes:     100 MB
  Max duration:  300 seconds
  Max records:   100,000

🎉 You can now send data to your pipeline!

Send data to your pipeline's HTTP endpoint:
curl "https://0e00c5ff09b34d018152af98d06f5a1xvc.pipelines.cloudflare.com/" -d '[{ ...JSON_DATA... }]'

To send data to your pipeline from a Worker, add the following configuration to your config file:
{
  "pipelines": [
    {
      "pipeline": "my-clickstream-pipeline",
      "binding": "PIPELINE"
    }
  ]
}

Head over to our getting started guide for an in-depth tutorial to building with Pipelines.

Investigate your Workers with the Query Builder in the new Observability dashboard

The Workers Observability dashboard offers a single place to investigate and explore your Workers Logs.

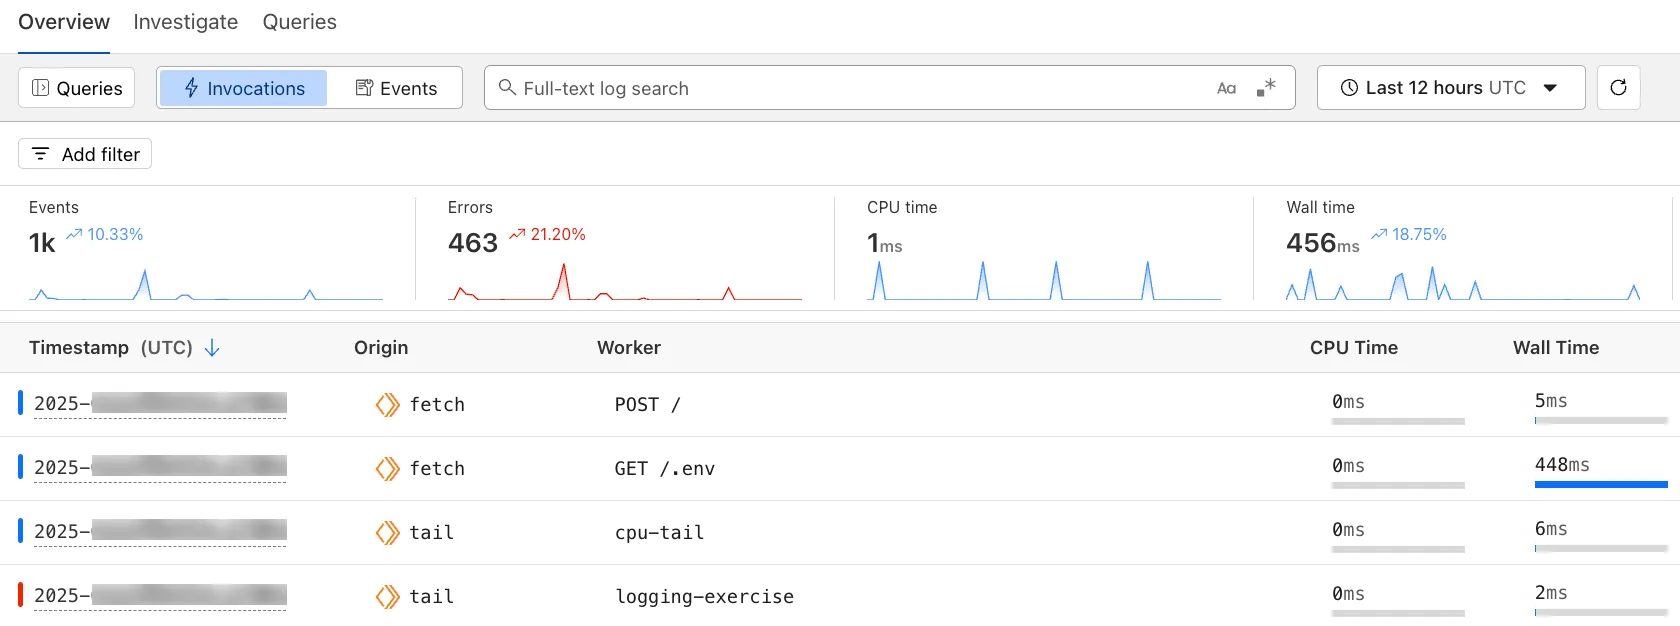
The Overview tab shows logs from all your Workers in one place. The Invocations view groups logs together by invocation, which refers to the specific trigger that started the execution of the Worker (i.e. fetch). The Events view shows logs in the order they were produced, based on timestamp. Previously, you could only view logs for a single Worker.

Workers Observability Overview Tab

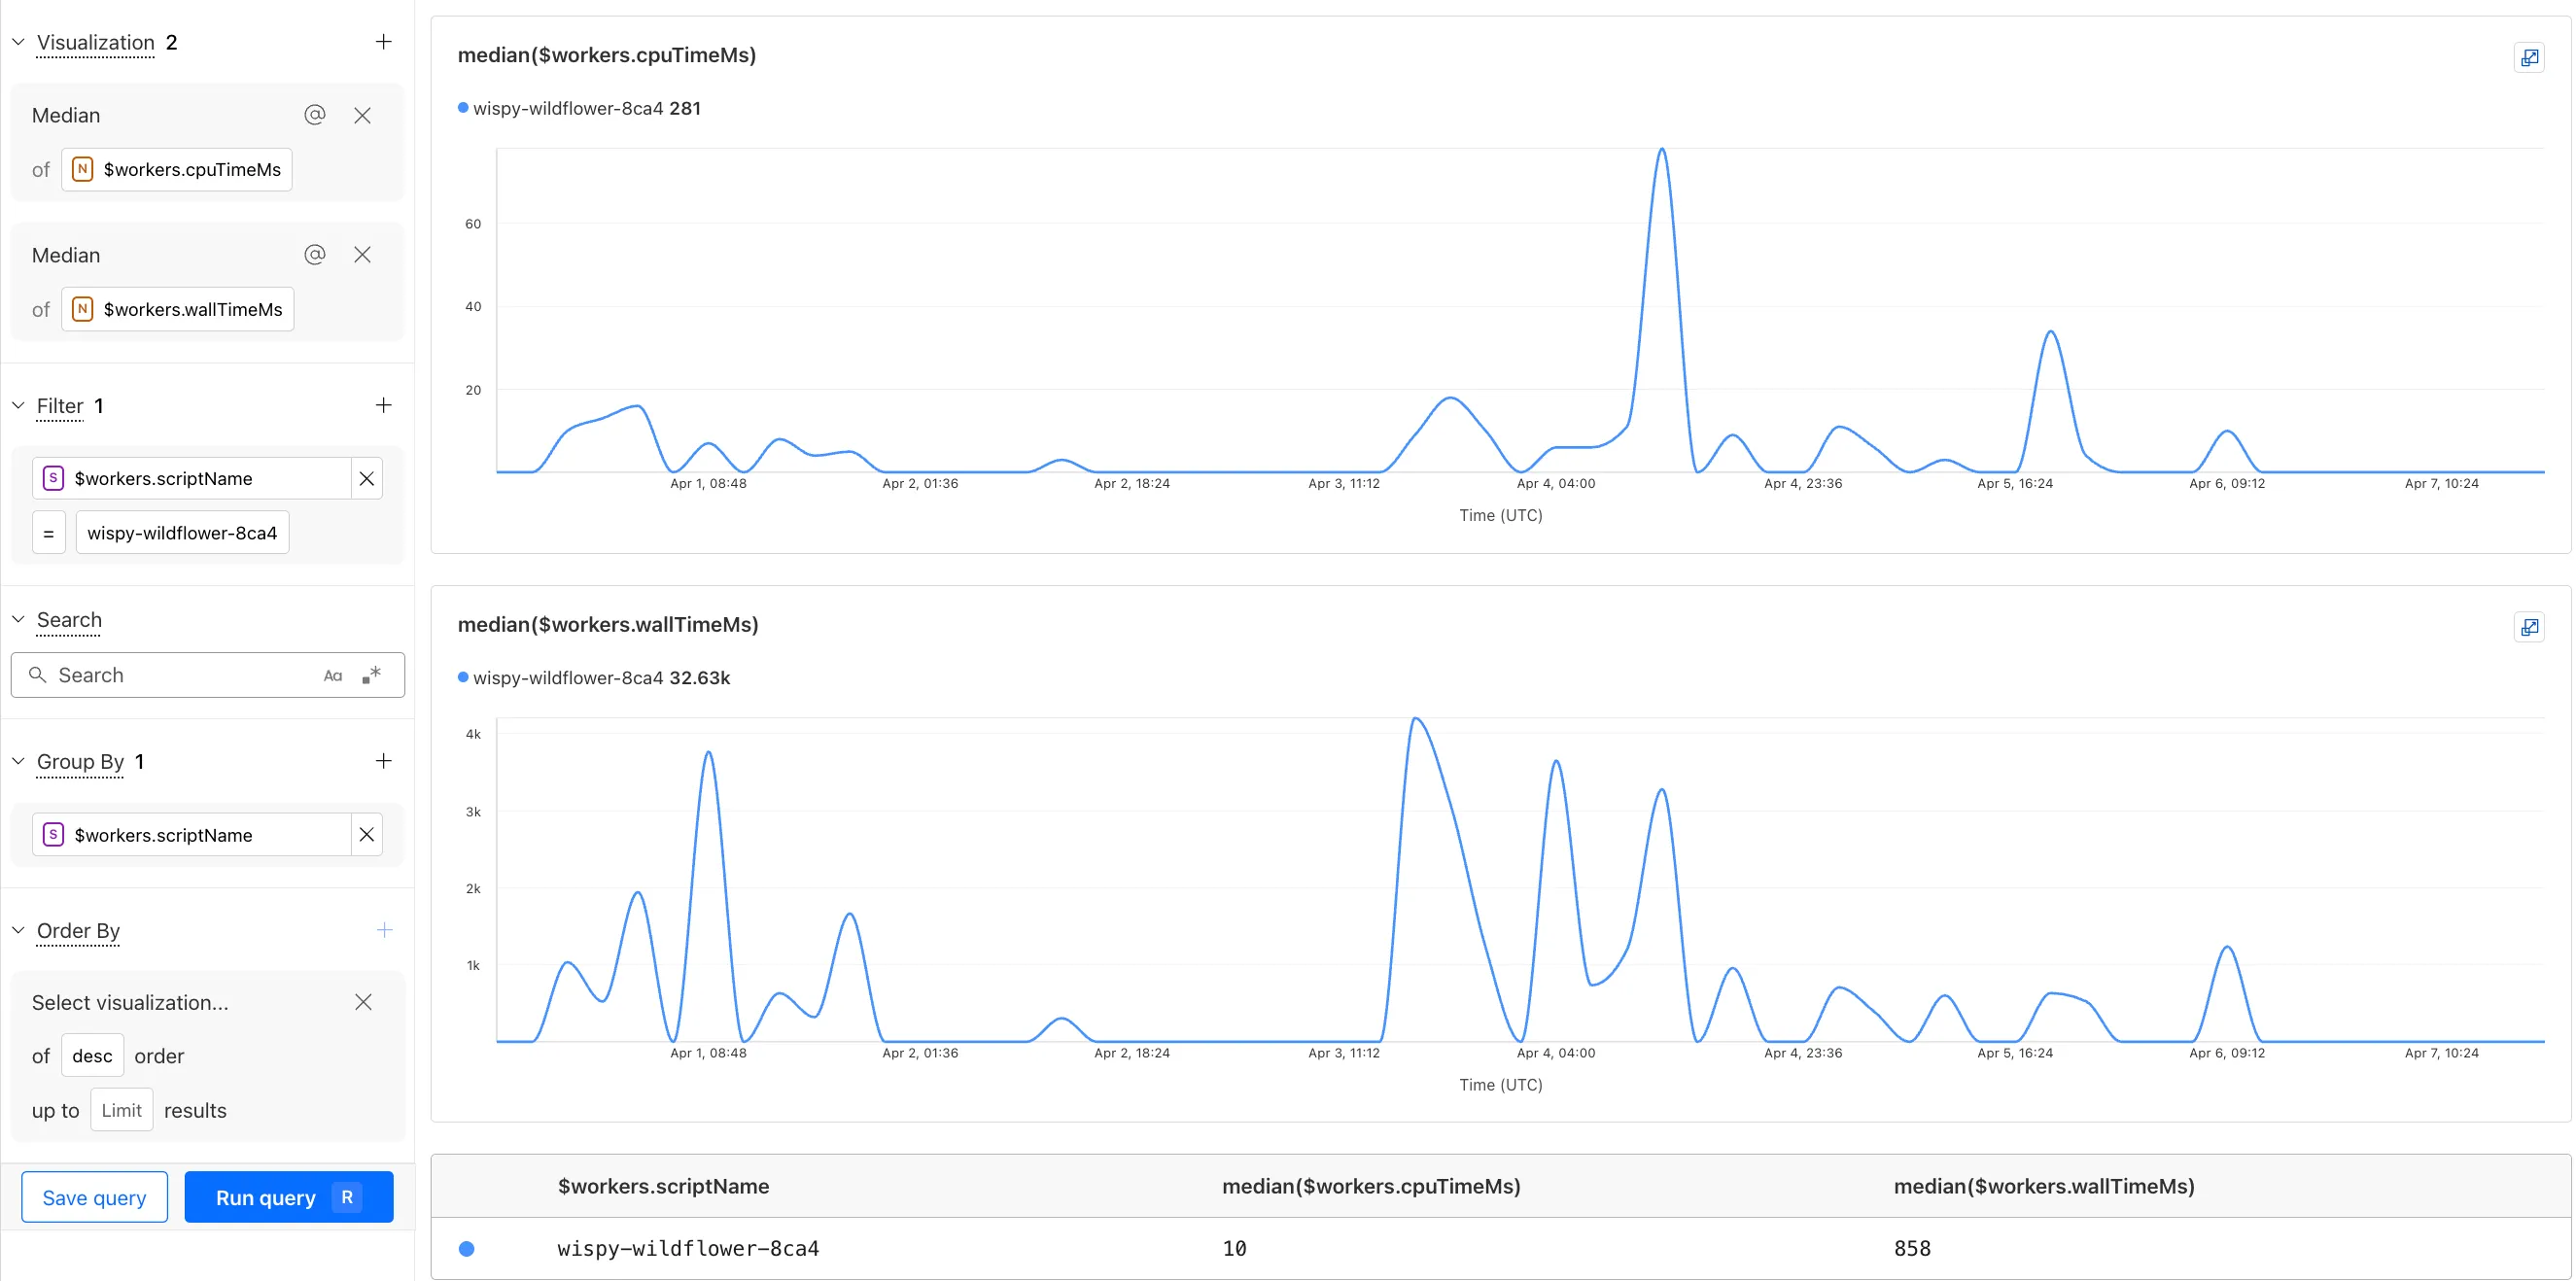
The Investigate tab presents a Query Builder, which helps you write structured queries to investigate and visualize your logs. The Query Builder can help answer questions such as:

  • Which paths are experiencing the most 5XX errors?
  • What is the wall time distribution by status code for my Worker?
  • What are the slowest requests, and where are they coming from?
  • Who are my top N users?
Workers Observability Overview Tab

The Query Builder can use any field that you store in your logs as a key to visualize, filter, and group by. Use the Query Builder to quickly access your data, build visualizations, save queries, and share them with your team.

Workers Logs is now Generally Available

Workers Logs is now Generally Available. With a small change to your Wrangler configuration, Workers Logs ingests, indexes, and stores all logs emitted from your Workers for up to 7 days.

We've introduced a number of changes during our beta period, including:

  • Dashboard enhancements with customizable fields as columns in the Logs view and support for invocation-based grouping
  • Performance improvements to ensure no adverse impact
  • Public API endpoints for broader consumption

The API documents three endpoints: list the keys in the telemetry dataset, run a query, and list the unique values for a key. For more, visit our REST API documentation.

Visit the docs to learn more about the capabilities and methods exposed by the Query Builder. Start using Workers Logs and the Query Builder today by enabling observability for your Workers:

{
	"observability": {
		"enabled": true,
		"logs": {
			"invocation_logs": true,
			"head_sampling_rate": 1 // optional. default = 1.
		}
	}
}
[observability]
enabled = true

  [observability.logs]
  invocation_logs = true
  head_sampling_rate = 1

CPU time and Wall time now published for Workers Invocations

You can now observe and investigate the CPU time and Wall time for every Workers Invocations.

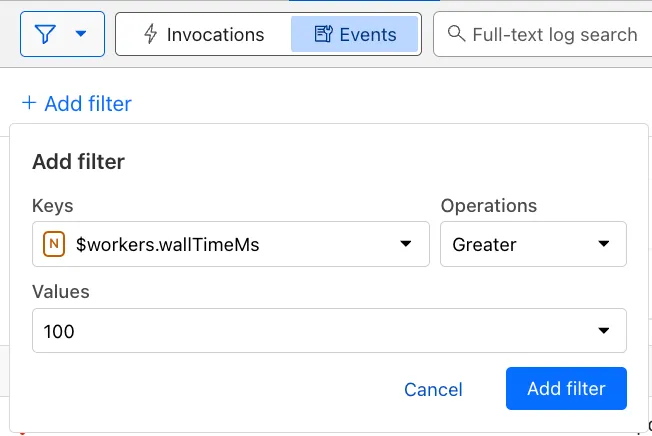
You can use a Workers Logs filter to search for logs where Wall time exceeds 100ms.

Workers Logs Wall Time Filter

You can also use the Workers Observability Query Builder to find the median CPU time and median Wall time for all of your Workers.

Query Builder filter