Pular para o conteúdo

Changelog

New updates and improvements at Cloudflare.

Markdown conversion in Workers AI

Document conversion plays an important role when designing and developing AI applications and agents. Workers AI now provides the toMarkdown utility method that developers can use to for quick, easy, and convenient conversion and summary of documents in multiple formats to Markdown language.

You can call this new tool using a binding by calling env.AI.toMarkdown() or the using the REST API endpoint.

In this example, we fetch a PDF document and an image from R2 and feed them both to env.AI.toMarkdown(). The result is a list of converted documents. Workers AI models are used automatically to detect and summarize the image.

import { Env } from "./env";

export default {
	async fetch(request: Request, env: Env, ctx: ExecutionContext) {
		// https://pub-979cb28270cc461d94bc8a169d8f389d.r2.dev/somatosensory.pdf
		const pdf = await env.R2.get("somatosensory.pdf");

		// https://pub-979cb28270cc461d94bc8a169d8f389d.r2.dev/cat.jpeg
		const cat = await env.R2.get("cat.jpeg");

		return Response.json(
			await env.AI.toMarkdown([
				{
					name: "somatosensory.pdf",
					blob: new Blob([await pdf.arrayBuffer()], {
						type: "application/octet-stream",
					}),
				},
				{
					name: "cat.jpeg",
					blob: new Blob([await cat.arrayBuffer()], {
						type: "application/octet-stream",
					}),
				},
			]),
		);
	},
};

This is the result:

[
	{
		"name": "somatosensory.pdf",
		"mimeType": "application/pdf",
		"format": "markdown",
		"tokens": 0,
		"data": "# somatosensory.pdf\n## Metadata\n- PDFFormatVersion=1.4\n- IsLinearized=false\n- IsAcroFormPresent=false\n- IsXFAPresent=false\n- IsCollectionPresent=false\n- IsSignaturesPresent=false\n- Producer=Prince 20150210 (www.princexml.com)\n- Title=Anatomy of the Somatosensory System\n\n## Contents\n### Page 1\nThis is a sample document to showcase..."
	},
	{
		"name": "cat.jpeg",
		"mimeType": "image/jpeg",
		"format": "markdown",
		"tokens": 0,
		"data": "The image is a close-up photograph of Grumpy Cat, a cat with a distinctive grumpy expression and piercing blue eyes. The cat has a brown face with a white stripe down its nose, and its ears are pointed upright. Its fur is light brown and darker around the face, with a pink nose and mouth. The cat's eyes are blue and slanted downward, giving it a perpetually grumpy appearance. The background is blurred, but it appears to be a dark brown color. Overall, the image is a humorous and iconic representation of the popular internet meme character, Grumpy Cat. The cat's facial expression and posture convey a sense of displeasure or annoyance, making it a relatable and entertaining image for many people."
	}
]

See Markdown Conversion for more information on supported formats, REST API and pricing.
npm i agents

npm i agents

agents-sdk -> agents Updated

📝 We've renamed the Agents package to agents!

If you've already been building with the Agents SDK, you can update your dependencies to use the new package name, and replace references to agents-sdk with agents:

# Install the new package
npm i agents
# Remove the old (deprecated) package
npm uninstall agents-sdk

# Find instances of the old package name in your codebase
grep -r 'agents-sdk' .
# Replace instances of the old package name with the new one
# (or use find-replace in your editor)
sed -i 's/agents-sdk/agents/g' $(grep -rl 'agents-sdk' .)

All future updates will be pushed to the new agents package, and the older package has been marked as deprecated.

Agents SDK updates New

We've added a number of big new features to the Agents SDK over the past few weeks, including:

  • You can now set cors: true when using routeAgentRequest to return permissive default CORS headers to Agent responses.
  • The regular client now syncs state on the agent (just like the React version).
  • useAgentChat bug fixes for passing headers/credentials, including properly clearing cache on unmount.
  • Experimental /schedule module with a prompt/schema for adding scheduling to your app (with evals!).
  • Changed the internal zod schema to be compatible with the limitations of Google's Gemini models by removing the discriminated union, allowing you to use Gemini models with the scheduling API.

We've also fixed a number of bugs with state synchronization and the React hooks.

// via https://github.com/cloudflare/agents/tree/main/examples/cross-domain
export default {
	async fetch(request, env) {
		return (
			// Set { cors: true } to enable CORS headers.
			(await routeAgentRequest(request, env, { cors: true })) ||
			new Response("Not found", { status: 404 })
		);
	},
};
// via https://github.com/cloudflare/agents/tree/main/examples/cross-domain
export default {
	async fetch(request: Request, env: Env) {
		return (
			// Set { cors: true } to enable CORS headers.
			(await routeAgentRequest(request, env, { cors: true })) ||
			new Response("Not found", { status: 404 })
		);
	},
} satisfies ExportedHandler<Env>;

Call Agent methods from your client code New

We've added a new @unstable_callable() decorator for defining methods that can be called directly from clients. This allows you call methods from within your client code: you can call methods (with arguments) and get native JavaScript objects back.

// server.ts
import { unstable_callable, Agent } from "agents";

export class Rpc extends Agent {
	// Use the decorator to define a callable method
	@unstable_callable({
		description: "rpc test",
	})
	async getHistory() {
		return this.sql`SELECT * FROM history ORDER BY created_at DESC LIMIT 10`;
	}
}
// server.ts
import { unstable_callable, Agent, type StreamingResponse } from "agents";
import type { Env } from "../server";

export class Rpc extends Agent<Env> {
	// Use the decorator to define a callable method
	@unstable_callable({
		description: "rpc test",
	})
	async getHistory() {
		return this.sql`SELECT * FROM history ORDER BY created_at DESC LIMIT 10`;
	}
}
// client.tsx
const { call } = useAgent({ agent: "rpc" });

const fetchUserHistory = async () => {
	try {
		setLoading(true);
		// Call methods directly on the Agent!
		const result = await call("getHistory");
		addToast(`RPC result: ${result}`, "success");
	} catch (error) {
		addToast(`Error: ${error}`, "error");
	} finally {
		setLoading(false);
	}
};

agents-starter Updated

We've fixed a number of small bugs in the agents-starter project — a real-time, chat-based example application with tool-calling & human-in-the-loop built using the Agents SDK. The starter has also been upgraded to use the latest wrangler v4 release.

If you're new to Agents, you can install and run the agents-starter project in two commands:

# Install it
$ npm create cloudflare@latest agents-starter -- --template="cloudflare/agents-starter"
# Run it
$ npm run start

You can use the starter as a template for your own Agents projects: open up src/server.ts and src/client.tsx to see how the Agents SDK is used.

More documentation Updated

We've heard your feedback on the Agents SDK documentation, and we're shipping more API reference material and usage examples, including:

  • Expanded API reference documentation, covering the methods and properties exposed by the Agents SDK, as well as more usage examples.
  • More Client API documentation that documents useAgent, useAgentChat and the new @unstable_callable RPC decorator exposed by the SDK.
  • New documentation on how to route requests to agents and (optionally) authenticate clients before they connect to your Agents.

Note that the Agents SDK is continually growing: the type definitions included in the SDK will always include the latest APIs exposed by the agents package.

If you're still wondering what Agents are, read our blog on building AI Agents on Cloudflare and/or visit the Agents documentation to learn more.

New models in Workers AI

Workers AI is excited to add 4 new models to the catalog, including 2 brand new classes of models with a text-to-speech and reranker model. Introducing:

  • @cf/baai/bge-m3 - a multi-lingual embeddings model that supports over 100 languages. It can also simultaneously perform dense retrieval, multi-vector retrieval, and sparse retrieval, with the ability to process inputs of different granularities.
  • @cf/baai/bge-reranker-base - our first reranker model! Rerankers are a type of text classification model that takes a query and context, and outputs a similarity score between the two. When used in RAG systems, you can use a reranker after the initial vector search to find the most relevant documents to return to a user by reranking the outputs.
  • @cf/openai/whisper-large-v3-turbo - a faster, more accurate speech-to-text model. This model was added earlier but is graduating out of beta with pricing included today.
  • @cf/myshell-ai/melotts - our first text-to-speech model that allows users to generate an MP3 with voice audio from inputted text.

Pricing is available for each of these models on the Workers AI pricing page.

This docs update includes a few minor bug fixes to the model schema for llama-guard, llama-3.2-1b, which you can review on the product changelog.

Try it out and let us know what you think! Stay tuned for more models in the coming days.

Import `env` to access bindings in your Worker's global scope

You can now access bindings from anywhere in your Worker by importing the env object from cloudflare:workers.

Previously, env could only be accessed during a request. This meant that bindings could not be used in the top-level context of a Worker.

Now, you can import env and access bindings such as secrets or environment variables in the initial setup for your Worker:

import { env } from "cloudflare:workers";
import ApiClient from "example-api-client";

// API_KEY and LOG_LEVEL now usable in top-level scope
const apiClient = ApiClient.new({ apiKey: env.API_KEY });
const LOG_LEVEL = env.LOG_LEVEL || "info";

export default {
	fetch(req) {
		// you can use apiClient or LOG_LEVEL, configured before any request is handled
	},
};

Additionally, env was normally accessed as a argument to a Worker's entrypoint handler, such as fetch. This meant that if you needed to access a binding from a deeply nested function, you had to pass env as an argument through many functions to get it to the right spot. This could be cumbersome in complex codebases.

Now, you can access the bindings from anywhere in your codebase without passing env as an argument:

// helpers.js
import { env } from "cloudflare:workers";

// env is *not* an argument to this function
export async function getValue(key) {
	let prefix = env.KV_PREFIX;
	return await env.KV.get(`${prefix}-${key}`);
}

For more information, see documentation on accessing env.

Retry Pages & Workers Builds Directly from GitHub

You can now retry your Cloudflare Pages and Workers builds directly from GitHub. No need to switch to the Cloudflare Dashboard for a simple retry!

Let\u2019s say you push a commit, but your build fails due to a spurious error like a network timeout. Instead of going to the Cloudflare Dashboard to manually retry, you can now rerun the build with just a few clicks inside GitHub, keeping you inside your workflow.

For Pages and Workers projects connected to a GitHub repository:

  1. When a build fails, go to your GitHub repository or pull request
  2. Select the failed Check Run for the build
  3. Select "Details" on the Check Run
  4. Select "Rerun" to trigger a retry build for that commit

Learn more about Pages Builds and Workers Builds.

Use the latest JavaScript features with Wrangler CLI v4

We've released the next major version of Wrangler, the CLI for Cloudflare Workers — wrangler@4.0.0. Wrangler v4 is a major release focused on updates to underlying systems and dependencies, along with improvements to keep Wrangler commands consistent and clear.

You can run the following command to install it in your projects:


									npm
									 i wrangler@latest


Unlike previous major versions of Wrangler, which were foundational rewrites and rearchitectures — Version 4 of Wrangler includes a much smaller set of changes. If you use Wrangler today, your workflow is very unlikely to change.

A detailed migration guide is available and if you find a bug or hit a roadblock when upgrading to Wrangler v4, open an issue on the cloudflare/workers-sdk repository on GitHub.

Going forward, we'll continue supporting Wrangler v3 with bug fixes and security updates until Q1 2026, and with critical security updates until Q1 2027, at which point it will be out of support.

Threaded replies now possible in Email Workers

We’re removing some of the restrictions in Email Routing so that AI Agents and task automation can better handle email workflows, including how Workers can reply to incoming emails.

It's now possible to keep a threaded email conversation with an Email Worker script as long as:

  • The incoming email has to have valid DMARC.
  • The email can only be replied to once in the same EmailMessage event.
  • The recipient in the reply must match the incoming sender.
  • The outgoing sender domain must match the same domain that received the email.
  • Every time an email passes through Email Routing or another MTA, an entry is added to the References list. We stop accepting replies to emails with more than 100 References entries to prevent abuse or accidental loops.

Here's an example of a Worker responding to Emails using a Workers AI model:

AI model responding to emailsts
import PostalMime from "postal-mime";
import { createMimeMessage } from "mimetext";
import { EmailMessage } from "cloudflare:email";

export default {
	async email(message, env, ctx) {
		const email = await PostalMime.parse(message.raw);
		const res = await env.AI.run("@cf/meta/llama-2-7b-chat-fp16", {
			messages: [
				{
					role: "user",
					content: email.text ?? "",
				},
			],
		});

		// message-id is generated by mimetext
		const response = createMimeMessage();
		response.setHeader("In-Reply-To", message.headers.get("Message-ID")!);
		response.setSender("agent@example.com");
		response.setRecipient(message.from);
		response.setSubject("Llama response");
		response.addMessage({
			contentType: "text/plain",
			data:
				res instanceof ReadableStream
					? await new Response(res).text()
					: res.response!,
		});

		const replyMessage = new EmailMessage(
			"<email>",
			message.from,
			response.asRaw(),
		);
		await message.reply(replyMessage);
	},
} satisfies ExportedHandler<Env>;

See Reply to emails from Workers for more information.

Access your Worker's environment variables from process.env

You can now access environment variables and secrets on process.env when using the nodejs_compat compatibility flag.

const apiClient = ApiClient.new({ apiKey: process.env.API_KEY });
const LOG_LEVEL = process.env.LOG_LEVEL || "info";

In Node.js, environment variables are exposed via the global process.env object. Some libraries assume that this object will be populated, and many developers may be used to accessing variables in this way.

Previously, the process.env object was always empty unless written to in Worker code. This could cause unexpected errors or friction when developing Workers using code previously written for Node.js.

Now, environment variables, secrets, and version metadata can all be accessed on process.env.

To opt-in to the new process.env behaviour now, add the nodejs_compat_populate_process_env compatibility flag to your wrangler.json configuration:

{
	// Rest of your configuration
	// Add "nodejs_compat_populate_process_env" to your compatibility_flags array
	"compatibility_flags": ["nodejs_compat", "nodejs_compat_populate_process_env"],
	// Rest of your configuration
compatibility_flags = [ "nodejs_compat", "nodejs_compat_populate_process_env" ]

After April 1, 2025, populating process.env will become the default behavior when both nodejs_compat is enabled and your Worker's compatibility_date is after "2025-04-01".

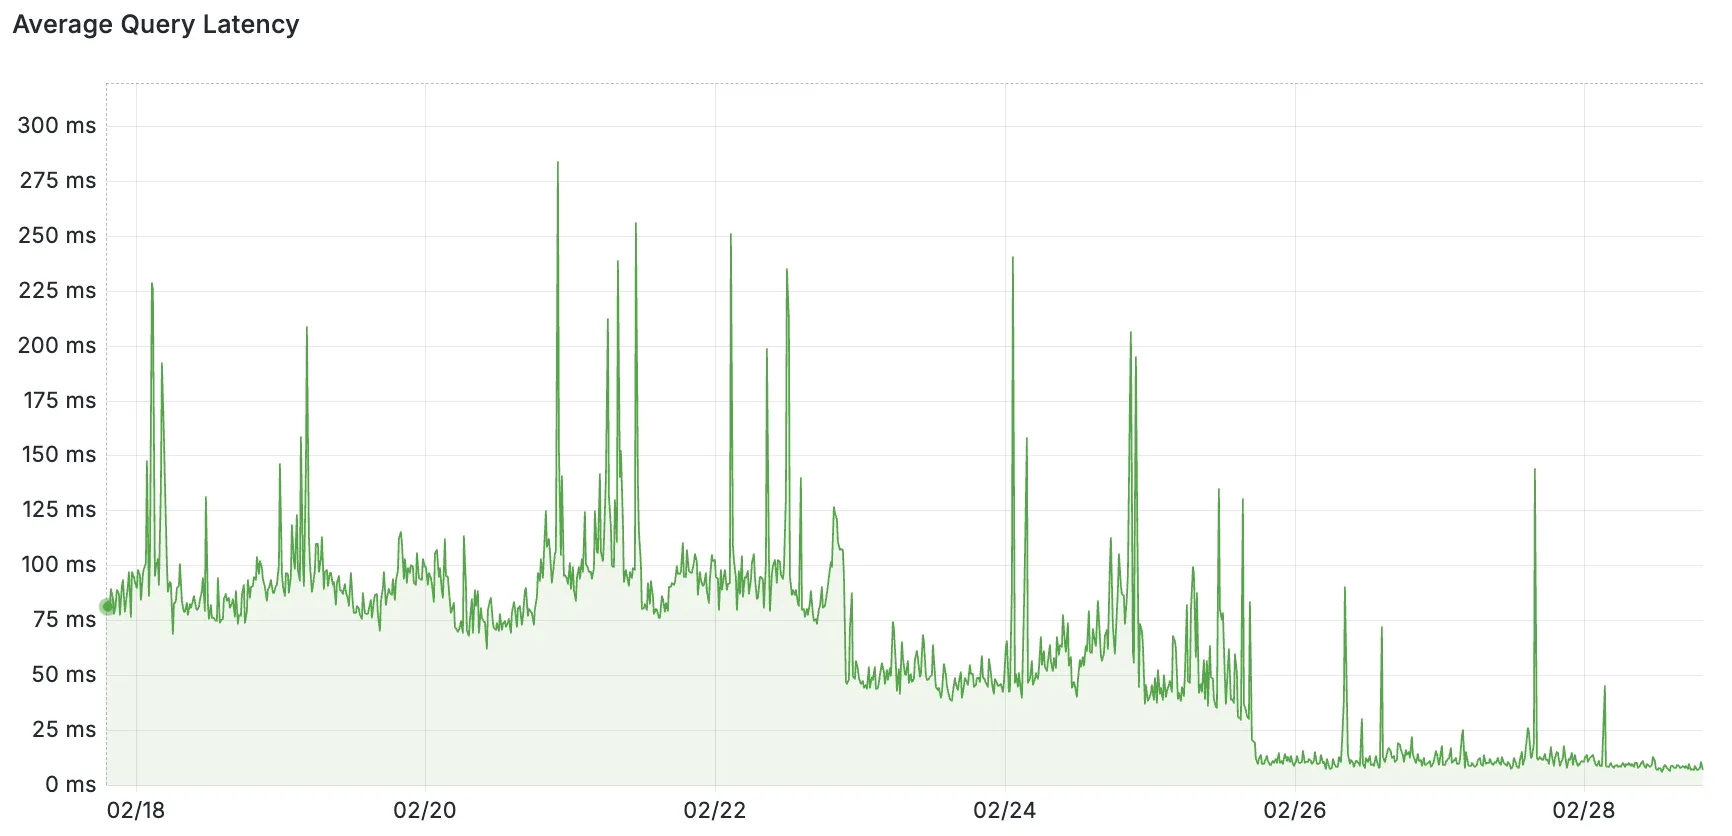
Hyperdrive reduces query latency by up to 90% and now supports IP access control lists

Hyperdrive now pools database connections in one or more regions close to your database. This means that your uncached queries and new database connections have up to 90% less latency as measured from connection pools.

Hyperdrive query latency decreases by 90% during Hyperdrive's gradual rollout of regional pooling.

By improving placement of Hyperdrive database connection pools, Workers' Smart Placement is now more effective when used with Hyperdrive, ensuring that your Worker can be placed as close to your database as possible.

With this update, Hyperdrive also uses Cloudflare's standard IP address ranges to connect to your database. This enables you to configure the firewall policies (IP access control lists) of your database to only allow access from Cloudflare and Hyperdrive.

Refer to documentation on how Hyperdrive makes connecting to regional databases from Cloudflare Workers fast.

This improvement is enabled on all Hyperdrive configurations.

Set retention polices for your R2 bucket with bucket locks

You can now use bucket locks to set retention policies on your R2 buckets (or specific prefixes within your buckets) for a specified period — or indefinitely. This can help ensure compliance by protecting important data from accidental or malicious deletion.

Locks give you a few ways to ensure your objects are retained (not deleted or overwritten). You can:

  • Lock objects for a specific duration, for example 90 days.
  • Lock objects until a certain date, for example January 1, 2030.
  • Lock objects indefinitely, until the lock is explicitly removed.

Buckets can have up to 1,000 bucket lock rules. Each rule specifies which objects it covers (via prefix) and how long those objects must remain retained.

Here are a couple of examples showing how you can configure bucket lock rules using Wrangler:

Ensure all objects in a bucket are retained for at least 180 days

npx wrangler r2 bucket lock add <bucket> --name 180-days-all --retention-days 180

Prevent deletion or overwriting of all logs indefinitely (via prefix)

npx wrangler r2 bucket lock add <bucket> --name indefinite-logs --prefix logs/ --retention-indefinite

For more information on bucket locks and how to set retention policies for objects in your R2 buckets, refer to our documentation.

Introducing Media Transformations from Cloudflare Stream

Today, we are thrilled to announce Media Transformations, a new service that brings the magic of Image Transformations to short-form video files, wherever they are stored!

For customers with a huge volume of short video — generative AI output, e-commerce product videos, social media clips, or short marketing content — uploading those assets to Stream is not always practical. Sometimes, the greatest friction to getting started was the thought of all that migrating. Customers want a simpler solution that retains their current storage strategy to deliver small, optimized MP4 files. Now you can do that with Media Transformations.

To transform a video or image, enable transformations for your zone, then make a simple request with a specially formatted URL. The result is an MP4 that can be used in an HTML video element without a player library. If your zone already has Image Transformations enabled, then it is ready to optimize videos with Media Transformations, too.

URL formattext
https://example.com/cdn-cgi/media/<OPTIONS>/<SOURCE-VIDEO>

For example, we have a short video of the mobile in Austin's office. The original is nearly 30 megabytes and wider than necessary for this layout. Consider a simple width adjustment:

Example URLtext
https://example.com/cdn-cgi/media/width=640/<SOURCE-VIDEO>
https://developers.cloudflare.com/cdn-cgi/media/width=640/https://pub-d9fcbc1abcd244c1821f38b99017347f.r2.dev/aus-mobile.mp4

The result is less than 3 megabytes, properly sized, and delivered dynamically so that customers do not have to manage the creation and storage of these transformed assets.

For more information, learn about Transforming Videos.

Use the latest JavaScript features with Wrangler CLI v4.0.0-rc.0

We've released a release candidate of the next major version of Wrangler, the CLI for Cloudflare Workers — wrangler@4.0.0-rc.0.

You can run the following command to install it and be one of the first to try it out:


									npm
									 i wrangler@v4-rc


Unlike previous major versions of Wrangler, which were foundational rewrites and rearchitectures — Version 4 of Wrangler includes a much smaller set of changes. If you use Wrangler today, your workflow is very unlikely to change. Before we release Wrangler v4 and advance past the release candidate stage, we'll share a detailed migration guide in the Workers developer docs. But for the vast majority of cases, you won't need to do anything to migrate — things will just work as they do today. We are sharing this release candidate in advance of the official release of v4, so that you can try it out early and share feedback.

New JavaScript language features that you can now use with Wrangler v4

Version 4 of Wrangler updates the version of esbuild that Wrangler uses internally, allowing you to use modern JavaScript language features, including:

The using keyword from Explicit Resource Management

The using keyword from the Explicit Resource Management standard makes it easier to work with the JavaScript-native RPC system built into Workers. This means that when you obtain a stub, you can ensure that it is automatically disposed when you exit scope it was created in:

function sendEmail(id, message) {
  using user = await env.USER_SERVICE.findUser(id);
  await user.sendEmail(message);

  // user[Symbol.dispose]() is implicitly called at the end of the scope.
}
Import attributes

Import attributes allow you to denote the type or other attributes of the module that your code imports. For example, you can import a JSON module, using the following syntax:

import data from "./data.json" with { type: "json" };

Other changes

--local is now the default for all CLI commands

All commands that access resources (for example, wrangler kv, wrangler r2, wrangler d1) now access local datastores by default, ensuring consistent behavior.

Clearer policy for the minimum required version of Node.js required to run Wrangler

Moving forward, the active, maintenance, and current versions of Node.js will be officially supported by Wrangler. This means the minimum officially supported version of Node.js you must have installed for Wrangler v4 will be Node.js v18 or later. This policy mirrors how many other packages and CLIs support older versions of Node.js, and ensures that as long as you are using a version of Node.js that the Node.js project itself supports, this will be supported by Wrangler as well.

Features previously deprecated in Wrangler v3 are now removed in Wrangler v4

All previously deprecated features in Wrangler v2 and in Wrangler v3 have now been removed. Additionally, the following features that were deprecated during the Wrangler v3 release have been removed:

  • Legacy Assets (using wrangler dev/deploy --legacy-assets or the legacy_assets config file property). Instead, we recommend you migrate to Workers assets.
  • Legacy Node.js compatibility (using wrangler dev/deploy --node-compat or the node_compat config file property). Instead, use the nodejs_compat compatibility flag. This includes the functionality from legacy node_compat polyfills and natively implemented Node.js APIs.
  • wrangler version. Instead, use wrangler --version to check the current version of Wrangler.
  • getBindingsProxy() (via import { getBindingsProxy } from "wrangler"). Instead, use the getPlatformProxy() API, which takes exactly the same arguments.
  • usage_model. This no longer has any effect, after the rollout of Workers Standard Pricing.

We'd love your feedback! If you find a bug or hit a roadblock when upgrading to Wrangler v4, open an issue on the cloudflare/workers-sdk repository on GitHub.

New REST API is in open beta!

We've released a new REST API for Browser Rendering in open beta, making interacting with browsers easier than ever. This new API provides endpoints for common browser actions, with more to be added in the future.

With the REST API you can:

  • Capture screenshots – Use /screenshot to take a screenshot of a webpage from provided URL or HTML.
  • Generate PDFs – Use /pdf to convert web pages into PDFs.
  • Extract HTML content – Use /content to retrieve the full HTML from a page. Snapshot (HTML + Screenshot) – Use /snapshot to capture both the page's HTML and a screenshot in one request
  • Scrape Web Elements – Use /scrape to extract specific elements from a page.

For example, to capture a screenshot:

Screenshot examplebash
curl -X POST 'https://api.cloudflare.com/client/v4/accounts/<accountId>/browser-rendering/screenshot' \
  -H 'Authorization: Bearer <apiToken>' \
  -H 'Content-Type: application/json' \
  -d '{
    "html": "Hello World!",
    "screenshotOptions": {
      "type": "webp",
      "omitBackground": true
    }
  }' \
  --output "screenshot.webp"

Learn more in our documentation.

Introducing Guardrails in AI Gateway

AI Gateway now includes Guardrails, to help you monitor your AI apps for harmful or inappropriate content and deploy safely.

Within the AI Gateway settings, you can configure:

  • Guardrails: Enable or disable content moderation as needed.
  • Evaluation scope: Select whether to moderate user prompts, model responses, or both.
  • Hazard categories: Specify which categories to monitor and determine whether detected inappropriate content should be blocked or flagged.
Guardrails in AI Gateway

Learn more in the blog or our documentation.

Introducing the Agents SDK

We've released the Agents SDK, a package and set of tools that help you build and ship AI Agents.

You can get up and running with a chat-based AI Agent (and deploy it to Workers) that uses the Agents SDK, tool calling, and state syncing with a React-based front-end by running the following command:

npm create cloudflare@latest agents-starter -- --template="cloudflare/agents-starter"
# open up README.md and follow the instructions

You can also add an Agent to any existing Workers application by installing the agents package directly

npm i agents

... and then define your first Agent:

import { Agent } from "agents";

export class YourAgent extends Agent<Env> {
	// Build it out
	// Access state on this.state or query the Agent's database via this.sql
	// Handle WebSocket events with onConnect and onMessage
	// Run tasks on a schedule with this.schedule
	// Call AI models
	// ... and/or call other Agents.
}

Head over to the Agents documentation to learn more about the Agents SDK, the SDK APIs, as well as how to test and deploying agents to production.

Workers AI now supports structured JSON outputs.

Workers AI now supports structured JSON outputs with JSON mode, which allows you to request a structured output response when interacting with AI models.

This makes it much easier to retrieve structured data from your AI models, and avoids the (error prone!) need to parse large unstructured text responses to extract your data.

JSON mode in Workers AI is compatible with the OpenAI SDK's structured outputs response_format API, which can be used directly in a Worker:

import { OpenAI } from "openai";

// Define your JSON schema for a calendar event
const CalendarEventSchema = {
	type: "object",
	properties: {
		name: { type: "string" },
		date: { type: "string" },
		participants: { type: "array", items: { type: "string" } },
	},
	required: ["name", "date", "participants"],
};

export default {
	async fetch(request, env) {
		const client = new OpenAI({
			apiKey: env.OPENAI_API_KEY,
			// Optional: use AI Gateway to bring logs, evals & caching to your AI requests
			// https://developers.cloudflare.com/ai-gateway/usage/providers/openai/
			// baseUrl: "https://gateway.ai.cloudflare.com/v1/{account_id}/{gateway_id}/openai"
		});

		const response = await client.chat.completions.create({
			model: "gpt-4o-2024-08-06",
			messages: [
				{ role: "system", content: "Extract the event information." },
				{
					role: "user",
					content: "Alice and Bob are going to a science fair on Friday.",
				},
			],
			// Use the `response_format` option to request a structured JSON output
			response_format: {
				// Set json_schema and provide ra schema, or json_object and parse it yourself
				type: "json_schema",
				schema: CalendarEventSchema, // provide a schema
			},
		});

		// This will be of type CalendarEventSchema
		const event = response.choices[0].message.parsed;

		return Response.json({
			calendar_event: event,
		});
	},
};
import { OpenAI } from "openai";

interface Env {
	OPENAI_API_KEY: string;
}

// Define your JSON schema for a calendar event
const CalendarEventSchema = {
	type: "object",
	properties: {
		name: { type: "string" },
		date: { type: "string" },
		participants: { type: "array", items: { type: "string" } },
	},
	required: ["name", "date", "participants"],
};

export default {
	async fetch(request: Request, env: Env) {
		const client = new OpenAI({
			apiKey: env.OPENAI_API_KEY,
			// Optional: use AI Gateway to bring logs, evals & caching to your AI requests
			// https://developers.cloudflare.com/ai-gateway/usage/providers/openai/
			// baseUrl: "https://gateway.ai.cloudflare.com/v1/{account_id}/{gateway_id}/openai"
		});

		const response = await client.chat.completions.create({
			model: "gpt-4o-2024-08-06",
			messages: [
				{ role: "system", content: "Extract the event information." },
				{
					role: "user",
					content: "Alice and Bob are going to a science fair on Friday.",
				},
			],
			// Use the `response_format` option to request a structured JSON output
			response_format: {
				// Set json_schema and provide ra schema, or json_object and parse it yourself
				type: "json_schema",
				schema: CalendarEventSchema, // provide a schema
			},
		});

		// This will be of type CalendarEventSchema
		const event = response.choices[0].message.parsed;

		return Response.json({
			calendar_event: event,
		});
	},
};

To learn more about JSON mode and structured outputs, visit the Workers AI documentation.

Bind the Images API to your Worker

You can now interact with the Images API directly in your Worker.

This allows more fine-grained control over transformation request flows and cache behavior. For example, you can resize, manipulate, and overlay images without requiring them to be accessible through a URL.

The Images binding can be configured in the Cloudflare dashboard for your Worker or in the Wrangler configuration file in your project's directory:

{
	"images": {
		"binding": "IMAGES", // i.e. available in your Worker on env.IMAGES
	},
}
[images]
binding = "IMAGES"

Within your Worker code, you can interact with this binding by using env.IMAGES.

Here's how you can rotate, resize, and blur an image, then output the image as AVIF:

const info = await env.IMAGES.info(stream);
// stream contains a valid image, and width/height is available on the info object

const response = (
	await env.IMAGES.input(stream)
		.transform({ rotate: 90 })
		.transform({ width: 128 })
		.transform({ blur: 20 })
		.output({ format: "image/avif" })
).response();

return response;

For more information, refer to Images Bindings.

Workers AI larger context windows

We've updated the Workers AI text generation models to include context windows and limits definitions and changed our APIs to estimate and validate the number of tokens in the input prompt, not the number of characters.

This update allows developers to use larger context windows when interacting with Workers AI models, which can lead to better and more accurate results.

Our catalog page provides more information about each model's supported context window.

Zaraz moves to the “Tag Management” category in the Cloudflare dashboard

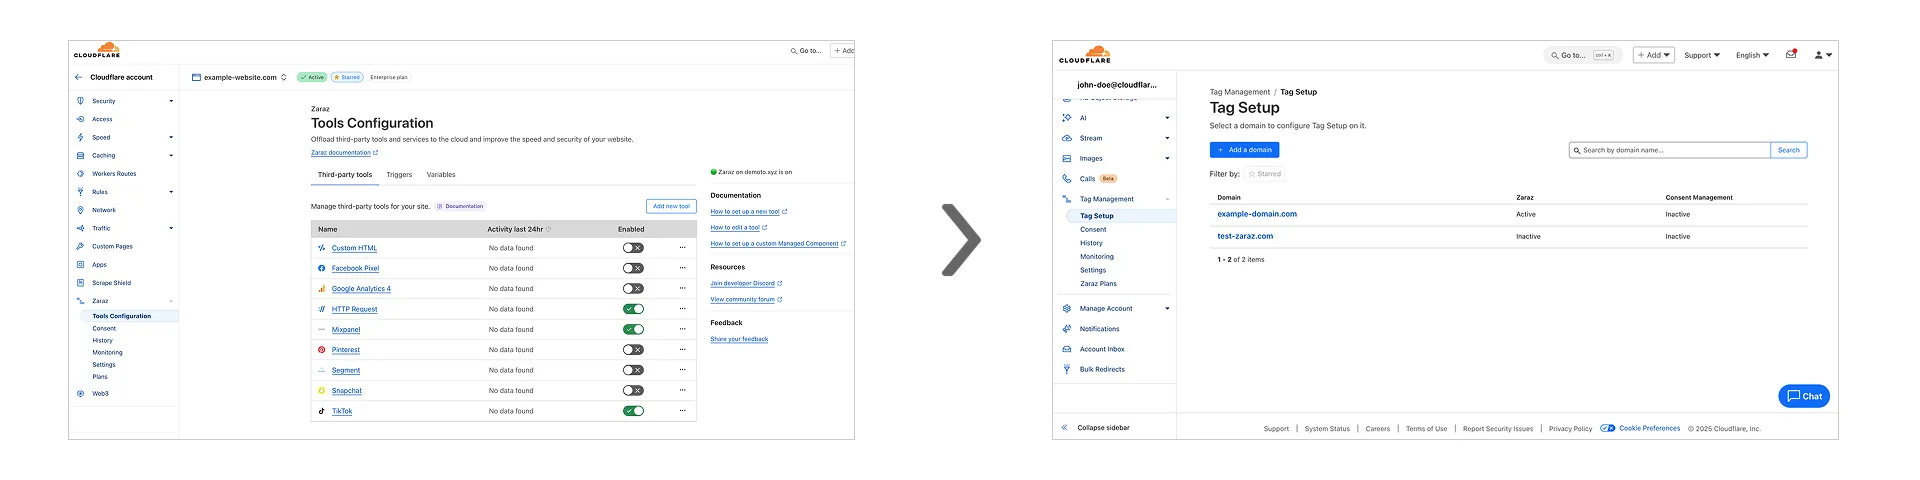
Zaraz at zone level to Tag management at account level

Previously, you could only configure Zaraz by going to each individual zone under your Cloudflare account. Now, if you’d like to get started with Zaraz or manage your existing configuration, you can navigate to the Tag Management section on the Cloudflare dashboard – this will make it easier to compare and configure the same settings across multiple zones.

These changes will not alter any existing configuration or entitlements for zones you already have Zaraz enabled on. If you’d like to edit existing configurations, you can go to the Tag Setup section of the dashboard, and select the zone you'd like to edit.

Workers for Platforms - Instant dispatch for newly created User Workers

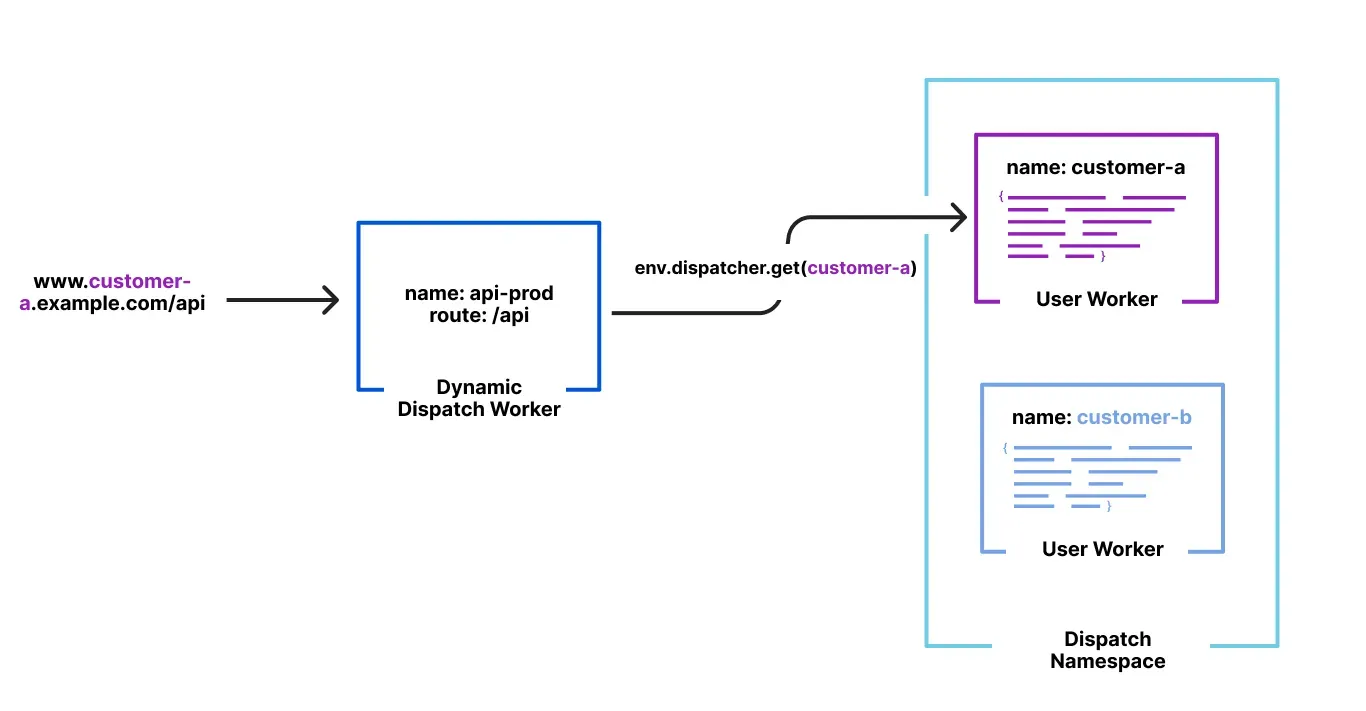
Workers for Platforms is an architecture wherein a centralized dispatch Worker processes incoming requests and routes them to isolated sub-Workers, called User Workers.

Workers for Platforms Requests

Previously, when a new User Worker was uploaded, there was a short delay before it became available for dispatch. This meant that even though an API request could return a 200 OK response, the script might not yet be ready to handle requests, causing unexpected failures for platforms that immediately dispatch to new Workers.

With this update, first-time uploads of User Workers are now deployed synchronously. A 200 OK response guarantees the script is fully provisioned and ready to handle traffic immediately, ensuring more predictable deployments and reducing errors.

Workers AI updated pricing

We've updated the Workers AI pricing to include the latest models and how model usage maps to Neurons.

  • Each model's core input format(s) (tokens, audio seconds, images, etc) now include mappings to Neurons, making it easier to understand how your included Neuron volume is consumed and how you are charged at scale
  • Per-model pricing, instead of the previous bucket approach, allows us to be more flexible on how models are charged based on their size, performance and capabilities. As we optimize each model, we can then pass on savings for that model.
  • You will still only pay for what you consume: Workers AI inference is serverless, and not billed by the hour.

Going forward, models will be launched with their associated Neuron costs, and we'll be updating the Workers AI dashboard and API to reflect consumption in both raw units and Neurons. Visit the Workers AI pricing page to learn more about Workers AI pricing.

Autofix Worker name configuration errors at build time

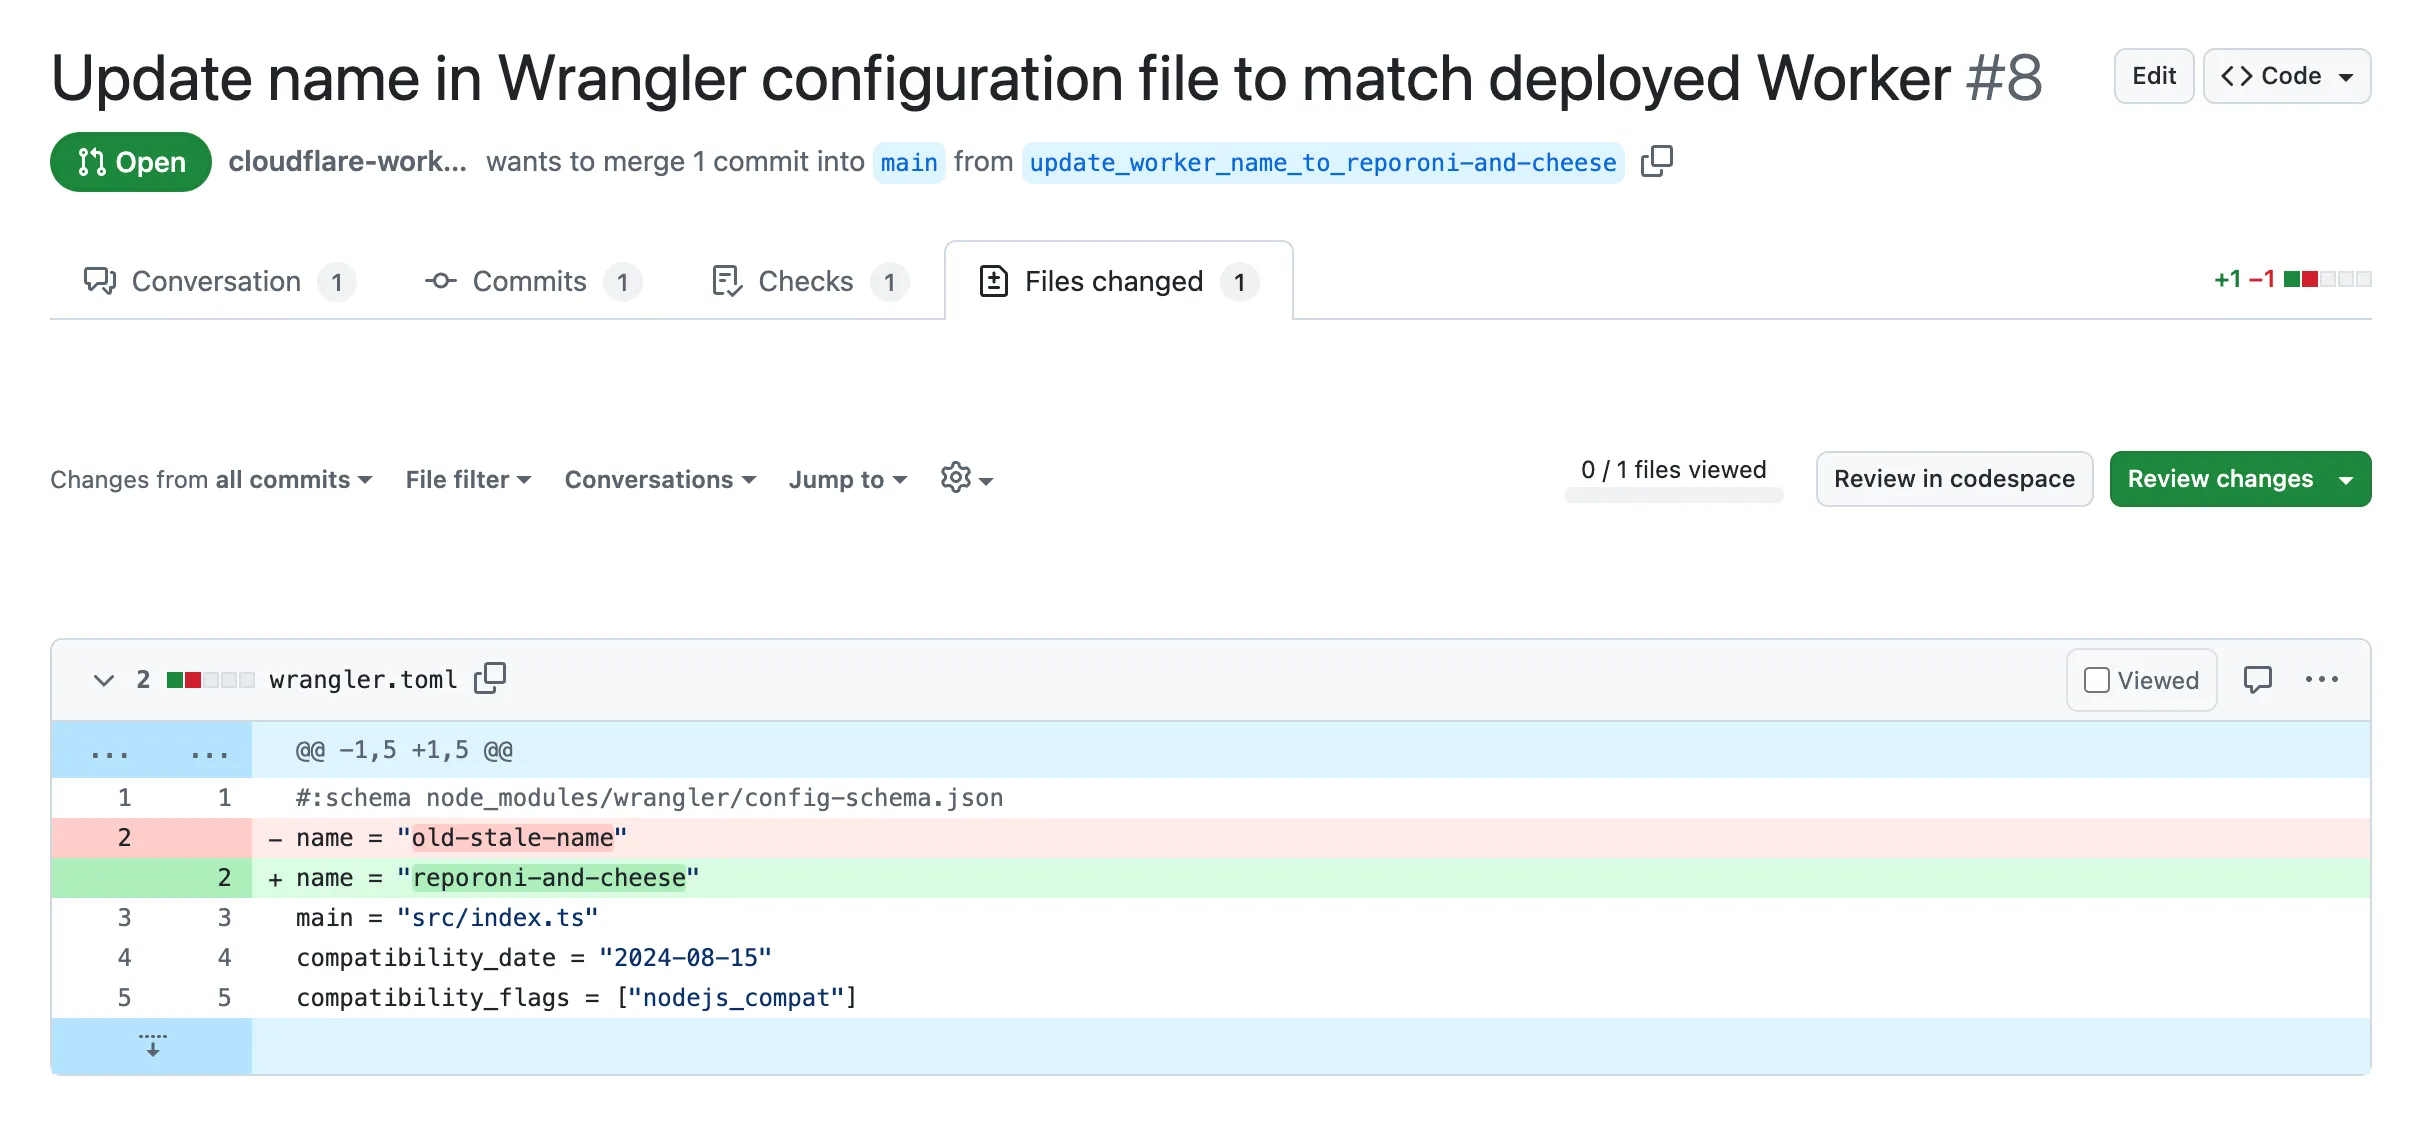
Auto-fixing Workers Name in Git Repo

Small misconfigurations shouldn’t break your deployments. Cloudflare is introducing automatic error detection and fixes in Workers Builds, identifying common issues in your wrangler.toml or wrangler.jsonc and proactively offering fixes, so you spend less time debugging and more time shipping.

Here's how it works:

  1. Before running your build, Cloudflare checks your Worker's Wrangler configuration file (wrangler.toml or wrangler.jsonc) for common errors.
  2. Once you submit a build, if Cloudflare finds an error it can fix, it will submit a pull request to your repository that fixes it.
  3. Once you merge this pull request, Cloudflare will run another build.

We're starting with fixing name mismatches between your Wrangler file and the Cloudflare dashboard, a top cause of build failures.

This is just the beginning, we want your feedback on what other errors we should catch and fix next. Let us know in the Cloudflare Developers Discord, #workers-and-pages-feature-suggestions.