If you're serving Static Assets with a _redirects file containing a rule like /ja/* /:splat, paths with double slashes were previously misinterpreted as external URLs. For example, visiting /ja//example.com would incorrectly redirect to https://example.com instead of /example.com on your domain. This has been fixed and double slashes now correctly resolve as local paths. Note: Cloudflare Pages was not affected by this issue.
We've updated preview URLs for Cloudflare Workers to support long branch names.
Previously, branch and Worker names exceeding the 63-character DNS limit would cause alias generation to fail, leaving pull requests without aliased preview URLs. This particularly impacted teams relying on descriptive branch naming.
Now, Cloudflare automatically truncates long branch names and appends a unique hash, ensuring every pull request gets a working preview link.
How it works
63 characters or less: <branch-name>-<worker-name> → Uses actual branch name as is
64 characters or more: <truncated-branch-name>--<hash>-<worker-name> → Uses truncated name with 4-character hash
Hash generation: The hash is derived from the full branch name to ensure uniqueness
Stable URLs: The same branch always generates the same hash across all commits
Requirements and compatibility
Wrangler 4.30.0 or later: This feature requires updating to wrangler@4.30.0+
No configuration needed: Works automatically with existing preview URL setups
We are changing how Python Workers are structured by default. Previously, handlers were defined at the top-level of a module as on_fetch, on_scheduled, etc. methods, but now they live in an entrypoint class.
Here's an example of how to now define a Worker with a fetch handler:
Resolved several issues with the cloudflare_workers_script resource that resulted in unwarranted plan diffs, including:
Using Durable Objects migrations
Using some bindings such as secret_text
Using smart placement
A resource should never show a plan diff if there isn't an actual change. This fix reduces unnecessary noise in your Terraform plan and is available in Cloudflare Terraform Provider 5.8.0.
Improved File Management
You can now specify content_file and content_sha256 instead of content. This prevents the Workers script content from being stored in the state file which greatly reduces plan diff size and noise. If your workflow synced plans remotely, this should now happen much faster since there is less data to sync. This is available in Cloudflare Terraform Provider 5.7.0.
Fixed an issue where Workers script versions in the SDK did not allow uploading files. This now works, and also has an improved files upload interface:
A minimal implementation of the MessageChannel API ↗ is now available in Workers. This means that you can use MessageChannel to send messages between different parts of your Worker, but not across different Workers.
The MessageChannel and MessagePort APIs will be available by default at the global scope
with any worker using a compatibility date of 2025-08-15 or later. It is also available
using the expose_global_message_channel compatibility flag, or can be explicitly disabled
using the no_expose_global_message_channel compatibility flag.
const { port1, port2 } = new MessageChannel();port2.onmessage = (event) => { console.log('Received message:', event.data);};port2.postMessage('Hello from port2!');
Any value that can be used with the structuredClone(...) API can be sent over the port.
Differences
There are a number of key limitations to the MessageChannel API in Workers:
Transfer lists are currently not supported. This means that you will not be able to transfer
ownership of objects like ArrayBuffer or MessagePort between ports.
The MessagePort is not yet serializable. This means that you cannot send a MessagePort object
through the postMessage method or via JSRPC calls.
The 'messageerror' event is only partially supported. If the 'onmessage' handler throws an
error, the 'messageerror' event will be triggered, however, it will not be triggered when there
are errors serializing or deserializing the message data. Instead, the error will be thrown when
the postMessage method is called on the sending port.
The 'close' event will be emitted on both ports when one of the ports is closed, however it
will not be emitted when the Worker is terminated or when one of the ports is garbage collected.
Now, you can use .env files to provide secrets and override environment variables on the env object during local development with Wrangler and the Cloudflare Vite plugin.
Previously in local development, if you wanted to provide secrets or environment variables during local development, you had to use .dev.vars files.
This is still supported, but you can now also use .env files, which are more familiar to many developers.
Using .env files in local development
You can create a .env file in your project root to define environment variables that will be used when running wrangler dev or vite dev. The .env file should be formatted like a dotenv file, such as KEY="VALUE":
.envbash
TITLE="My Worker"API_TOKEN="dev-token"
When you run wrangler dev or vite dev, the environment variables defined in the .env file will be available in your Worker code via the env object:
If your Worker defines multiple environments, you can set different variables for each environment (ex: production or staging) by creating files named .env.<environment-name>.
When you use wrangler <command> --env <environment-name> or CLOUDFLARE_ENV=<environment-name> vite dev, the corresponding environment-specific file will also be loaded and merged with the .env file.
For example, if you want to set different environment variables for the staging environment, you can create a file named .env.staging:
.env.stagingbash
API_TOKEN="staging-token"
When you run wrangler dev --env staging or CLOUDFLARE_ENV=staging vite dev, the environment variables from .env.staging will be merged onto those from .env.
export default { async fetch(request, env) { const title = env.TITLE; // "My Worker" (from `.env`) const apiToken = env.API_TOKEN; // "staging-token" (from `.env.staging`, overriding the value from `.env`) const response = await fetch( `https://api.example.com/data?token=${apiToken}`, ); return new Response(`Title: ${title} - ` + (await response.text())); },};
Find out more
For more information on how to use .env files with Wrangler and the Cloudflare Vite plugin, see the following documentation:
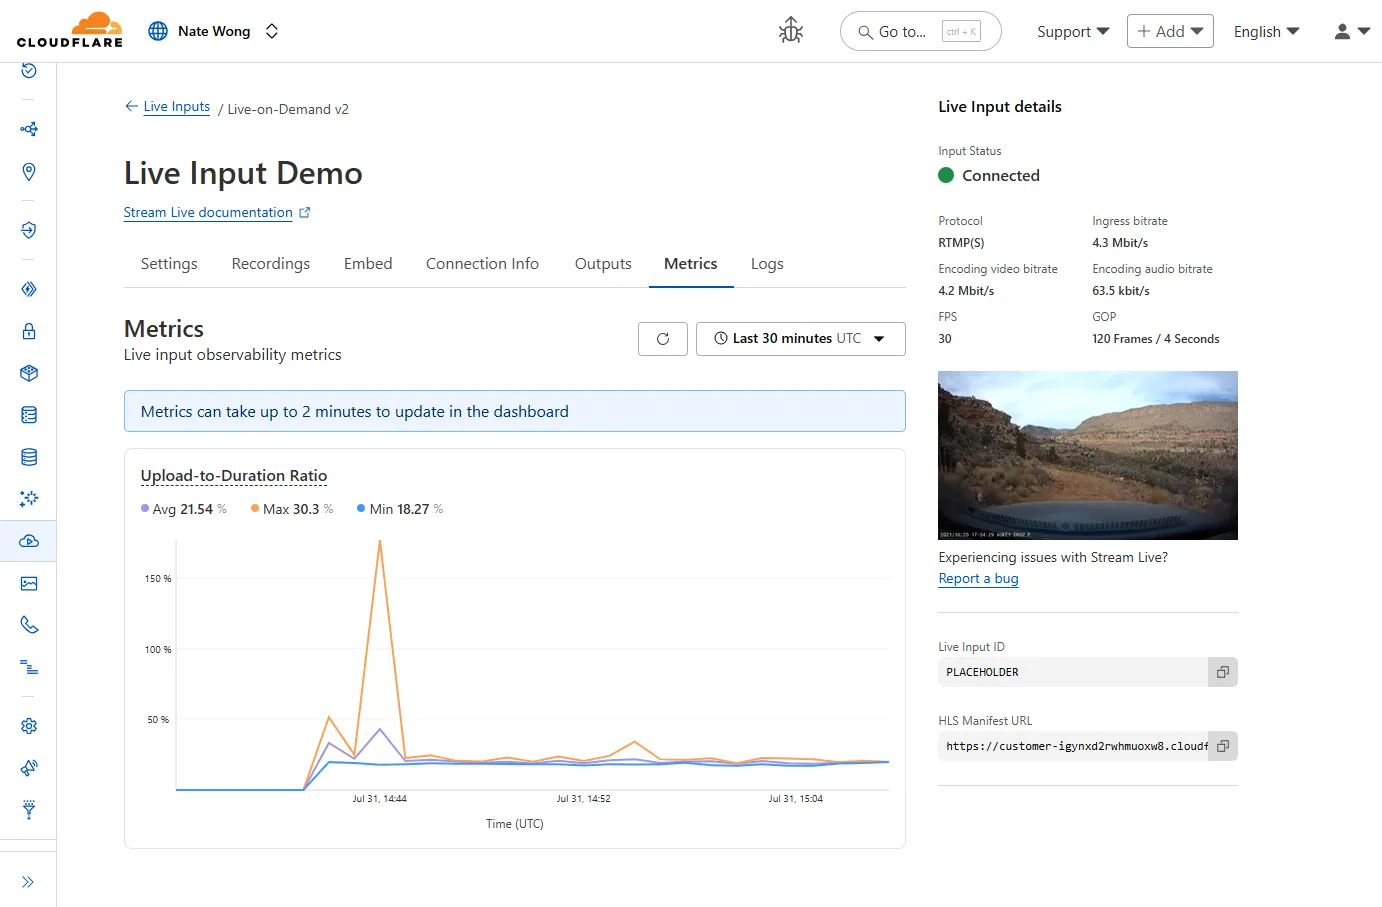
New information about broadcast metrics and events is now available in
Cloudflare Stream in the Live Input details of the Dashboard.
You can now easily understand broadcast-side health and performance with new
observability, which can help when troubleshooting common issues, particularly
for new customers who are just getting started, and platform customers who may
have limited visibility into how their end-users configure their encoders.
To get started, start a live stream (just getting started?), then visit the Live Input details page in Dash.
See our new live Troubleshooting guide
to learn what these metrics mean and how to use them to address common broadcast
issues.
You can now import waitUntil from cloudflare:workers to extend your Worker's execution beyond the request lifecycle from anywhere in your code.
Previously, waitUntil could only be accessed through the execution context (ctx) parameter passed to your Worker's handler functions. This meant that if you needed to schedule background tasks from deeply nested functions or utility modules, you had to pass the ctx object through multiple function calls to access waitUntil.
Now, you can import waitUntil directly and use it anywhere in your Worker without needing to pass ctx as a parameter:
import { waitUntil } from "cloudflare:workers";export function trackAnalytics(eventData) { const analyticsPromise = fetch("https://analytics.example.com/track", { method: "POST", body: JSON.stringify(eventData), }); // Extend execution to ensure analytics tracking completes waitUntil(analyticsPromise);}
This is particularly useful when you want to:
Schedule background tasks from utility functions or modules
Extend execution for analytics, logging, or cleanup operations
Avoid passing the execution context through multiple layers of function calls
import { waitUntil } from "cloudflare:workers";export default { async fetch(request, env, ctx) { // Background task that should complete even after response is sent cleanupTempData(env.KV_NAMESPACE); return new Response("Hello, World!"); }};function cleanupTempData(kvNamespace) { // This function can now use waitUntil without needing ctx const deletePromise = kvNamespace.delete("temp-key"); waitUntil(deletePromise);}
By setting the value of the cache property to no-cache, you can force Cloudflare's
cache to revalidate its contents with the origin when
making subrequests from Cloudflare Workers.
When no-cache is set, the Worker request will first look for a match in Cloudflare's cache, then:
If there is a match, a conditional request is sent to the origin, regardless of whether or not the match is fresh or stale. If the resource has not changed, the
cached version is returned. If the resource has changed, it will be downloaded from the origin, updated in the cache, and returned.
If there is no match, Workers will make a standard request to the origin and cache the response.
This increases compatibility with NPM packages and JavaScript frameworks that rely on setting the
cache property, which is a cross-platform standard part
of the Request interface. Previously, if you set the cache
property on Request to 'no-cache', the Workers runtime threw an exception.
The latest releases of @cloudflare/agents ↗ brings major improvements to MCP transport protocols support and agents connectivity. Key updates include:
MCP elicitation support
MCP servers can now request user input during tool execution, enabling interactive workflows like confirmations, forms, and multi-step processes. This feature uses durable storage to preserve elicitation state even during agent hibernation, ensuring seamless user interactions across agent lifecycle events.
// Request user confirmation via elicitationconst confirmation = await this.elicitInput({ message: `Are you sure you want to increment the counter by ${amount}?`, requestedSchema: { type: "object", properties: { confirmed: { type: "boolean", title: "Confirm increment", description: "Check to confirm the increment", }, }, required: ["confirmed"], },});
Check out our demo ↗ to see elicitation in action.
HTTP streamable transport for MCP
MCP now supports HTTP streamable transport which is recommended over SSE. This transport type offers:
Better performance: More efficient data streaming and reduced overhead
Improved reliability: Enhanced connection stability and error recover- Automatic fallback: If streamable transport is not available, it gracefully falls back to SSE
The SDK automatically selects the best available transport method, gracefully falling back from streamable-http to SSE when needed.
Enhanced MCP connectivity
Significant improvements to MCP server connections and transport reliability:
Auto transport selection: Automatically determines the best transport method, falling back from streamable-http to SSE as needed
Improved error handling: Better connection state management and error reporting for MCP servers
Reliable prop updates: Centralized agent property updates ensure consistency across different contexts
Lightweight .queue for fast task deferral
You can use .queue() to enqueue background work — ideal for tasks like processing user messages, sending notifications etc.
class MyAgent extends Agent { doSomethingExpensive(payload) { // a long running process that you want to run in the background } queueSomething() { await this.queue("doSomethingExpensive", somePayload); // this will NOT block further execution, and runs in the background await this.queue("doSomethingExpensive", someOtherPayload); // the callback will NOT run until the previous callback is complete // ... call as many times as you want }}
Want to try it yourself? Just define a method like processMessage in your agent, and you’re ready to scale.
New email adapter
Want to build an AI agent that can receive and respond to emails automatically? With the new email adapter and onEmail lifecycle method, now you can.
export class EmailAgent extends Agent { async onEmail(email: AgentEmail) { const raw = await email.getRaw(); const parsed = await PostalMime.parse(raw); // create a response based on the email contents // and then send a reply await this.replyToEmail(email, { fromName: "Email Agent", body: `Thanks for your email! You've sent us "${parsed.subject}". We'll process it shortly.`, }); }}
Custom methods are now automatically wrapped with the agent's context, so calling getCurrentAgent() should work regardless of where in an agent's lifecycle it's called. Previously this would not work on RPC calls, but now just works out of the box.
export class MyAgent extends Agent { async suggestReply(message) { // getCurrentAgent() now correctly works, even when called inside an RPC method const { agent } = getCurrentAgent()!; return generateText({ prompt: `Suggest a reply to: "${message}" from "${agent.name}"`, tools: [replyWithEmoji], }); }}
We’ve shipped a major release for the @cloudflare/sandbox ↗ SDK, turning it into a full-featured, container-based execution platform that runs securely on Cloudflare Workers.
This update adds live streaming of output, persistent Python and JavaScript code interpreters with rich output support (charts, tables, HTML, JSON), file system access, Git operations, full background process control, and the ability to expose running services via public URLs.
This makes it ideal for building AI agents, CI runners, cloud REPLs, data analysis pipelines, or full developer tools — all without managing infrastructure.
Code interpreter (Python, JS, TS)
Create persistent code contexts with support for rich visual + structured outputs.
createCodeContext(options)
Creates a new code execution context with persistent state.
Sandboxes are still experimental. We're using them to explore how isolated, container-like workloads might scale on Cloudflare — and to help define the developer experience around them.
We're thrilled to be a Day 0 partner with OpenAI ↗ to bring their latest open models ↗ to Workers AI, including support for Responses API, Code Interpreter, and Web Search (coming soon).
Get started with the new models at @cf/openai/gpt-oss-120b and @cf/openai/gpt-oss-20b.
Check out the blog ↗ for more details about the new models, and the gpt-oss-120b and gpt-oss-20b model pages for more information about pricing and context windows.
Responses API
If you call the model through:
Workers Binding, it will accept/return Responses API – env.AI.run(“@cf/openai/gpt-oss-120b”)
REST API on /run endpoint, it will accept/return Responses API – https://api.cloudflare.com/client/v4/accounts/<account_id>/ai/run/@cf/openai/gpt-oss-120b
REST API on new /responses endpoint, it will accept/return Responses API – https://api.cloudflare.com/client/v4/accounts/<account_id>/ai/v1/responses
REST API for OpenAI Compatible endpoint, it will return Chat Completions (coming soon) – https://api.cloudflare.com/client/v4/accounts/<account_id>/ai/v1/chat/completions
The model is natively trained to support stateful code execution, and we've implemented support for this feature using our Sandbox SDK ↗ and Containers ↗. Cloudflare's Developer Platform is uniquely positioned to support this feature, so we're very excited to bring our products together to support this new use case.
Web Search (coming soon)
We are working to implement Web Search for the model, where users can bring their own Exa API Key so the model can browse the Internet.
As part of the ongoing open beta for Workers Builds, we’ve increased the available disk space for builds from 8 GB to 20 GB for both Free and Paid plans.
This provides more space for larger projects, dependencies, and build artifacts while improving overall build reliability.
Metric
Free Plan
Paid Plans
Disk Space
20 GB
20 GB
All other build limits — including CPU, memory, build minutes, and timeout remain unchanged.
Earlier this year, we announced the launch of the new Terraform v5 Provider. We are aware of the high number of issues ↗ reported by the Cloudflare community related to the v5 release. We have committed to releasing improvements on a 2 week cadeance to ensure it's stability and reliability. We have also pivoted from an issue-to-issue approach to a resource-per-resource approach - we will be focusing on specific resources for every release, stabilizing the release and closing all associated bugs with that resource before moving onto resolving migration issues.
Thank you for continuing to raise issues. We triage them weekly and they help make our products stronger.
Changes
Resources stabilized:
cloudflare_custom_pages
cloudflare_page_rule
cloudflare_dns_record
cloudflare_argo_tiered_caching
Addressed chronic drift issues in cloudflare_logpush_job, cloudflare_zero_trust_dns_location, cloudflare_ruleset & cloudflare_api_token
cloudflare_zone_subscription returns expected values rate_plan.id from former versions
cloudflare_workers_script can now successfully be destroyed with bindings & migration for Durable Objects now recorded in tfstate
Ability to configure add_headers under cloudflare_zero_trust_gateway_policy
Other bug fixes
For a more detailed look at all of the changes, see the changelog ↗ in GitHub.
If you have an unaddressed issue with the provider, we encourage you to check the open issues ↗ and open a new one if one does not already exist for what you are experiencing.
Upgrading
We suggest holding off on migration to v5 while we work on stabilization. This help will you avoid any blocking issues while the Terraform resources are actively being stabilized.
If you'd like more information on migrating from v4 to v5, please make use of the migration guide ↗. We have provided automated migration scripts using Grit which simplify the transition, although these do not support implementations which use Terraform modules, so customers making use of modules need to migrate manually. Please make use of terraform plan to test your changes before applying, and let us know if you encounter any additional issues by reporting to our GitHub repository ↗.
You can now configure and run Containers alongside your Worker during local development when using the Cloudflare Vite plugin. Previously, you could only develop locally when using Wrangler as your local development server.
Configuration
You can simply configure your Worker and your Container(s) in your Wrangler configuration file:
Once your Worker and Containers are configured, you can access the Container instances from your Worker code:
import { Container, getContainer } from "@cloudflare/containers";export class MyContainer extends Container { defaultPort = 4000; // Port the container is listening on sleepAfter = "10m"; // Stop the instance if requests not sent for 10 minutes}async fetch(request, env) { const { "session-id": sessionId } = await request.json(); // Get the container instance for the given session ID const containerInstance = getContainer(env.MY_CONTAINER, sessionId) // Pass the request to the container instance on its default port return containerInstance.fetch(request);}
Local development
To develop your Worker locally, start a local dev server by running
Define environment variables and secrets store bindings in your Wrangler configuration file as normal:
{ "name": "my-worker", "main": "./src/index.ts", // Set this to today's date "compatibility_date": "2026-07-20", "vars": { "API_HOST": "https://example.com", }, "secrets_store_secrets": [ { "binding": "API_KEY", "store_id": "demo", "secret_name": "api-key" } ]}
name = "my-worker"main = "./src/index.ts"# Set this to today's datecompatibility_date = "2026-07-20"[vars]API_HOST = "https://example.com"[[secrets_store_secrets]]binding = "API_KEY"store_id = "demo"secret_name = "api-key"
Add secrets to a .dev.vars.example or .env.example file:
.dev.vars.exampleini
COOKIE_SIGNING_KEY=my-secret # comment
And optionally, you can add a description for these bindings in your template's package.json to help users understand how to configure each value:
package.jsonjson
{ "name": "my-worker", "private": true, "cloudflare": { "bindings": { "API_KEY": { "description": "Select your company's API key for connecting to the example service." }, "COOKIE_SIGNING_KEY": { "description": "Generate a random string using `openssl rand -hex 32`." } } }}
These secrets and environment variables will be presented to users in the dashboard as they deploy this template, allowing them to configure each value. Additional information about creating templates and Deploy to Cloudflare buttons can be found in our documentation.
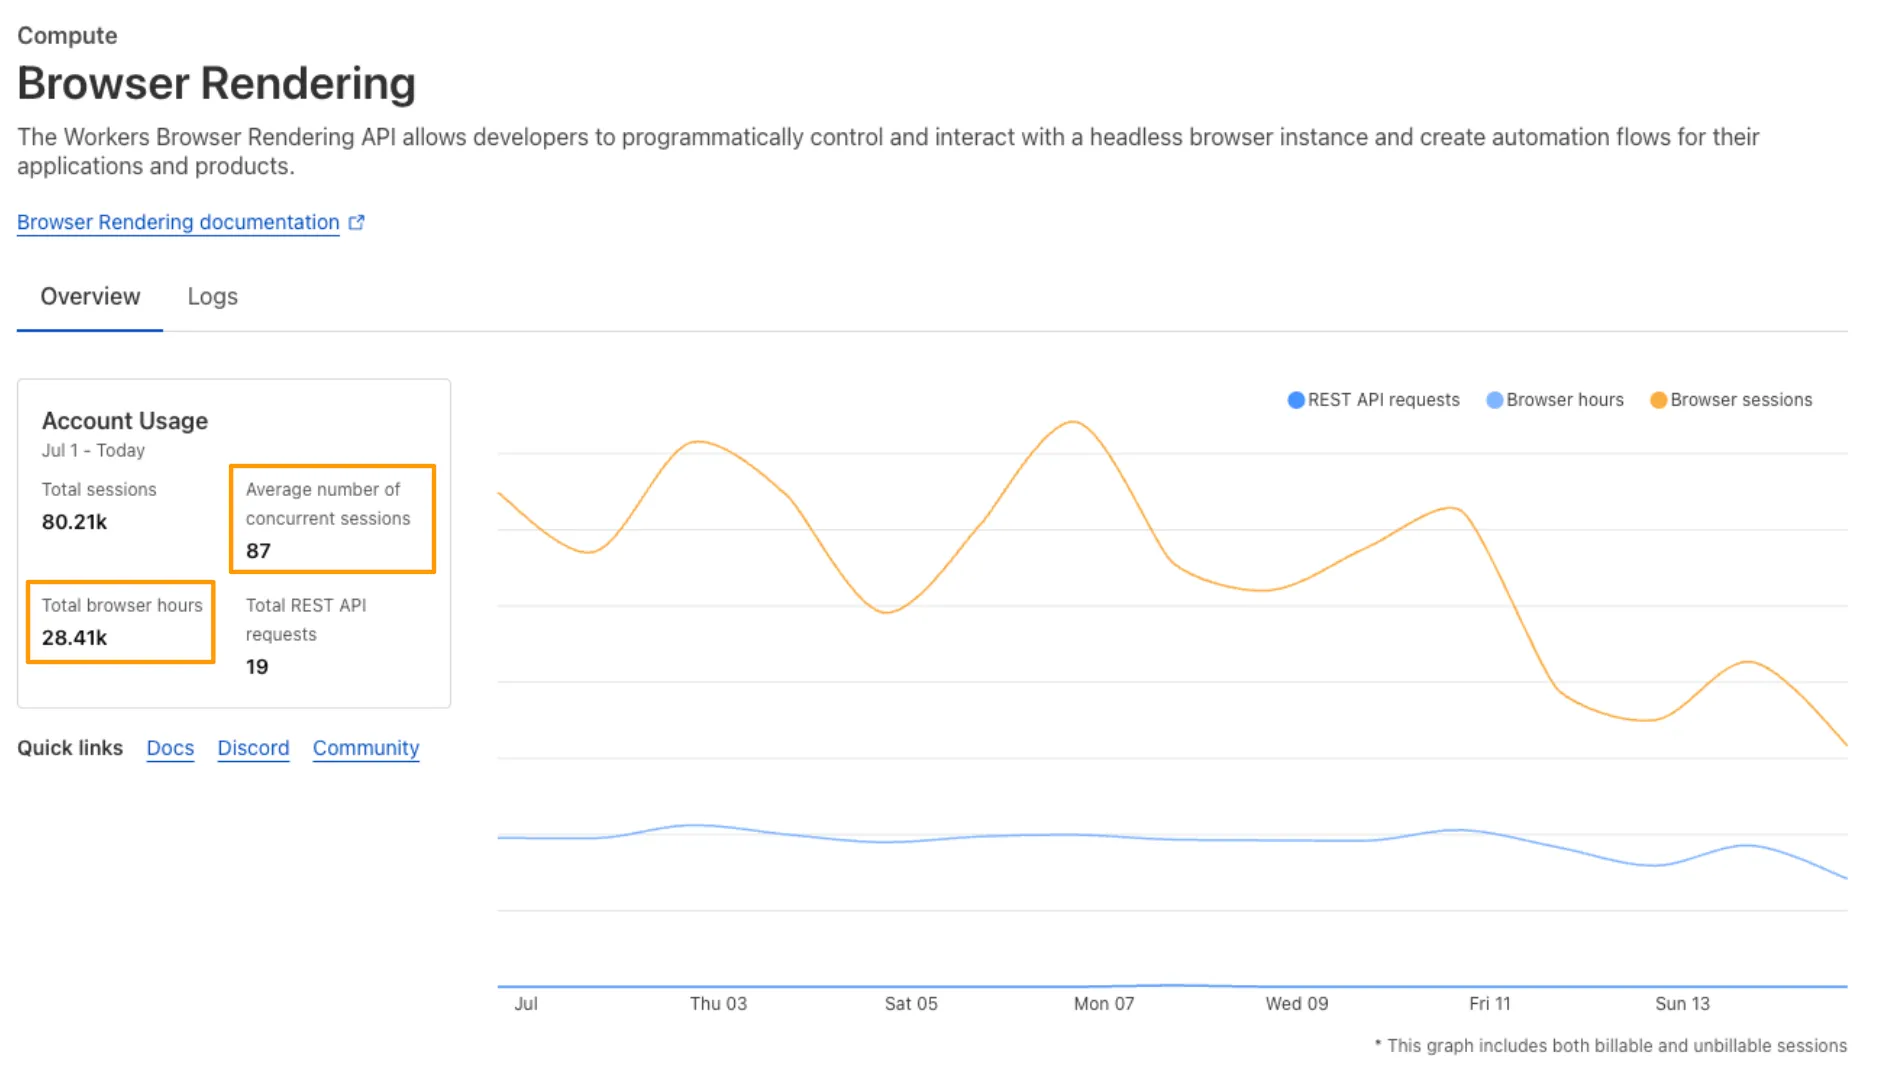
We’ve launched pricing for Browser Rendering, including a free tier and a pay-as-you-go model that scales with your needs. Starting August 20, 2025, Cloudflare will begin billing for Browser Rendering.
There are two ways to use Browser Rendering. Depending on the method you use, here’s how billing will work:
REST API: Charged for Duration only ($/browser hour)
Browser Sessions: Charged for both Duration and Concurrency ($/browser hour and # of concurrent browsers)
Included usage and pricing by plan
Plan
Included duration
Included concurrency
Price (beyond included)
Workers Free
10 minutes per day
3 concurrent browsers
N/A
Workers Paid
10 hours per month
10 concurrent browsers (averaged monthly)
1. REST API: 0.09 per additional browser hour <br />**2. Workers Bindings**: 0.09 per additional browser hour $2.00 per additional concurrent browser
What you need to know:
Workers Free Plan: 10 minutes of browser usage per day with 3 concurrent browsers at no charge.
Workers Paid Plan: 10 hours of browser usage per month with 10 concurrent browsers (averaged monthly) at no charge. Additional usage is charged as shown above.
If you've been using Browser Rendering and do not wish to incur charges, ensure your usage stays within your plan's included usage. To estimate costs, take a look at these example pricing scenarios.
You can now run your Browser Rendering locally using npx wrangler dev, which spins up a browser directly on your machine before deploying to Cloudflare's global network. By running tests locally, you can quickly develop, debug, and test changes without needing to deploy or worry about usage costs.
Now, when you connect your Cloudflare Worker to a git repository on GitHub or GitLab, each branch of your repository has its own stable preview URL, that you can use to preview code changes before merging the pull request and deploying to production.
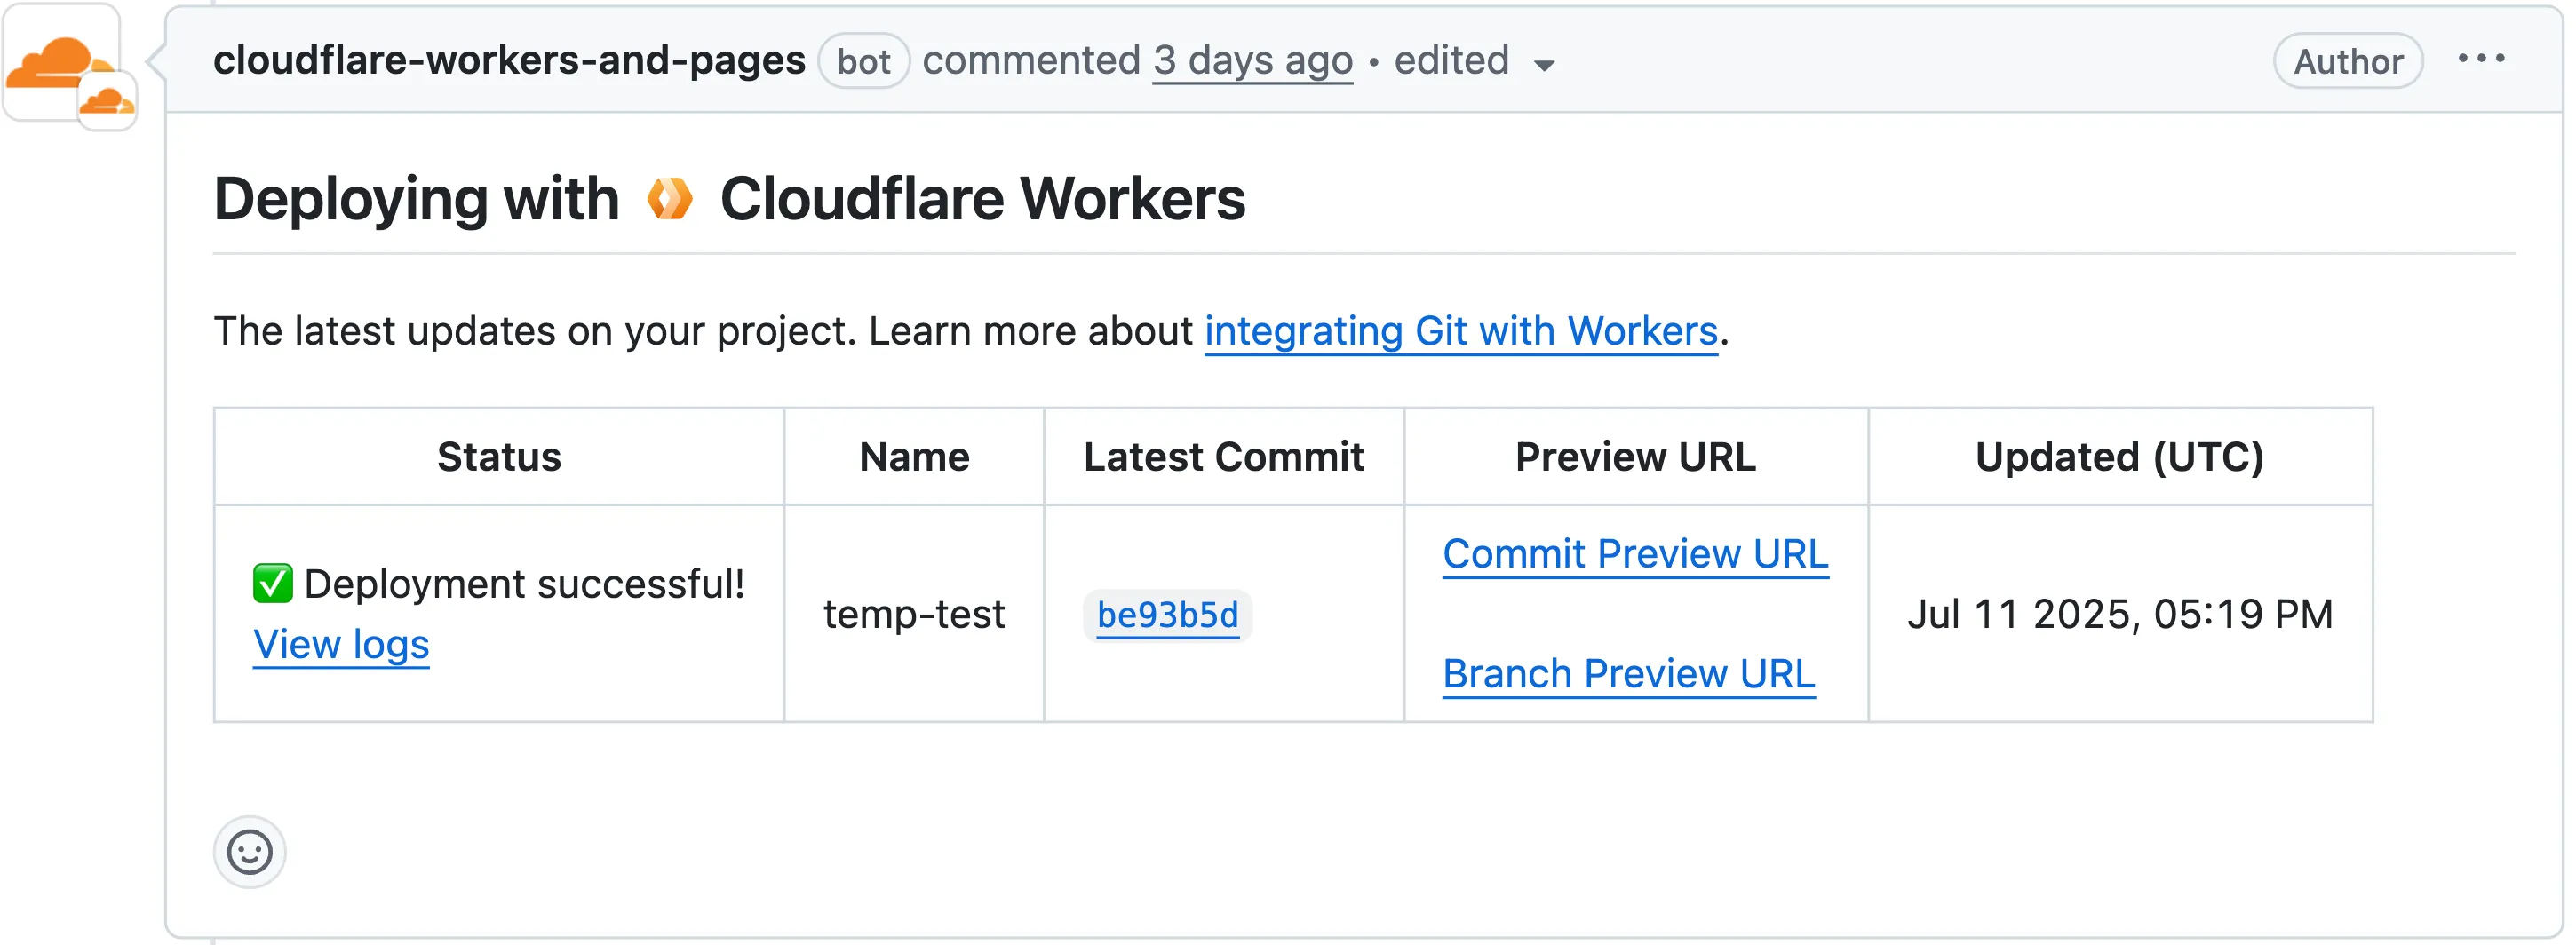
This works the same way that Cloudflare Pages does — every time you create a pull request, you'll automatically get a shareable preview link where you can see your changes running, without affecting production. The link stays the same, even as you add commits to the same branch.
These preview URLs are named after your branch and are posted as a comment to each pull request. The URL stays the same with every commit and always points to the latest version of that branch.
Preview URL types
Each comment includes two preview URLs as shown above:
Commit Preview URL: Unique to the specific version/commit (e.g., <version-prefix>-<worker-name>.<subdomain>.workers.dev)
Branch Preview URL: A stable alias based on the branch name (e.g., <branch-name>-<worker-name>.<subdomain>.workers.dev)
How it works
When you create a pull request:
A preview alias is automatically created based on the Git branch name (e.g., <branch-name> becomes <branch-name>-<worker-name>.<subdomain>.workers.dev)
No configuration is needed, the alias is generated for you
The link stays the same even as you add commits to the same branch
Preview URLs are posted directly to your pull request as comments (just like they are in Cloudflare Pages)
Custom alias name
You can also assign a custom preview alias using the Wrangler CLI, by passing the --preview-alias flag when uploading a version of your Worker:
wrangler versions upload --preview-alias staging
Limitations while in beta
Only available on the workers.dev subdomain (custom domains not yet supported)
Requires Wrangler v4.21.0+
Preview URLs are not generated for Workers that use Durable Objects
We now support audio mode! Use this feature to extract audio from a source video, outputting
an M4A file to use in downstream workflows like AI inference, content moderation, or transcription.
For example,
Example URLtext
https://example.com/cdn-cgi/media/<OPTIONS>/<SOURCE-VIDEO>https://example.com/cdn-cgi/media/mode=audio,time=3s,duration=60s/<input video with diction>
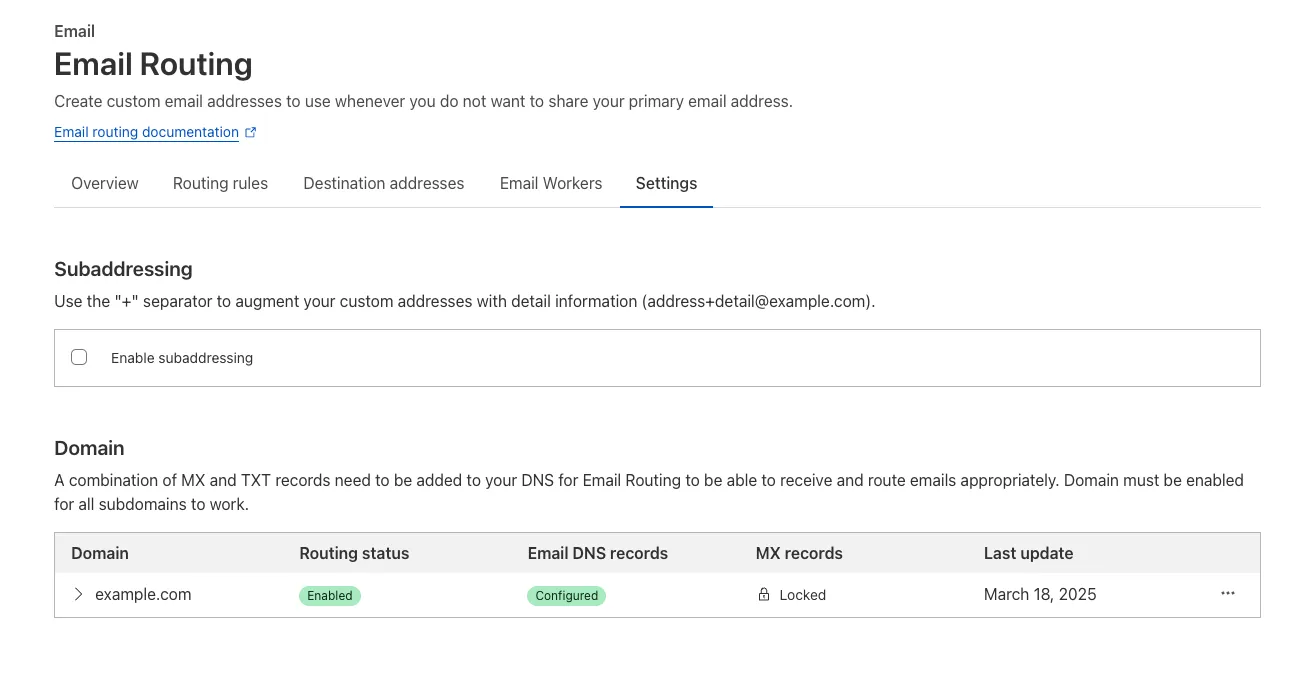
Subaddressing, as defined in RFC 5233 ↗, also known as plus addressing, is now supported in Email Routing. This enables using the "+" separator to augment your custom addresses with arbitrary detail information.
Now you can send an email to user+detail@example.com and it will be captured by the user@example.com custom address. The +detail part is ignored by Email Routing, but it can be captured next in the processing chain in the logs, an Email Worker or an Agent application ↗.
Customers can use this feature to dynamically add context to their emails, such as tracking the source of an email or categorizing emails without needing to create multiple custom addresses.
Check our Developer Docs to learn how to enable subaddressing in Email Routing.
Vite 7 ↗ is now supported in the Cloudflare Vite plugin.
See the Vite changelog ↗ for a list of changes.
Note that the minimum Node.js versions supported by Vite 7 are 20.19 and 22.12.
We continue to support Vite 6 so you do not need to immediately upgrade.
Your real-time applications running over Cloudflare Tunnel are now faster and more reliable. We've completely re-architected the way cloudflared proxies UDP traffic in order to isolate it from other traffic, ensuring latency-sensitive applications like private DNS are no longer slowed down by heavy TCP traffic (like file transfers) on the same Tunnel.
This is a foundational improvement to Cloudflare Tunnel, delivered automatically to all customers. There are no settings to configure — your UDP traffic is already flowing faster and more reliably.
What’s new:
Faster UDP performance: We've significantly reduced the latency for establishing new UDP sessions, making applications like private DNS much more responsive.
Greater reliability for mixed traffic: UDP packets are no longer affected by heavy TCP traffic, preventing timeouts and connection drops for your real-time services.
Earlier this year, we announced the launch of the new Terraform v5 Provider. We are aware of the high number of issues ↗ reported by the Cloudflare community related to the v5 release, with 13.5% of resources impacted. We have committed to releasing improvements on a 2 week cadeance to ensure it's stability and relability, including the v5.7 release.
Thank you for continuing to raise issues and please keep an eye on this changelog for more information about upcoming releases.
Changes
Addressed permanent diff bug on Cloudflare Tunnel config
State is now saved correctly for Zero Trust Access applications
Exact match is now working as expected within data.cloudflare_zero_trust_access_applications
cloudflare_zero_trust_access_policy now supports OIDC claims & diff issues resolved
Self hosted applications with private IPs no longer require a public domain for cloudflare_zero_trust_access_application.
New resource:
cloudflare_zero_trust_tunnel_warp_connector
Other bug fixes
For a more detailed look at all of the changes, see the
changelog ↗ in GitHub.
If you have an unaddressed issue with the provider, we encourage you to check the open issues ↗ and open a new one if one does not already exist for what you are experiencing.
Upgrading
We suggest holding on migration to v5 while we work on stabilization of the v5 provider. This will ensure Cloudflare can work ahead and avoid any blocking issues.
If you'd like more information on migrating from v4 to v5, please make use of the
migration guide ↗. We have
provided automated migration scripts using Grit which simplify the transition, although these do not support implementations which
use Terraform modules, so customers making use of modules need to migrate manually. Please make use of terraform plan to test
your changes before applying, and let us know if you encounter any additional issues by reporting to our
GitHub repository ↗.
You can now expect 3-5× faster indexing in AutoRAG, and with it, a brand new Jobs view to help you monitor indexing progress.
With each AutoRAG, indexing jobs are automatically triggered to sync your data source (i.e. R2 bucket) with your Vectorize index, ensuring new or updated files are reflected in your query results. You can also trigger jobs manually via the Sync API or by clicking “Sync index” in the dashboard.
With the new jobs observability, you can now:
View the status, job ID, source, start time, duration and last sync time for each indexing job
Inspect real-time logs of job events (e.g. Starting indexing data source...)
See a history of past indexing jobs under the Jobs tab of your AutoRAG
This makes it easier to understand what’s happening behind the scenes.
Coming soon: We’re adding APIs to programmatically check indexing status, making it even easier to integrate AutoRAG into your workflows.